Building a social media app with AWS Amplify and Flutter(PART 1)
R
I love creating and writing about the creation of software.
Search for a command to run...
I love creating and writing about the creation of software.
Glad you liked it
Which amplify features is the best to build a social media platform in AWS?
I think the best features would be based on the use case of your social media app. For example, based on this tutorial, you'll find the amplify features I used to accomplish the task.
Rosius Ndimofor Thank you
This series outlines the steps involved in build an MVP for a social Medial Application using the Amplify Framework and flutter
1 October, 2021 - Loom Recording - Watch Video PART 1 Hi there, in the first part of this series, we briefly introduced and added amplify to our Flutter application. In this second part, we'll continue from where we left off. FULL SOURCE ...
Watch the complete Video on Youtube https://www.youtube.com/watch?v=kKX-8L_R2XM Prerequisites Before proceeding make sure you have these dependencies Docker Python 3.11 and above AWS CLI Full access to a foundation model. For this workshop, we'll...

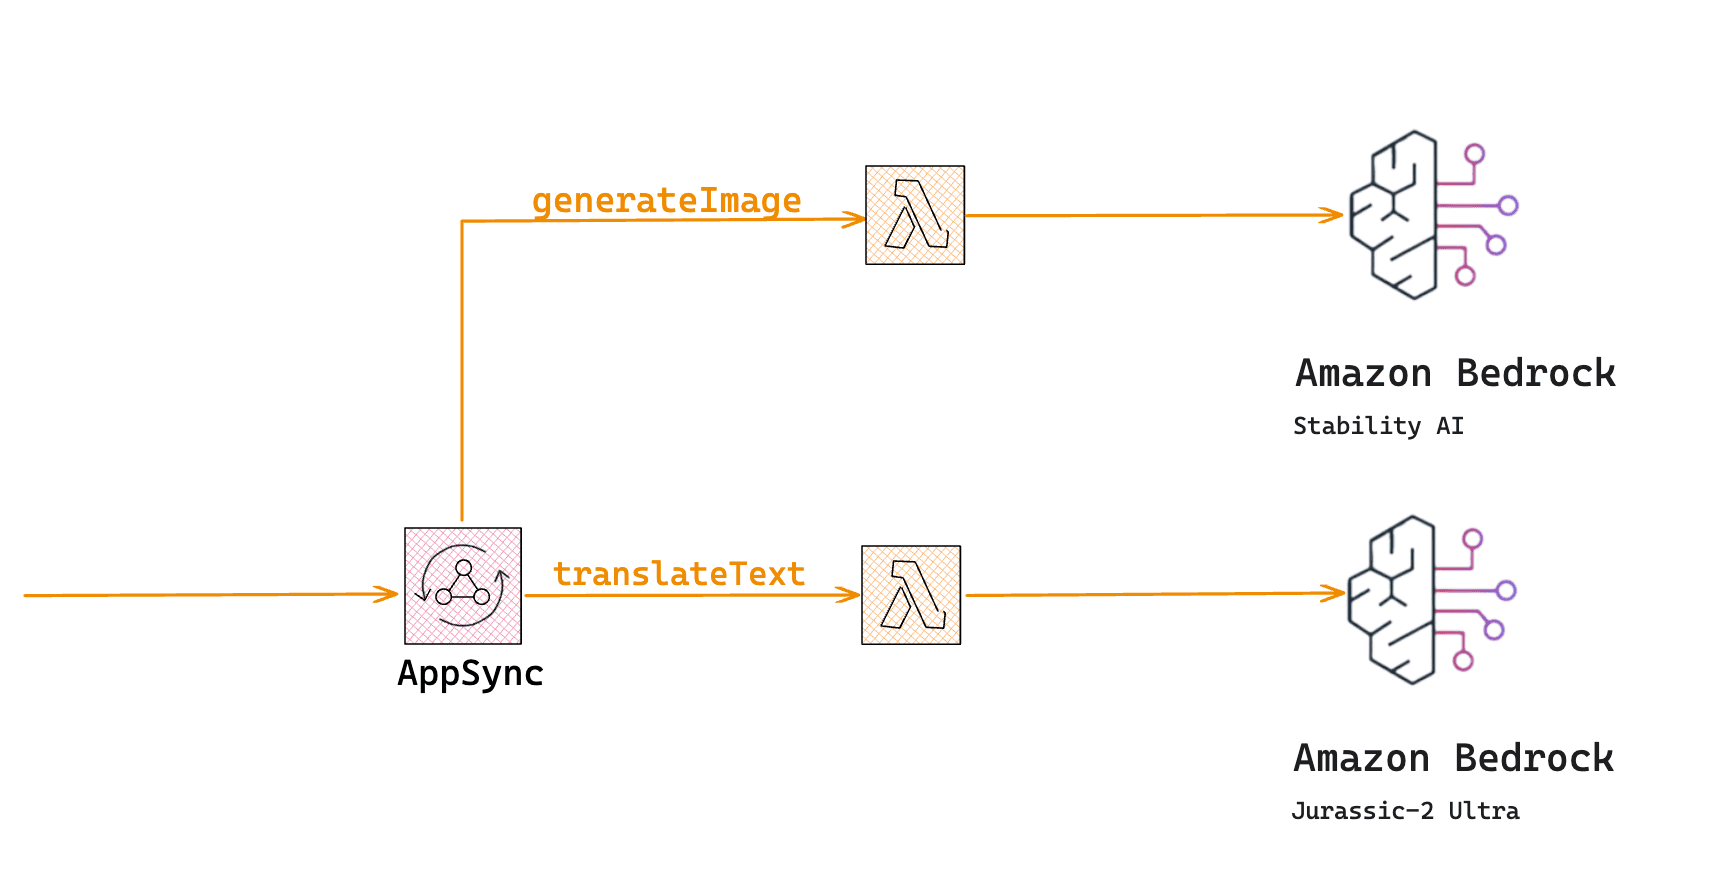
Introduction In a previous workshop, Building event-driven applications with AWS sam and python we built an e-commerce ordering service using AWS SAM, API Gateway, Lambda and Python. Here's the solutions architecture. In that workshop, whenever a ne...

Github Repository https://github.com/EducloudHQ/introduction_to_gen_ai Skill up with serverless on Educloud https://www.educloud.academy/content/da99ad07-7efa-41e7-ba50-b18e6b89e10d This post is an introductory lesson to building AI-enhanced serverle...
Introduction Serverless computing is a cloud-based approach to application development that eliminates the need for provisioning and managing servers. Instead, developers focus on writing code that is triggered by events such as HTTP requests or data...

https://github.com/trey-rosius/sam_stepfunctions Hey!!! How you doing? In this post, we’ll look at how to build a workflow, using SAM as IaC, Appsync, and python. Prerequisites Install AWS Cli (https://docs.aws.amazon.com/cli/latest/userguide/cli-c...

Dear Reader,
when I began learning how to create mobile applications, all I ever wanted to build was the next Facebook. And deep down within, I 100% believed I could create the next big social media app that'll go head-on with Facebook😅.
The year was 2014
I actually did create one called tori (That's pidgin English for Story), and struggle tooth and nail to get users on it 🥲.
The backend was a REST API built with PHP slim Framework with a MySQL database and hosted on Digital Ocean.
Developing that app, made me understand the true meaning of struggle. Yeah! The struggle with building both backend and frontend, while getting users to use it was real
Needless to say, the head-on battle with Facebook didn't happen.
I wish serverless was ubiquitous back then as it is today.
Well, it's 2021, and we are in luck. Serverless is here, it's big, bold, matured, and serves the aws amplify framework for rapidly creating modern full stack mobile and web applications.
With aws amplify framework, you can develop offline first scalable and highly performant full-stack serverless Graphql apps with ease.
In this post series, our main focus would be on building each individual component(login and registration, profile, home page, posts....) for our social media application.
I've created a Github repo and separated each component into branches, with visual screenshots. I enjoy showing the outputs.
Now we know what we are about to build. So how do we go about building it?
Firstly, Our app has to be offline first. What do I mean by that?
The app is supposed to function even when there's no internet connection. Offline-first apps make it possible to move content off the server and onto the phone. If an app only has to go to the server when it needs to, rather than all the time, it will be faster and more reliable.
How's that supposed to happen?
Amplify's DataStore provides an on-device data storage service to read, write and observe data in an online as well as offline mode and sync that data to a cloud database (DynamoDB) seamlessly.
Data modeling in DataStore is done with GraphQL which creates models in the native language of your framework (Dart,JS, Java, Swift, etc.).
With DataStore, you can also create offline-only apps without an AWS account or without provisioning any backend service like AWS AppSync or AWS DynamoDB.
DataStore also includes Delta Sync and several auto conflict resolution strategies with GraphQL.
A User can create many Post. A Post can only belong to a single User. A Post can have many comments. A comment can only belong to a single Post
So there's a n:m(one to many) relationship between User and Post,
And a n:m(one to many) relationship between Post and Comments.
A User can have many Chats and a Chat can belong to many Users. Therefore User and Chats have a m:m(many to many) relationship.
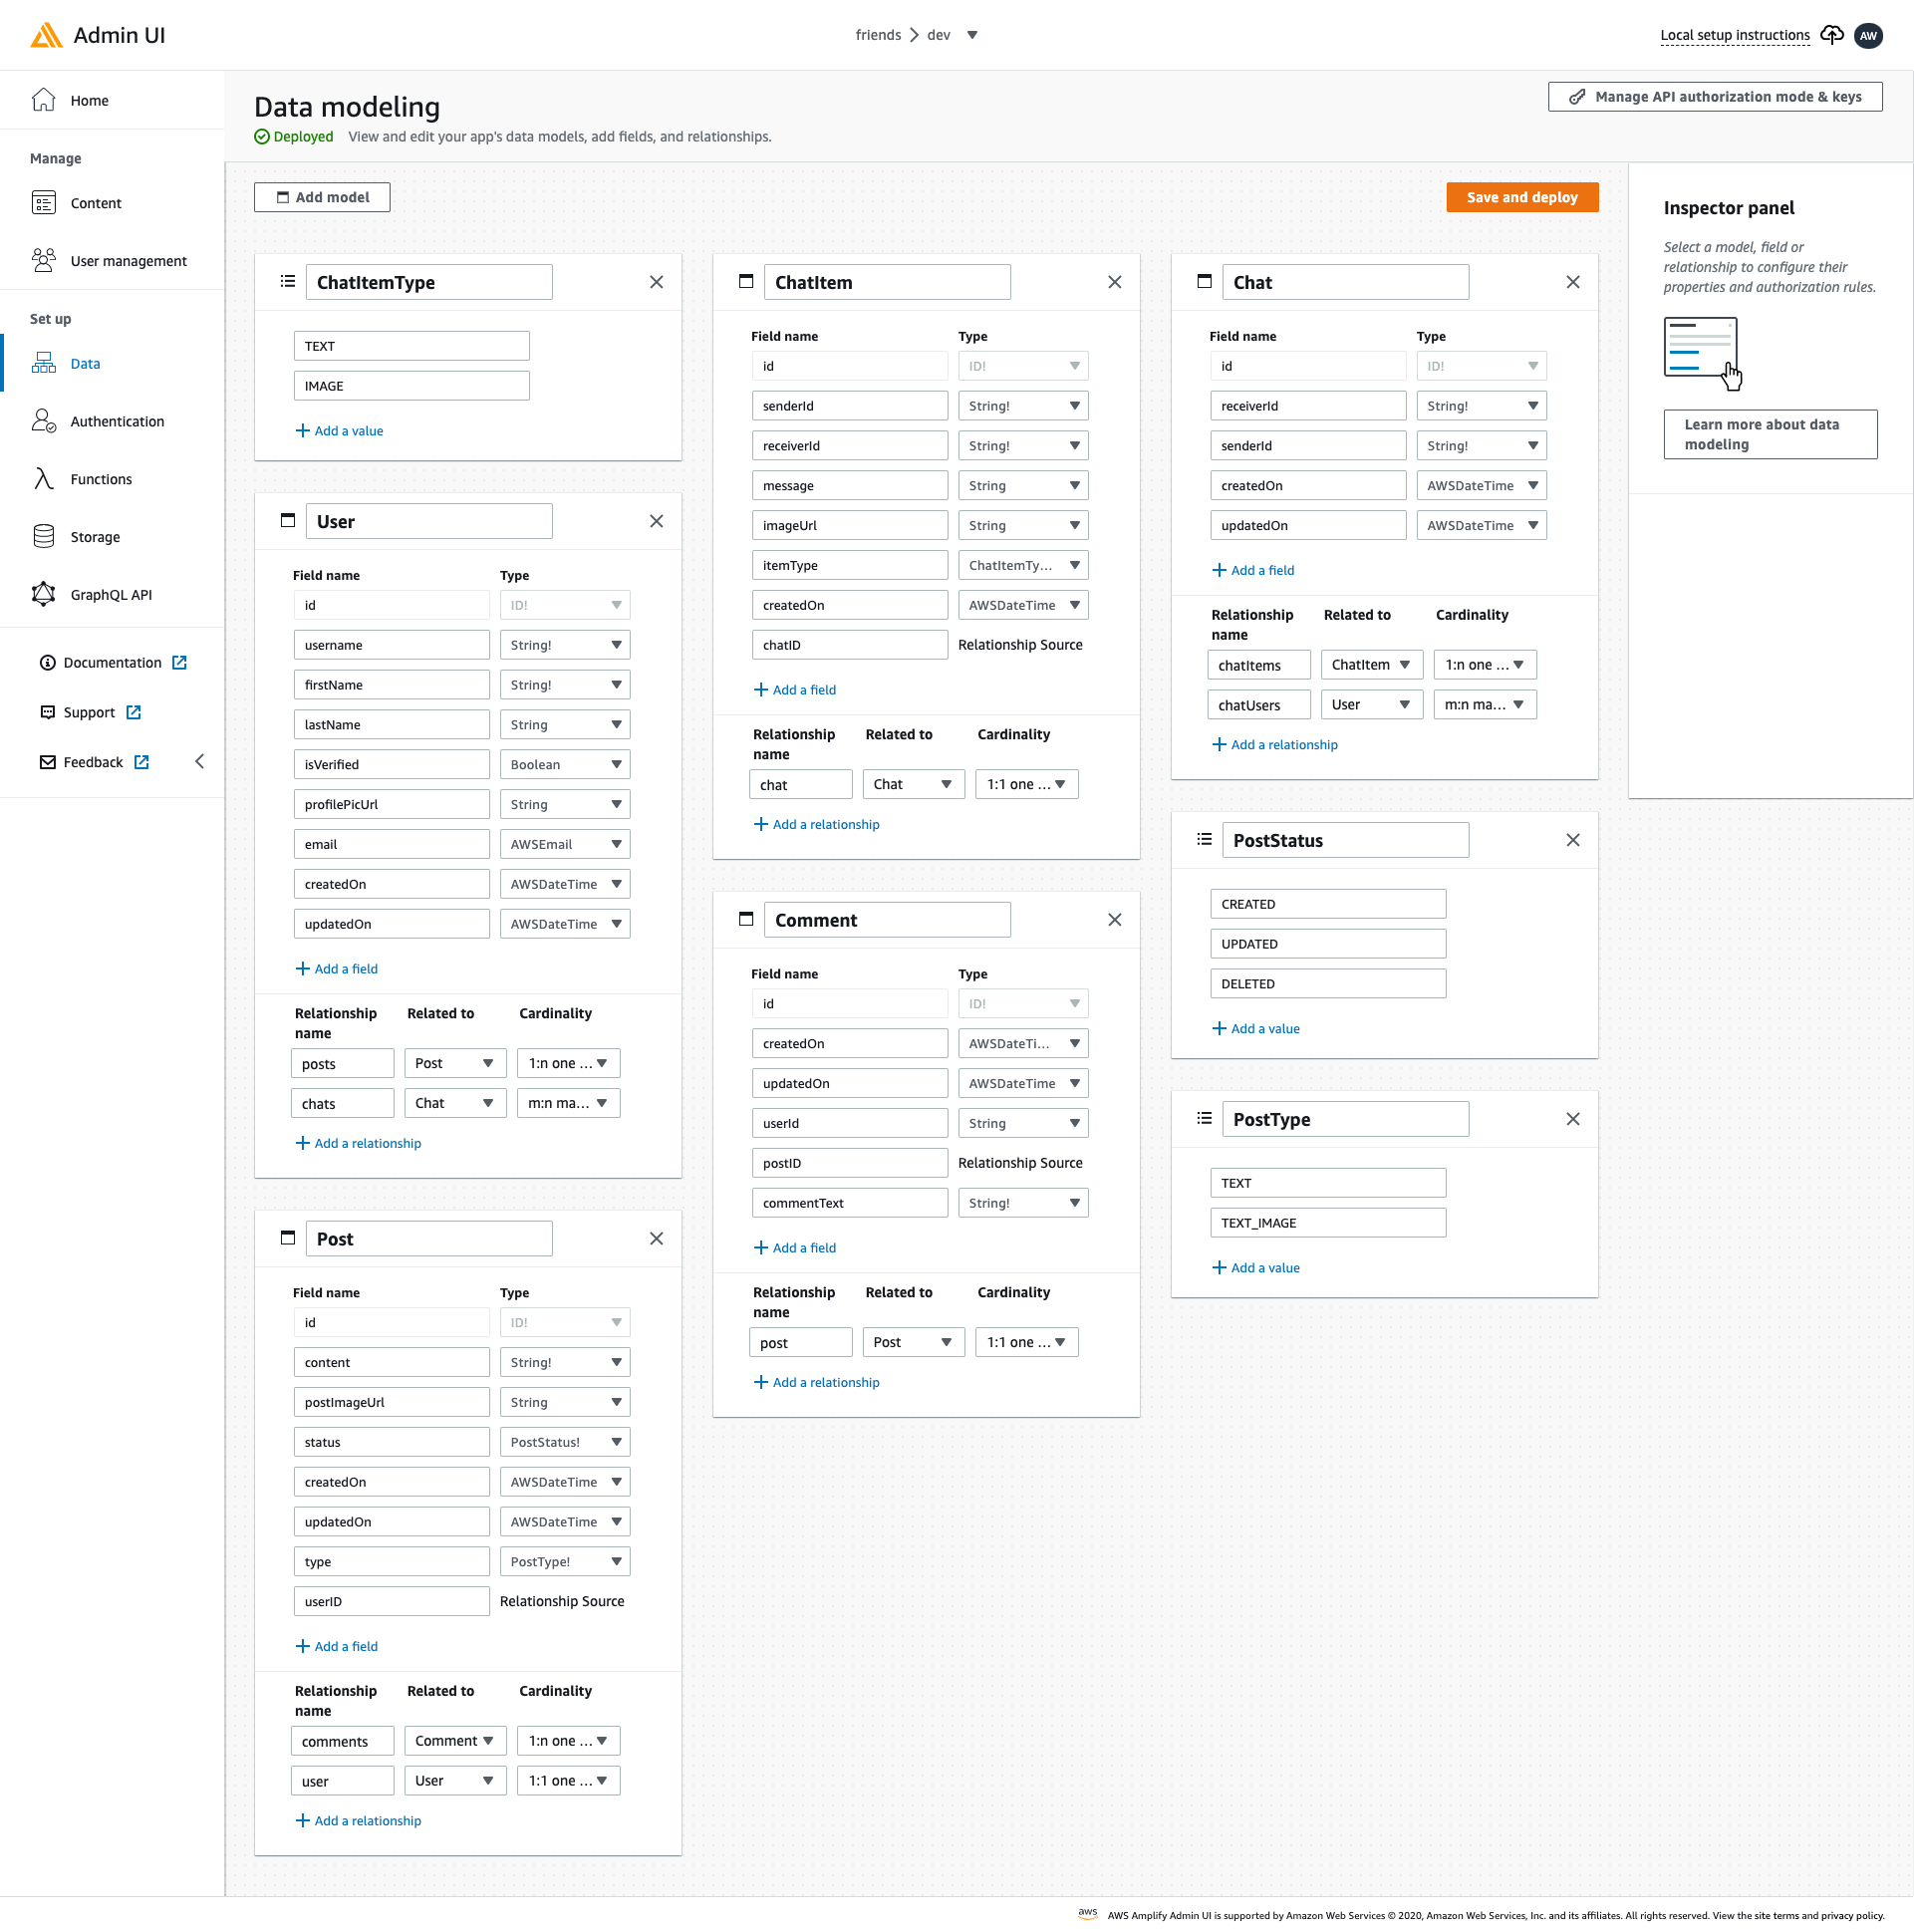
We'll visually see this in the Data Modeling editor provided by aws amplify.
Here's how the complete schema design looks like

Let's get started
npm install -g @aws-amplify/cli
When it's done installing, setup the Amplify CLI by running
amplify configure
You'll be asked to sign in to your AWS account and create a user with AdministrativeAccess to your account to provision AWS resources for you like AppSync, Cognito etc.. Just follow the instructions in the CLI to complete it.
Once the user is created, Amplify CLI will ask you to provide the accessKeyId and the secretAccessKey to connect Amplify CLI with your newly created IAM user.
Enter the access key of the newly created user:
? accessKeyId:  # YOUR_ACCESS_KEY_ID
? secretAccessKey:  # YOUR_SECRET_ACCESS_KEY
This would update/create the AWS Profile in your local machine
? Profile Name:  # (default)

Successfully set up the new user.
And that's it for the setup.
environment:
  sdk: ">=2.12.0 <3.0.0"

# Dependencies specify other packages that your package needs in order to work.
# To automatically upgrade your package dependencies to the latest versions
# consider running `flutter pub upgrade --major-versions`. Alternatively,
# dependencies can be manually updated by changing the version numbers below to
# the latest version available on pub.dev. To see which dependencies have newer
# versions available, run `flutter pub outdated`.
dependencies:
  flutter:
    sdk: flutter
  amplify_flutter: ^0.2.4
  amplify_datastore: ^0.2.4
  amplify_auth_cognito: ^0.2.4
  amplify_storage_s3: ^0.2.4
  amplify_api: ^0.2.4
  provider: ^5.0.0
  image_picker: ^0.8.2
  path_provider: ^2.0.2
  image_cropper: ^1.2.1
  cached_network_image: ^3.1.0
I'll explain the significance of each plugin as we move through building the application. For now, install the dependencies by running
flutter pub get
platform :ios, '13.0'
minSdkVersion 21
We are now set.
From the amplify docs,
With the basic setup complete, you can now model the data your application will work with.
<br>
Amplify DataStore persists the modeled data on your local device and can even synchronize to a backend API without writing any additional code.
<br>
These models are specified as GraphQL schemas.
<br>
You can learn more about GraphQL schemas and data modeling. [HERE](https://phatrabbitapps.com/building-full-stack-serverless-application-with-amplify-flutter-graphql-aws-cdk-and-typescript)
<br>
For now, let’s start by generating some initial data models.
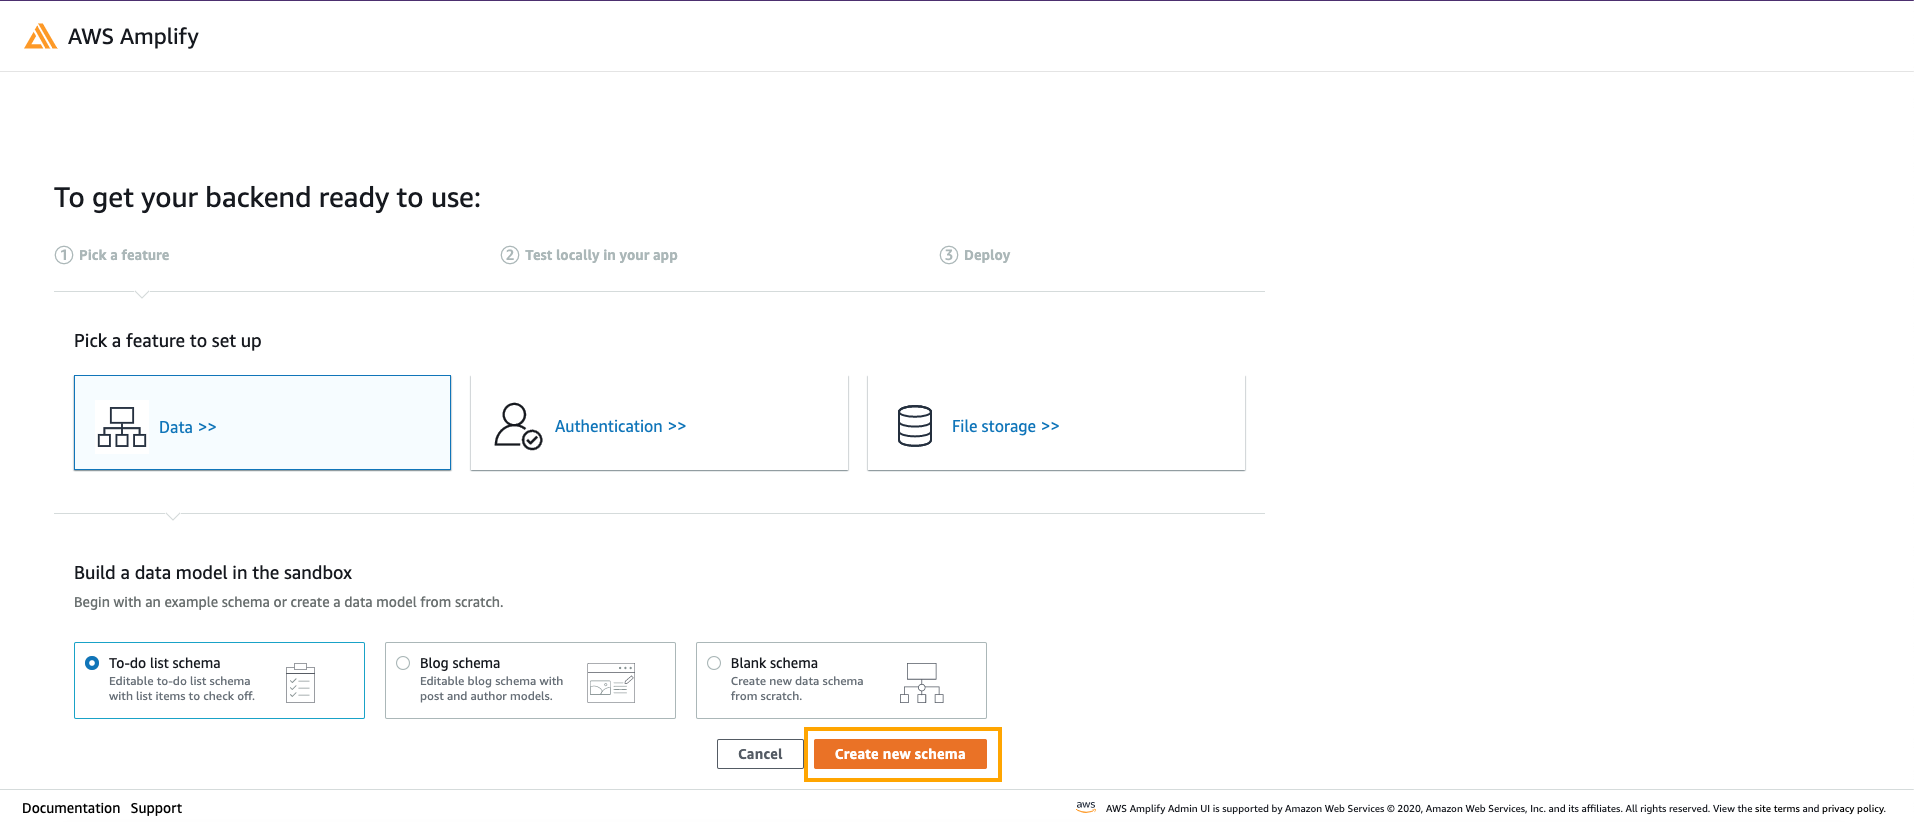 On the Data modeling screen, you should see your Todo data model. Go ahead and add the other entities, based on this image.
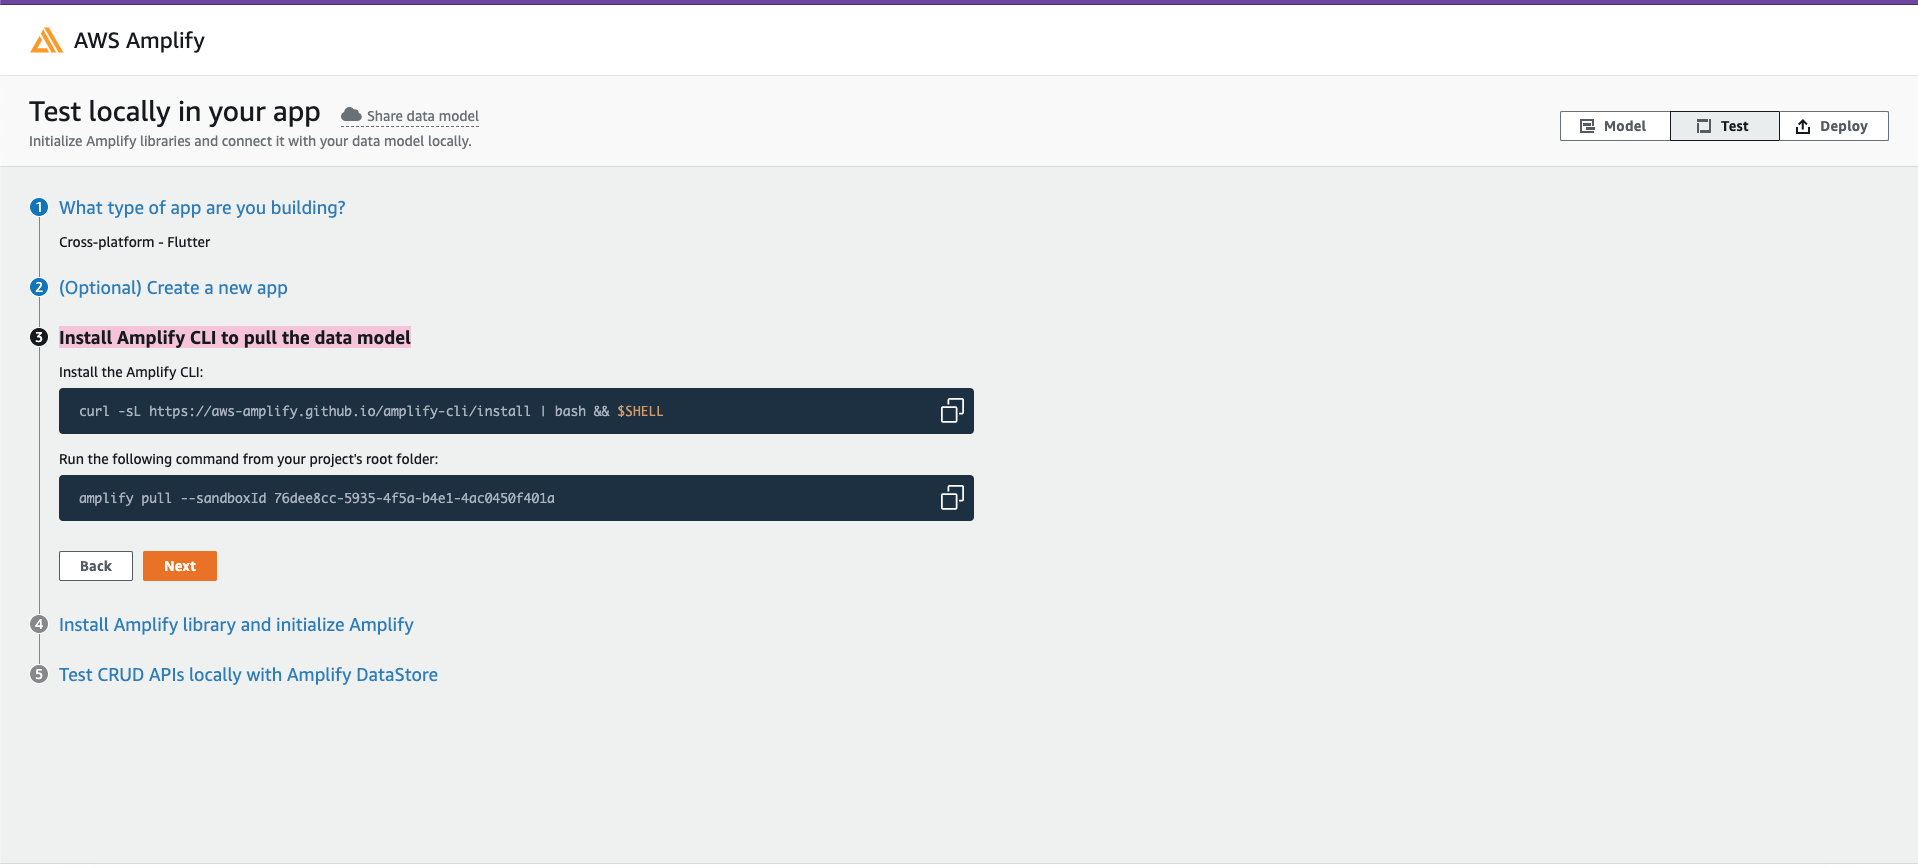
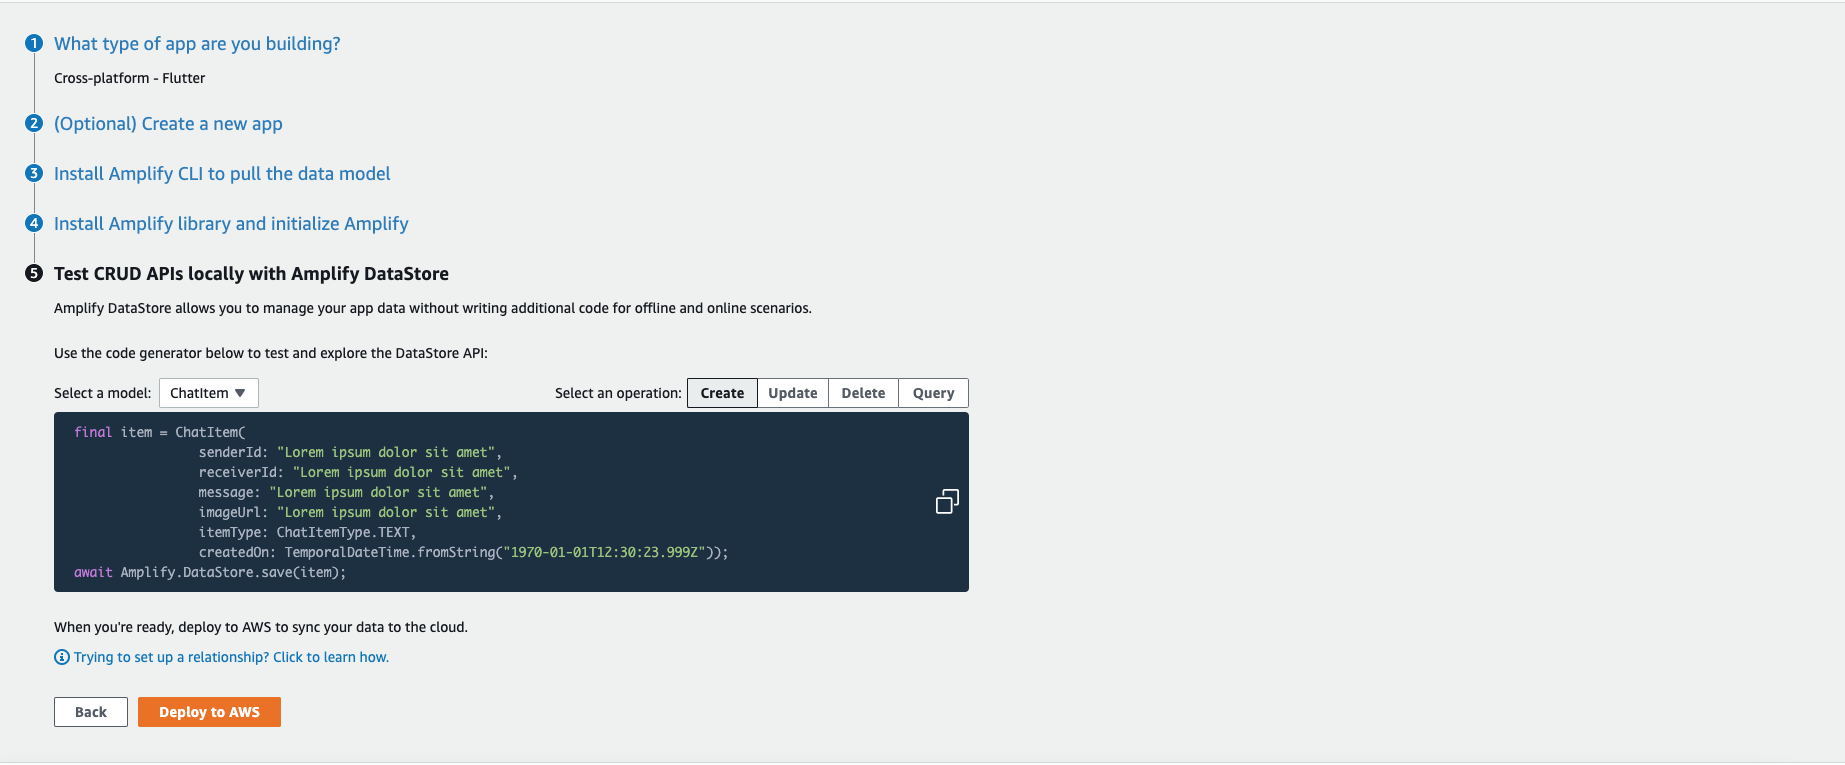
 Once you are done, click on next and follow the instructions on the next screen.
 If you followed all the instructions in the setup screen, Amplify should have generated several directories and configuration files in your project for you.

 Let’s take a look at the generated GraphQL schema.
From the project root folder, navigate to amplify/backend/api/ and open up schema.graphql.
Here's how it looks like
enum ChatItemType {
  TEXT
  IMAGE
}

type ChatItem @model @auth(rules: [{allow: public}]) @key(name: "byChat", fields: ["chatID"]) {
  id: ID!
  senderId: String!
  receiverId: String!
  message: String
  imageUrl: String
  itemType: ChatItemType!
  createdOn: AWSDateTime
  chat: Chat @connection
  chatID: ID
}

type Chat @model @auth(rules: [{allow: public}]) {
  id: ID!
  receiverId: String!
  senderId: String!
  createdOn: AWSDateTime
  updatedOn: AWSDateTime
  chatItems: [ChatItem] @connection(keyName: "byChat", fields: ["id"])
  chatUsers: [ChatUser] @connection(keyName: "byChat", fields: ["id"])
}

type User @model @auth(rules: [{allow: public}]) {
  id: ID!
  username: String!
  firstName: String!
  lastName: String
  isVerified: Boolean
  profilePicUrl: String
  email: AWSEmail
  createdOn: AWSDateTime
  updatedOn: AWSDateTime
  posts: [Post] @connection(keyName: "byUser", fields: ["id"])
  chats: [ChatUser] @connection(keyName: "byUser", fields: ["id"])
}

enum PostStatus {
  CREATED
  UPDATED
  DELETED
}

type Comment @model @auth(rules: [{allow: public}]) @key(name: "byPost", fields: ["postID"]) {
  id: ID!
  createdOn: AWSDateTime!
  updatedOn: AWSDateTime
  userId: String
  post: Post @connection
  postID: ID
  commentText: String!
}

enum PostType {
  TEXT
  TEXT_IMAGE
}

type Post @model @auth(rules: [{allow: public}]) @key(name: "byUsers", fields: ["userID"]) @key(name: "byUser", fields: ["userID"]) {
  id: ID!
  content: String!
  postImageUrl: String
  status: PostStatus!
  createdOn: AWSDateTime
  updatedOn: AWSDateTime
  comments: [Comment] @connection(keyName: "byPost", fields: ["id"])
  type: PostType!
  user: User @connection
  userID: ID
}

type ChatUser @model(queries: null) @key(name: "byChat", fields: ["chatID", "userID"]) @key(name: "byUser", fields: ["userID", "chatID"]) @auth(rules: [{allow: public}, {allow: public}]) {
  id: ID!
  chatID: ID!
  userID: ID!
  chat: Chat! @connection(fields: ["chatID"])
  user: User! @connection(fields: ["userID"])
}
If you want to know what @model,@key etc means, please check out this tutorial where I give a detailed overview of all that. https://phatrabbitapps.com/building-serverless-applications-with-amplifyvuejsnuxtjs-and-graphqlpart-1.
auth category.
username and passworddefault configuration with social provider.
amplify add auth

amplify add storage

schema.graphql is saved in the backend/api folder of our project. And our datastore models are generated from this schema.
amplify update API) and push(amplify push`) the update to the cloud. Then regenerate the datastore models to reflect the updated schema.
amplify codegen models

amplify add api
Once API has been added, run the command below to push all local changes to the cloud
amplify push
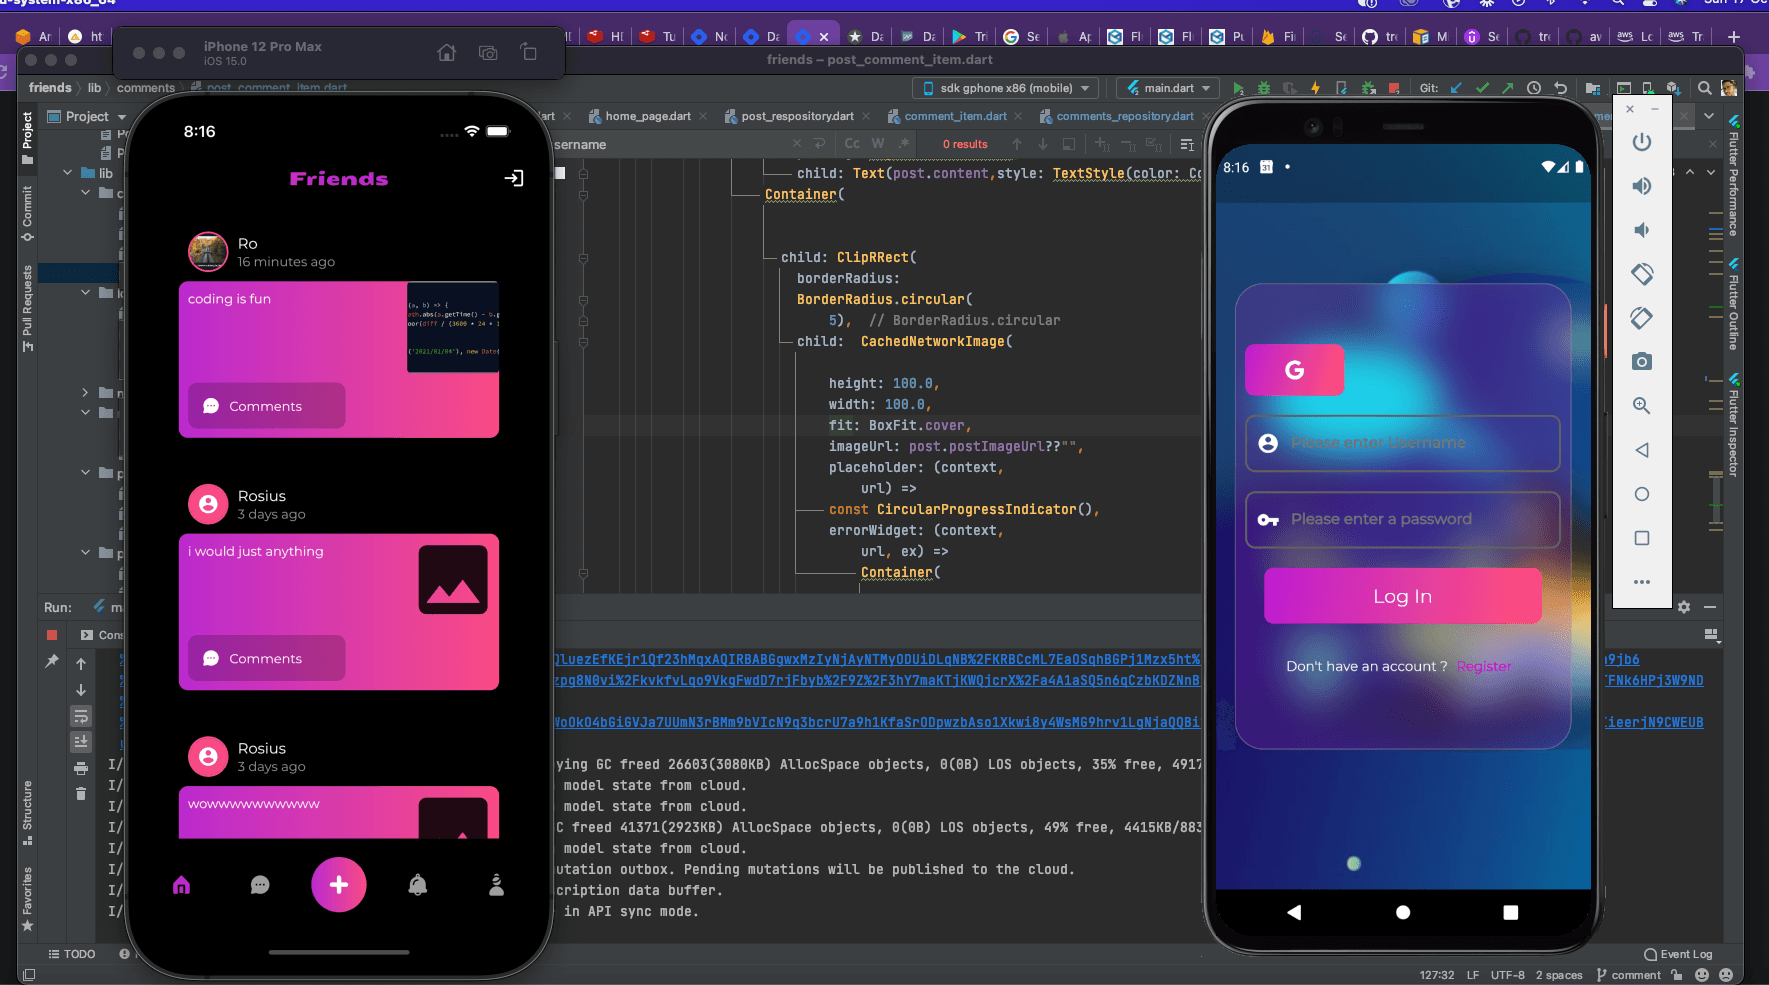
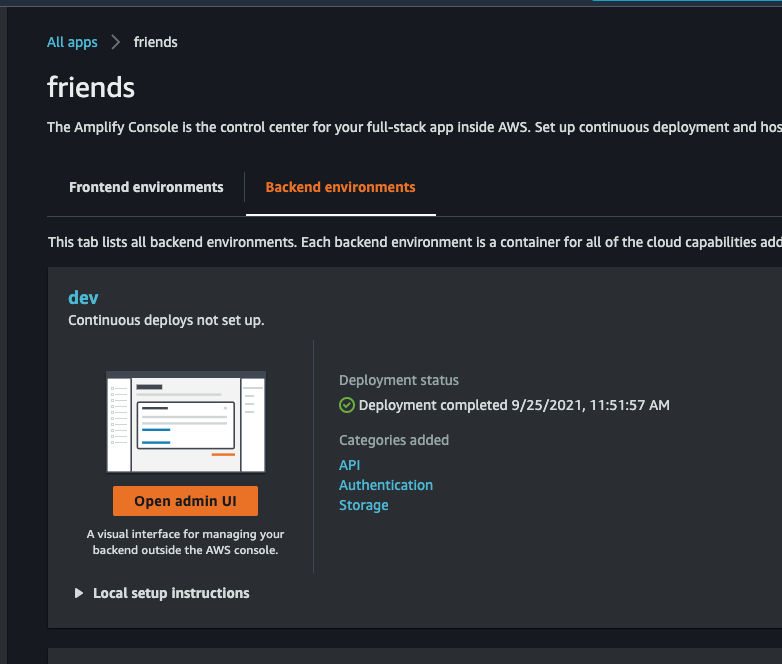
If you've pushed all your categories to the cloud, your amplify app home page should look like so. Take note of the added categories.
Now, we can start building our login and registration pages.
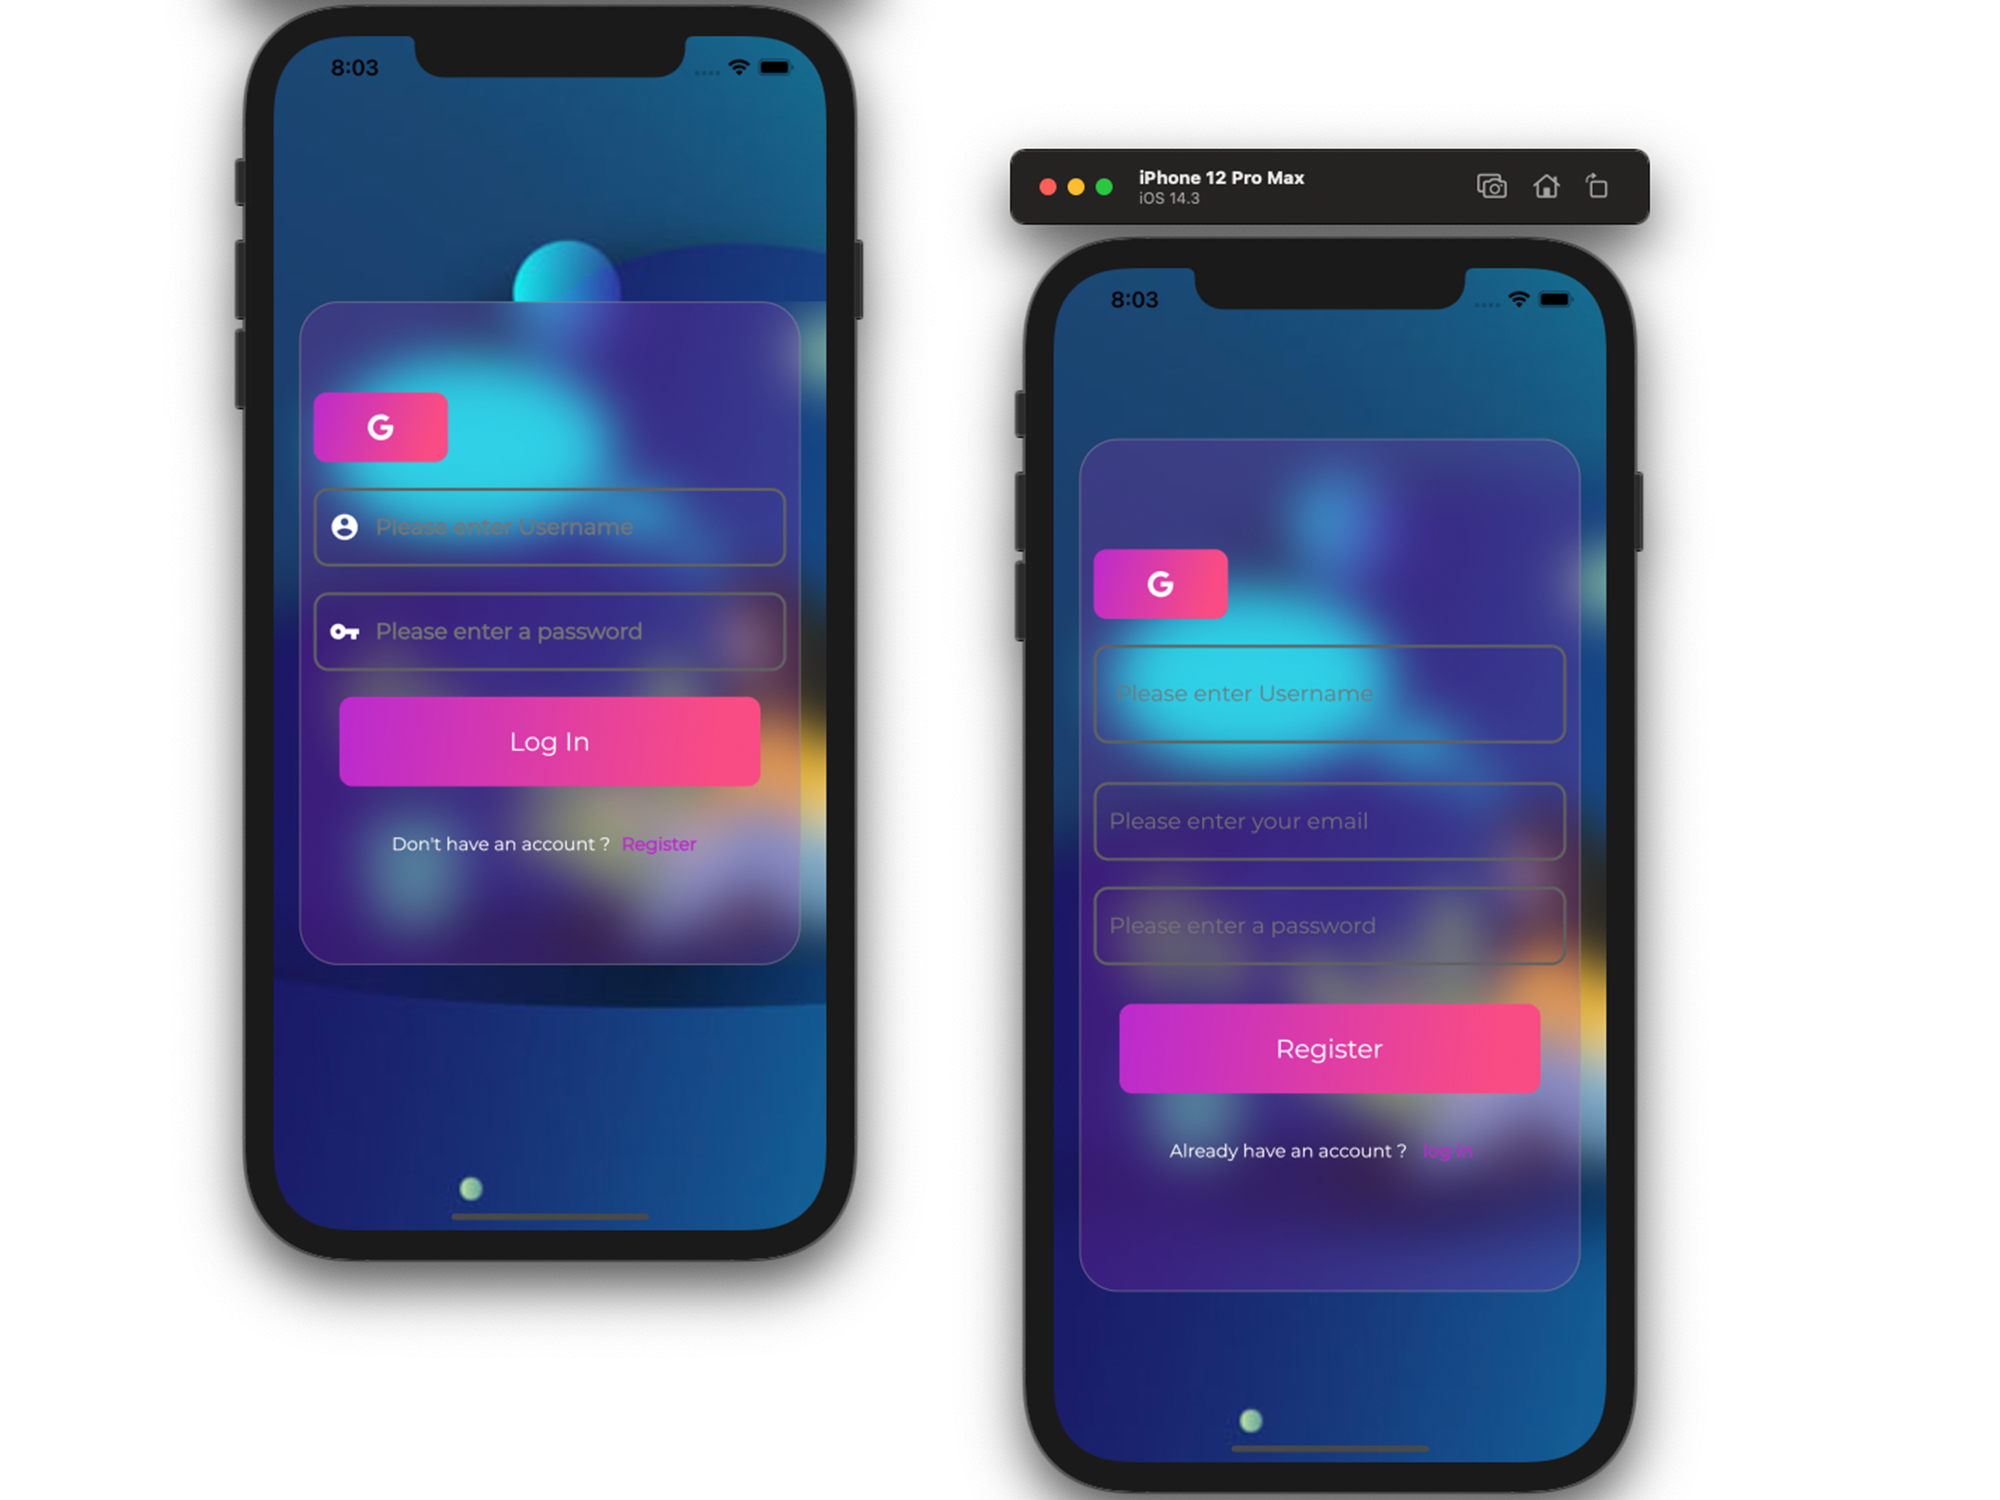
Here's a video on how login with google works. I apologize for the background noise.
1 October, 2021 - Loom Recording - Watch Video
This post is already getting too long, we'll pick it up in PART 2.
Thanks for checking this piece out. I appreciate it. If you loved it, please share.
Any feedback would be greatly appreciated.
If you enjoy building serverless apps, do check out my other blog posts. You most definitely learn a thing or two.
Till we meet again my internet comrade
Happy Coding ✌🏾