How to build AI-enhanced Serverless APIs with AWS Bedrock, SAM,Appsync, and Python
Github Repository
github.com/EducloudHQ/introduction_to_gen_ai
Skill up with serverless on Educloud
educloud.academy/content/da99ad07-7efa-41e7..
This post is an introductory lesson to building AI-enhanced serverless Applications.
We’ll see how to manipulate user prompts in several ways, and also how to generate images, by accessing foundation models hosted on AWS Bedrock through a well-defined API.
Audience
This workshop is strictly for beginners.
Prerequisites
In order to successfully complete this workshop, you should be familiar with building APIs and at least, have some basic understanding of Serverless application development.
Please check out our introductory Serverless workshops, if you’ve never built a Serverless application before.
Here’s a beginners workshop, to help you get started.
Building a Serverless Rest API with SAM and Python
Make sure these tools are installed and configured, before proceeding
- The AWS CLI installed.
- AWS account and associated credentials that allow you to create resources.
- AWS SAM
Creating a new SAM Project
From the CLI(command line interface), create a folder and give it any name of your choice.
On a Mac,
mkdir intro-gen-ai
On Windows
mkdir intro-gen-ai
On Linux
mkdir intro-gen-ai
Navigate into the folder and run the sam init command, to create a new SAM project.
Please choose Python 3.10 and above as your runtime language.
Once you are done, open up the folder in any IDE of your choice and proceed.
I’ll be using Pycharm by JetBrains.
Getting access to AWS Bedrock Foundation Models
Log into the AWS Console and navigate to Amazon Bedrock.
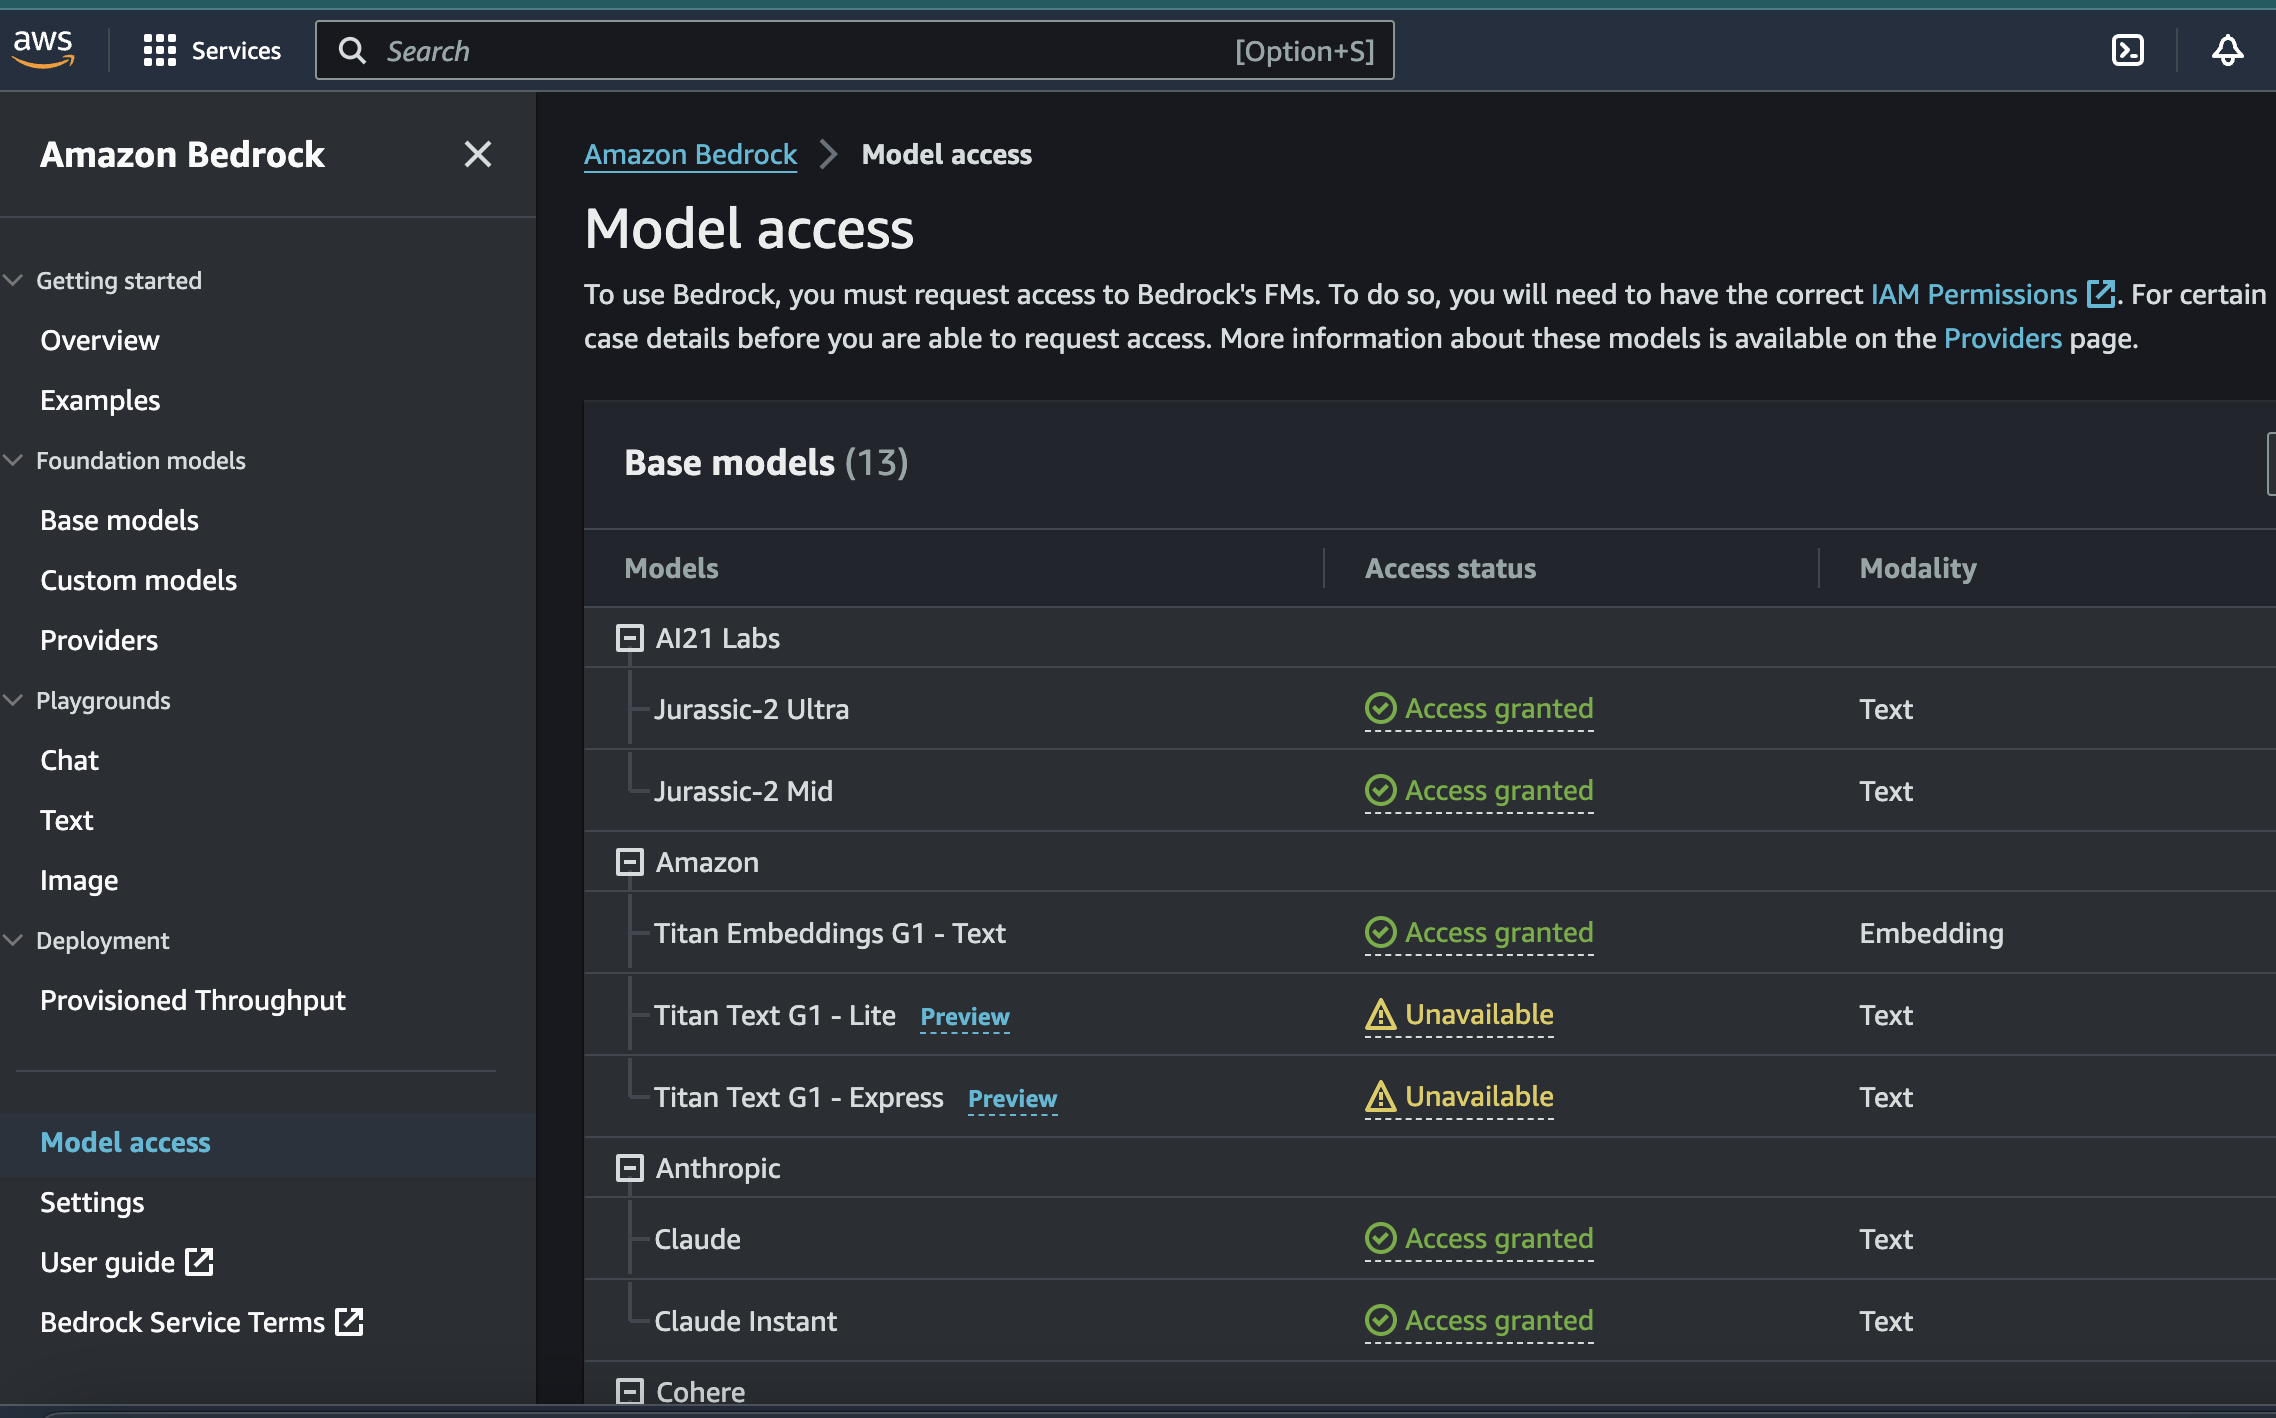
In the Bedrock screen, at the bottom left-hand corner, click on the Model Access menu and request access to these 2 foundation Models.
- Jurassic-2 Ultra
- Stability AI
You can request access to more
Once access has been granted, you should see the following screen with green Access granted texts against the models you requested.

Installing dependencies
Inside the src folder, open up the requirements.txt file and add the following dependencies.
aws-lambda-powertools[tracer]
boto3==1.28.57
botocore==1.31.57
aws-lambda-powertools is a collection of tools and libraries that make it easier to develop and maintain high-quality AWS applications.
The tracer package in aws-lambda-powertools provides a distributed tracing system that can be used to track the flow of requests through your Lambda functions and other microservices.
boto3 is the AWS Software Development Kit (SDK) for Python. It provides a high-level interface to AWS services, making it easier to develop Python applications that interact with AWS.
botocore is the low-level interface to AWS services. It is used by boto3 to make requests to AWS services.
Install the packages by running this command from the src folder of your application
pip install -r requirements.txt
Building the API
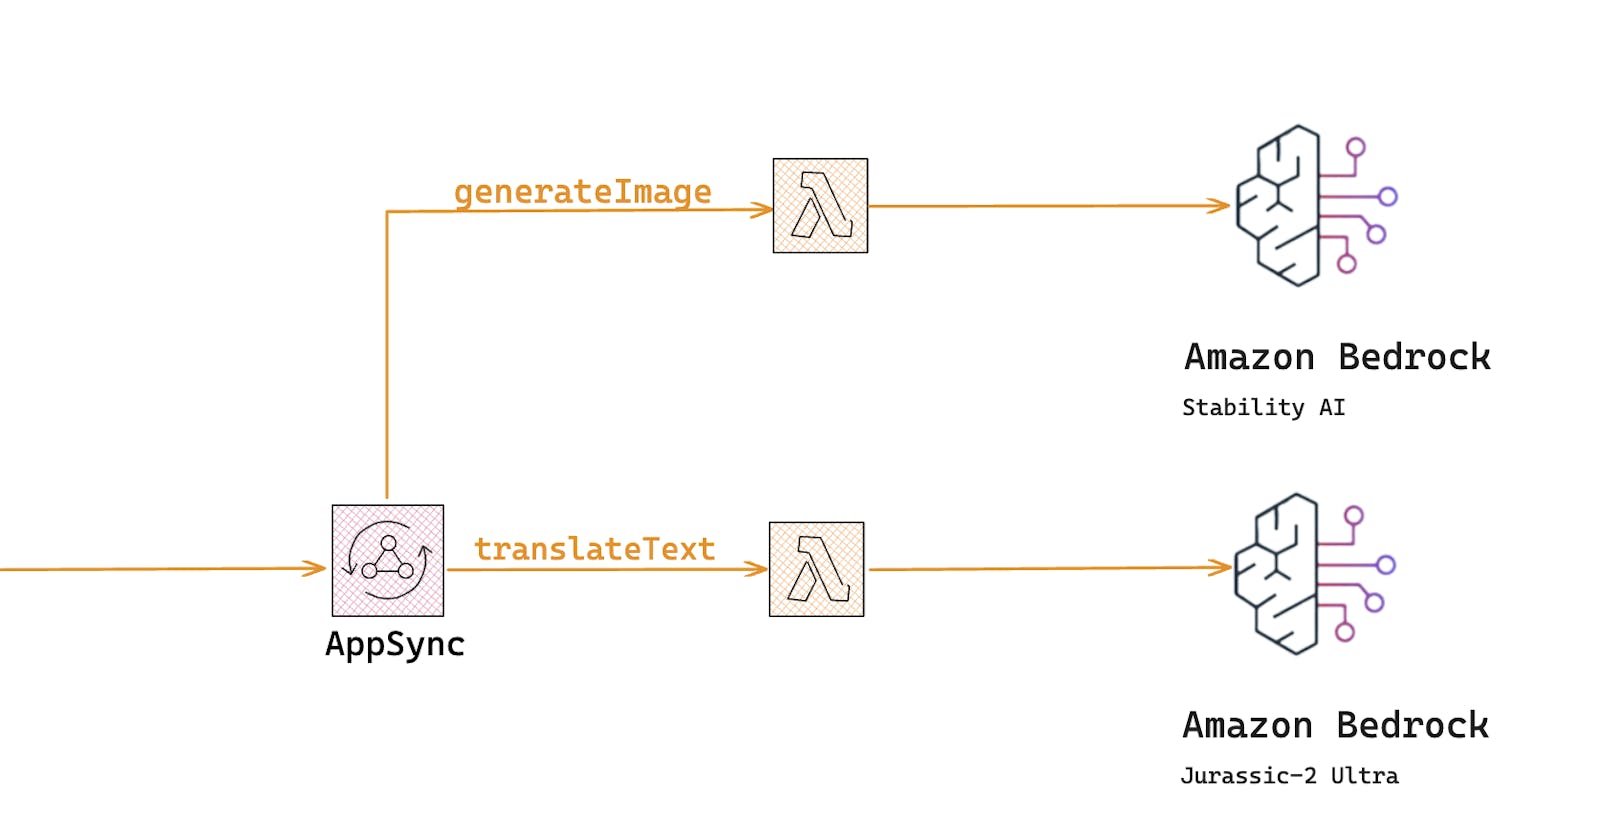
Our API will have 2 endpoints.
- generateText endpoint
- generateImage endpoint
We’ll use the Lambdalith approach to creating these endpoints. The AWS lambda powertools package comes with a Router method which helps split large lambda functions into small mini lambda functions.
You can read more on this approach here.
rehanvdm.com/blog/should-you-use-a-lambda-m..
docs.powertools.aws.dev/lambda/python/lates..
Creating folders
Open up your newly created project in any IDE and create the highlighted folders and files below.
Folder = schema , File = schema.graphql
Folder = generate_img File = main.py

Add Graphql Schema
Our schema file is made up of only 2 queries.
schema {
            query:Query
        }

type Query{
    generateSuggestions(input:String!):String! @aws_api_key
    generateImage(prompt:String!):String! @aws_api_key
}
Type the above schema into schema.graphql file.
Create GraphQL API Resources
Under Resources in your template.yml file, type in the following code.
###################
    # GRAPHQL API
    ##################

    GenerativeAIAPI:
        Type: "AWS::AppSync::GraphQLApi"
        Properties:
            Name: GenerativeAIAPI
            AuthenticationType: "API_KEY"
            XrayEnabled: true
            LogConfig:
                CloudWatchLogsRoleArn: !GetAtt RoleAppSyncCloudWatch.Arn
                ExcludeVerboseContent: FALSE
                FieldLogLevel: ALL

    GenerativeAIApiKey:
        Type: AWS::AppSync::ApiKey
        Properties:
            ApiId: !GetAtt GenerativeAIAPI.ApiId

    GenerativeAIApiSchema:
        Type: "AWS::AppSync::GraphQLSchema"
        Properties:
            ApiId: !GetAtt GenerativeAIAPI.ApiId
            DefinitionS3Location: 'schema/schema.graphql'
We are creating an AWS AppSync GraphQL API named GenerativeAIAPI. The API is configured to use API key authentication and has X-Ray tracing enabled. The log configuration is set to send all logs to CloudWatch Logs with no verbose content excluded.
We also create an API key named GenerativeAIApiKey and associate it with the API. This API key can be used by clients to authenticate with the API and make requests.
In a previous lesson, we defined a file named schema/schema.graphql. This file is stored in S3 and is referenced by the DefinitionS3Location property of the GenerativeAIApiSchema resource.
Create Lambda function resources
We’ll take the Lambdalith approach to creating this API. Meaning that both endpoints would use one lambda function and one datasource.
This approach is highly encouraged around the community and you should read up on it here.
rehanvdm.com/blog/should-you-use-a-lambda-m..
docs.powertools.aws.dev/lambda/python/lates..
Create a lambda function resource that has access to invoke the AWS Bedrock models we requested above.
GenerativeAIFunction:
        Type: AWS::Serverless::Function # More info about Function Resource: https://docs.aws.amazon.com/serverless-application-model/latest/developerguide/sam-resource-function.html
        DependsOn:
          - LambdaLoggingPolicy
        Properties:
            Handler: app.lambda_handler
            CodeUri: src
            Description: Generative ai source function
            Architectures:
                - x86_64
            Tracing: Active
            Policies:
                - Statement:
                    - Sid: "BedrockScopedAccess"
                      Effect: "Allow"
                      Action: "bedrock:InvokeModel"
                      Resource:
                        - "arn:aws:bedrock:*::foundation-model/ai21.j2-ultra-v1"             # Powertools env vars: https://awslabs.github.io/aws-lambda-powertools-python/#environment-variables
                        - "arn:aws:bedrock:*::foundation-model/stability.stable-diffusion-xl-v0"             # Powertools env vars: https://awslabs.github.io/aws-lambda-powertools-python/#environment-variables

            Tags:
                LambdaPowertools: python
We grant the lambda function access by assigning an invokeModel policy to the function
            Policies:
                - Statement:
                    - Sid: "BedrockScopedAccess"
                      Effect: "Allow"
                      Action: "bedrock:InvokeModel"
                      Resource:
                        - "arn:aws:bedrock:*::foundation-model/ai21.j2-ultra-v1"             # Powertools env vars: https://awslabs.github.io/aws-lambda-powertools-python/#environment-variables
                        - "arn:aws:bedrock:*::foundation-model/stability.stable-diffusion-xl-v0"             # Powertools env vars: https://awslabs.github.io/aws-lambda-powertools-python/#environment-variables
Create Lambda Datasource
After creating the lambda function resource, we need to attach it to a datasource. The resolvers will then use the datasource to resolve the GraphQL fields.
GenerativeAIFunctionDataSource:
        Type: "AWS::AppSync::DataSource"
        Properties:
            ApiId: !GetAtt GenerativeAIAPI.ApiId
            Name: "GenerativeAILambdaDirectResolver"
            Type: "AWS_LAMBDA"
            ServiceRoleArn: !GetAtt AppSyncServiceRole.Arn
            LambdaConfig:
                LambdaFunctionArn: !GetAtt GenerativeAIFunction.Arn
Foundation models we’ll use
For this tutorial, we’ll use 2 foundation models
AI21 Jurassic (Grande and Jumbo).
We’ll use this model for text generation. The model takes as input
{
    "prompt": "<prompt>",
    "maxTokens": 200,
    "temperature": 0.5,
    "topP": 0.5,
    "stopSequences": [],
    "countPenalty": {"scale": 0},
    "presencePenalty": {"scale": 0},
    "frequencyPenalty": {"scale": 0}
}
And returns the below output
{
    "id": 1234,
    "prompt": {
        "text": "<prompt>",
        "tokens": [
            {
                "generatedToken": {
                    "token": "\u2581who\u2581is",
                    "logprob": -12.980147361755371,
                    "raw_logprob": -12.980147361755371
                },
                "topTokens": null,
                "textRange": {"start": 0, "end": 6}
            },
            //...
        ]
    },
    "completions": [
        {
            "data": {
                "text": "<output>",
                "tokens": [
                    {
                        "generatedToken": {
                            "token": "<|newline|>",
                            "logprob": 0.0,
                            "raw_logprob": -0.01293118204921484
                        },
                        "topTokens": null,
                        "textRange": {"start": 0, "end": 1}
                    },
                    //...
                ]
            },
            "finishReason": {"reason": "endoftext"}
        }
    ]
}
Stability AI Stable Diffusion XL
We’ll use this model for image generation.
It takes the below input
{
    "text_prompts": [
        {"text": "this is where you place your input text"}
    ],
    "cfg_scale": 10,
    "seed": 0,
    "steps": 50
}
And returns this output
{
    "result": "success",
    "artifacts": [
        {
            "seed": 123,
            "base64": "<image in base64>",
            "finishReason": "SUCCESS"
        },
        //...
    ]
}
Create the generateText endpoint
First, we have to create a generateText Resolver, then we’ll create a generateText mini Lambda function.
GenerateTextResolver:
        Type: "AWS::AppSync::Resolver"
        Properties:
            ApiId: !GetAtt GenerativeAIAPI.ApiId
            TypeName: "Query"
            FieldName: "generateText"
            DataSourceName: !GetAtt GenerativeAIFunctionDataSource.Name
This resolver has a TypeName and FieldName corresponding to what we defined in the schema.graphql .
Inside src/generate_text/main.py, type in this code.
First, we need to import all modules we’ll be using within the function
from aws_lambda_powertools.event_handler.appsync import Router
from aws_lambda_powertools import Logger
from aws_lambda_powertools import Tracer
from aws_lambda_powertools import Metrics
from aws_lambda_powertools.metrics import MetricUnit
import json

from botocore.exceptions import ClientError
import boto3
Then we initialize the Router, Logger, Metrics, and Tracer
tracer = Tracer()

metrics = Metrics(namespace="Powertools")

logger = Logger(child=True)
router = Router()
Let’s create a client for the Bedrock Runtime service, which is used to run machine learning models.
bedrock_runtime = boto3.client(
        service_name="bedrock-runtime",
        region_name="us-east-1",
    )
We’ll use the text that the user has entered as the prompt
Then we’ll create a JSON object that contains the prompt data, as well as other parameters that control how the machine learning model is queried.
These parameters include the maximum number of tokens that the model should generate, the stop sequences that the model should use to terminate the generation of text, the temperature of the model, and the top probability cutoff.
# create the prompt
    prompt_data = f"""
    Command: {input}"""

    body = json.dumps({
        "prompt": prompt_data,
        "maxTokens": 200,
        "stopSequences": [],
        "temperature": 0.7,
        "topP": 1,

    })

    modelId = 'ai21.j2-ultra-v1'
    accept = 'application/json'
    contentType = 'application/json'
We’ll then invoke the Bedrock model while passing in all these parameters.
The invoke_model() method of the Amazon Bedrock runtime client (InvokeModel API) will be the primary method we use for our Text Generation.
response = bedrock_runtime.invoke_model(body=body, modelId=modelId,
                                                accept=accept,
                                                contentType=contentType)

        response_body = json.loads(response.get('body').read())
        logger.debug(f"response body: {response_body}")

        outputText = response_body.get('completions')[0].get('data').get('text')
Create the generateImage endpoint
The generateImage endpoint is very similar to the generateText endpoint, with the only difference being the foundation model we’ll be using, which is Stability AI Stable Diffusion XL.
Here’s the body we’ll be sending into our invoke model method. The prompt represents the user input.
For example … generate an image of a fat rabbit
body = json.dumps({
        "text_prompts": [{"text": prompt}],
        "cfg_scale": 10,
        "seed": 0,
        "steps": 50,

    })
    modelId = 'stability.stable-diffusion-xl-v0'
    accept = 'application/json'
    contentType = 'application/json'
    outputText = "\n"
Then we invoke the model with the required parameters and wait for the output.
The output is a base64 string of the image. You can then convert the base64 string to a jpg image.
response = bedrock_runtime.invoke_model(body=body, modelId=modelId, accept=accept, contentType=contentType)

        response_body = json.loads(response.get('body').read())
        logger.debug(f"response body: {response_body}")

        outputText = response_body.get('artifacts')[0].get('base64')
Deploy and test
Get the complete code from the Github repository, open the code in your IDE, and run these commands to build and deploy your app
sam build --use-container
sam deploy --guided
Once successfully deployed, navigate the appsync console and run your tests.
For testing, I'll be using this tool graphbolt.dev. It's called Graphbolt and it offers a ton of features to help you test and debug your graphql APIs;
Testing both endpoints

Conclusion In this blog post, we saw how to add generative ai to a Graphql API created with AWS Appsync and python. If you wish to see a more advanced use of generative ai, checkout this workshop on Educloud Academy, about building a notes taking application with Gen AI.

