Serverless api design with AWS: Lambda, dynamoDB and API gateway.
I love creating and writing about the creation of software.
Introduction
Hi, in the article, we'll be creating a serverless rest api using AWS(Amazon Web Services).I'll link off to other articles describing concepts which are beyond the scope of this article. So let's get down to it.
What is Serverless ? 🤔
It's a way to build and run applications without thinking about servers. Serverless doesn't mean the lack of servers, it simply means, the servers aren't managed by you. Infrastructure management tasks like capacity provisioning and patching are handled by your cloud provider(AWS), so you can focus only on writing code that serves your customers.Why Serverless ?
1. Zero management of infrastructure means you move from Idea to market a lot faster.
2. Serverless services automatically scale as your application grows. So you won't bother about your servers crashing when thousands of users flood your application.
3. You get to pay only for what you use, hence lower cost.
4. Serverless applications have built-in service integrations, so you can focus on building your application instead of configuring it.
If you wish to know more about serverless, please check these out.
https://aws.amazon.com/serverless/
https://serverless-stack.com/chapters/what-is-serverless.html
What Services would we be using ?
DynamoDB is a fully managed, highly available distributed database. It takes care of replicating your data across many regions without a lot of administration. It offers fast performance and scalability without hiccups in your service, which makes it an excellent tool for use in an application.
Here are a couple of articles to get you up and running on building applications with dynamoDb.
DynamoDB, Demystified 1
DynamoDB,Demystified 2
Lambda is a serverless compute service that lets you run code without provisioning or managing servers, creating workload-aware cluster scaling logic, maintaining event integrations, or managing runtimes. With Lambda, you can run code for virtually any type of application or backend service - all with zero administration. Just upload your code as a ZIP file or container image, and Lambda automatically and precisely allocates compute execution power and runs your code based on the incoming request or event, for any scale of traffic.
We’ll be using Lambda to express in a function what shape of data we’d like to create, read, update or delete from DynamoDB.
API Gateway is pretty well named :) It integrates with Lambda or other backend services to provide a proxy to accept API calls, aggregate the services to fulfill them, and return the appropriate result. It provides tools for the requests, such as testing and modeling
Serverless Framework(https://www.serverless.com/)
The Serverless Framework would help us to develop and deploy our lambda Lambda functions, along with the AWS infrastructure resources they require. It's a CLI that offers structure, automation and best practices out-of-the-box, allowing you to focus on building sophisticated, event-driven, serverless architectures, comprised of Functions and Events. It aims to ease the pain of creating, deploying, managing and lambda functions.Let's get started
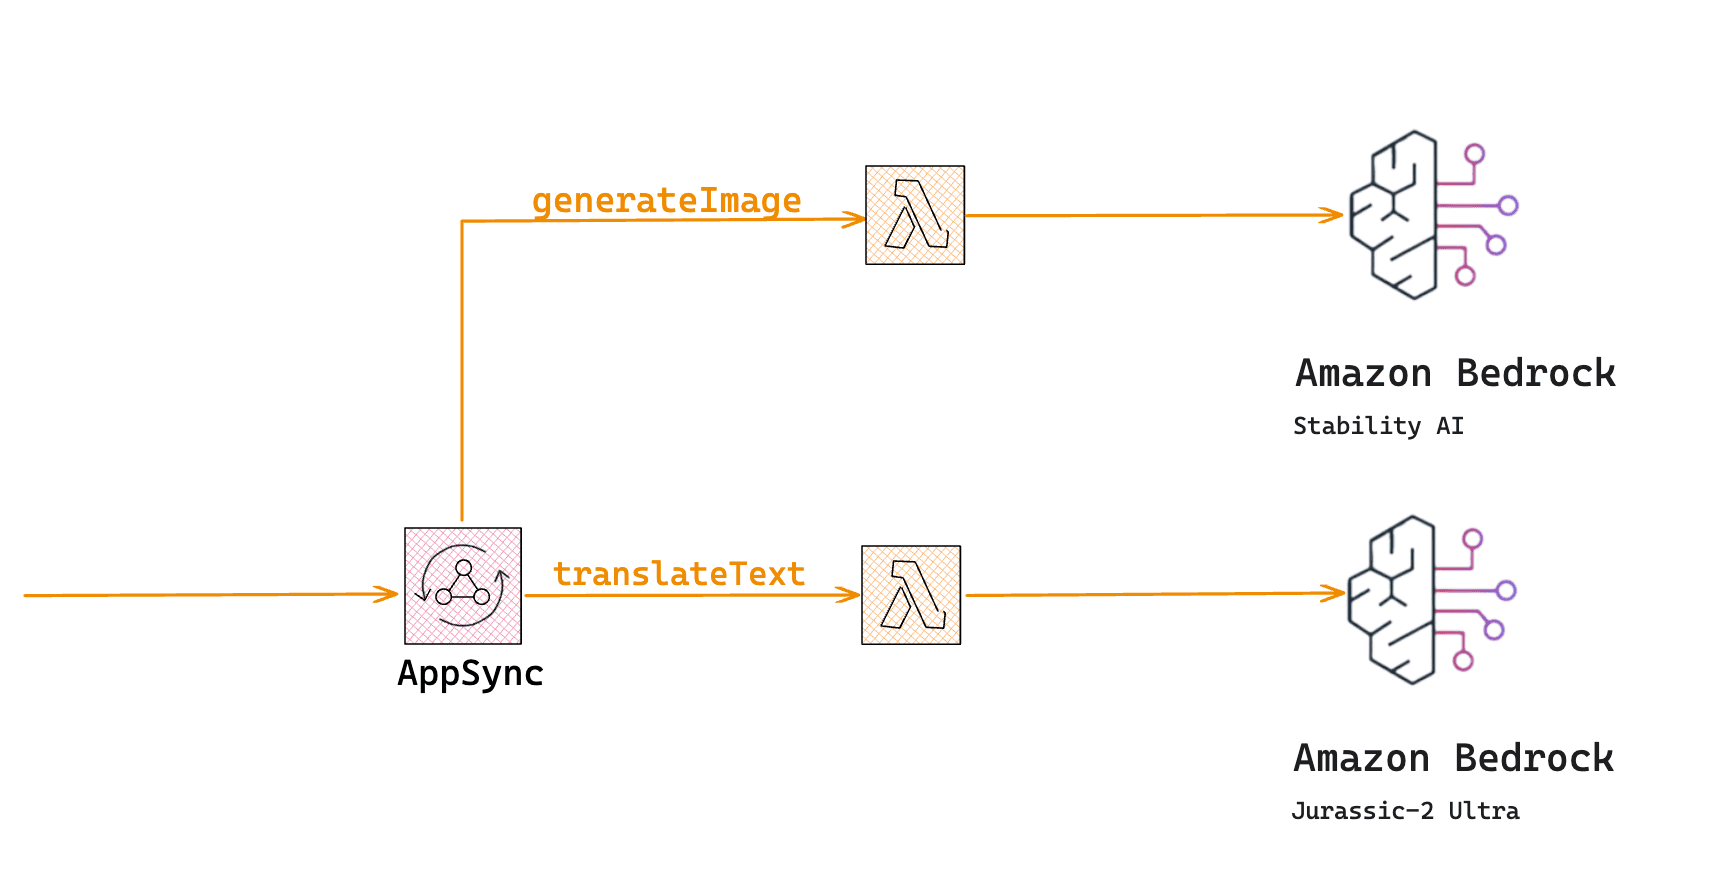
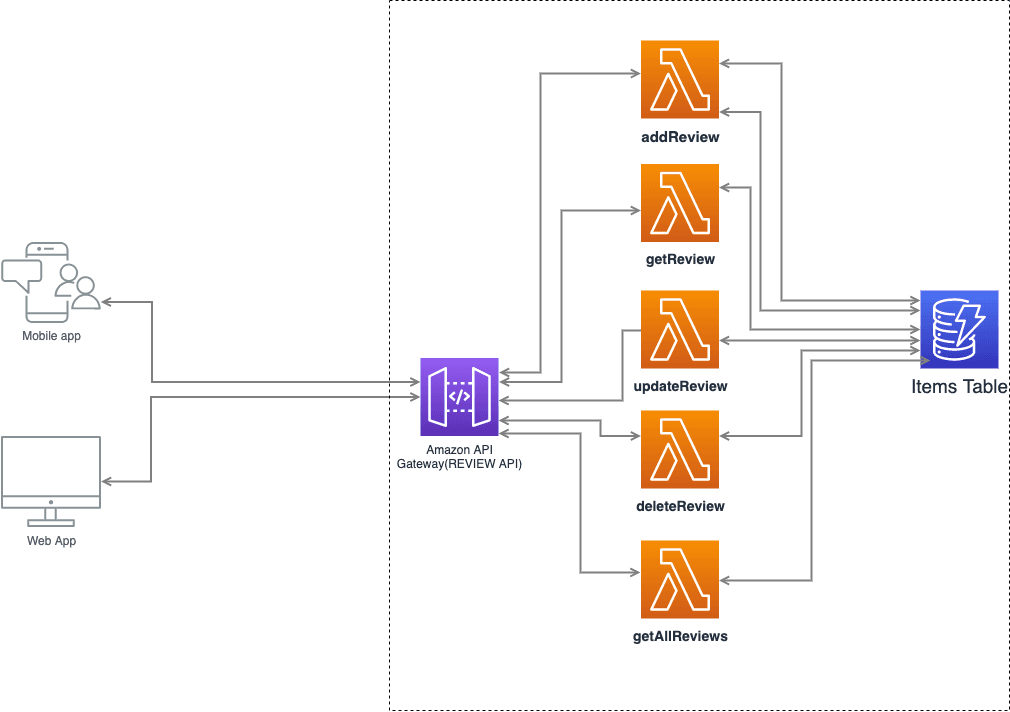
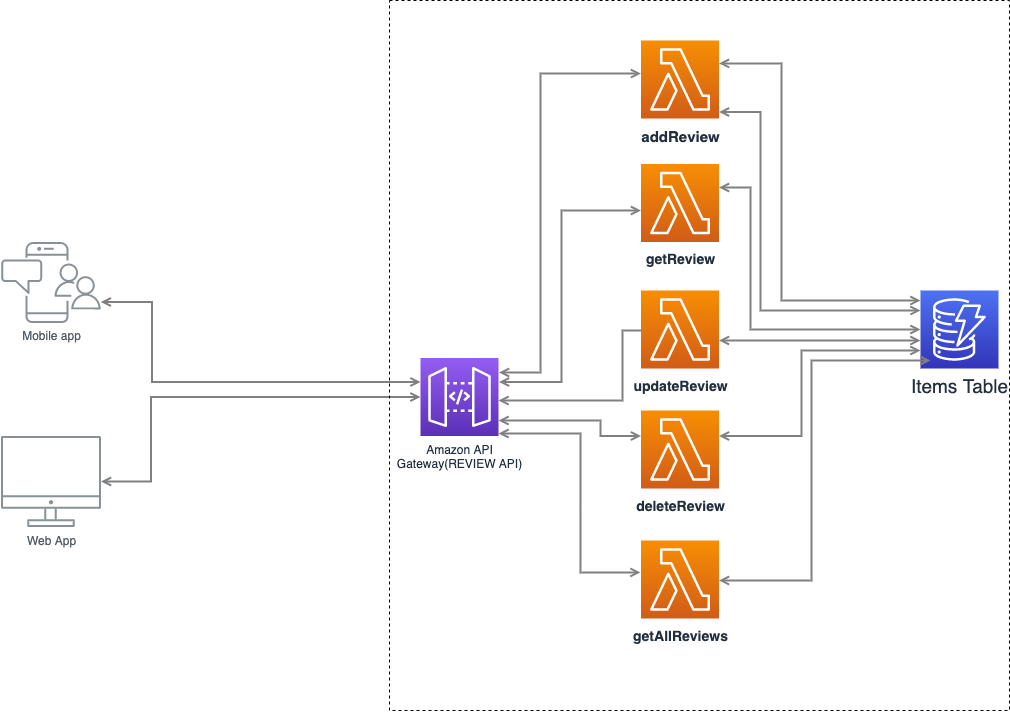
That heavy lifting is done by the big folks and all you have to do is concentrate on the business logic of your app. Here are some advantages of serverless.Please create and log into your AWS account https://signin.aws.amazon.com/signin?redirect_uri=https%3A%2F%2Fconsole.aws.amazon.com%2Fconsole%2Fhome%3Fnc2%3Dh_ct%26src%3Dheader-signin%26state%3DhashArgs%2523%26isauthcode%3Dtrue&client_id=arn%3Aaws%3Aiam%3A%3A015428540659%3Auser%2Fhomepage&forceMobileApp=0&code_challenge=Ay7BpzyaxiesxwZ83HOICjPgg7oVFe_MDP5EZVGFres&code_challenge_method=SHA-256. Chances are, you'll get overwhelmed by the numerous amount of services AWS offers. AWS is great and disorienting because it has a ton of options.But don't worry, i'm here to keep you on track incase you loose your way. Here's an Architectural overview of the complete system.
We have to install 3 important dependencies
node(https://nodejs.org/en/download/)
Aws cli(https://docs.aws.amazon.com/cli/latest/userguide/cli-chap-install.html)
Serverless framework
npm install -g serverless
Next, we have to create a user role on AWS, which would grant access to other users or applications, in this case Serverless framework.Without the user role and the right permissions applied, we won't be able to use serverless framework to access AWS. Therefore, you need to log in to AWS.
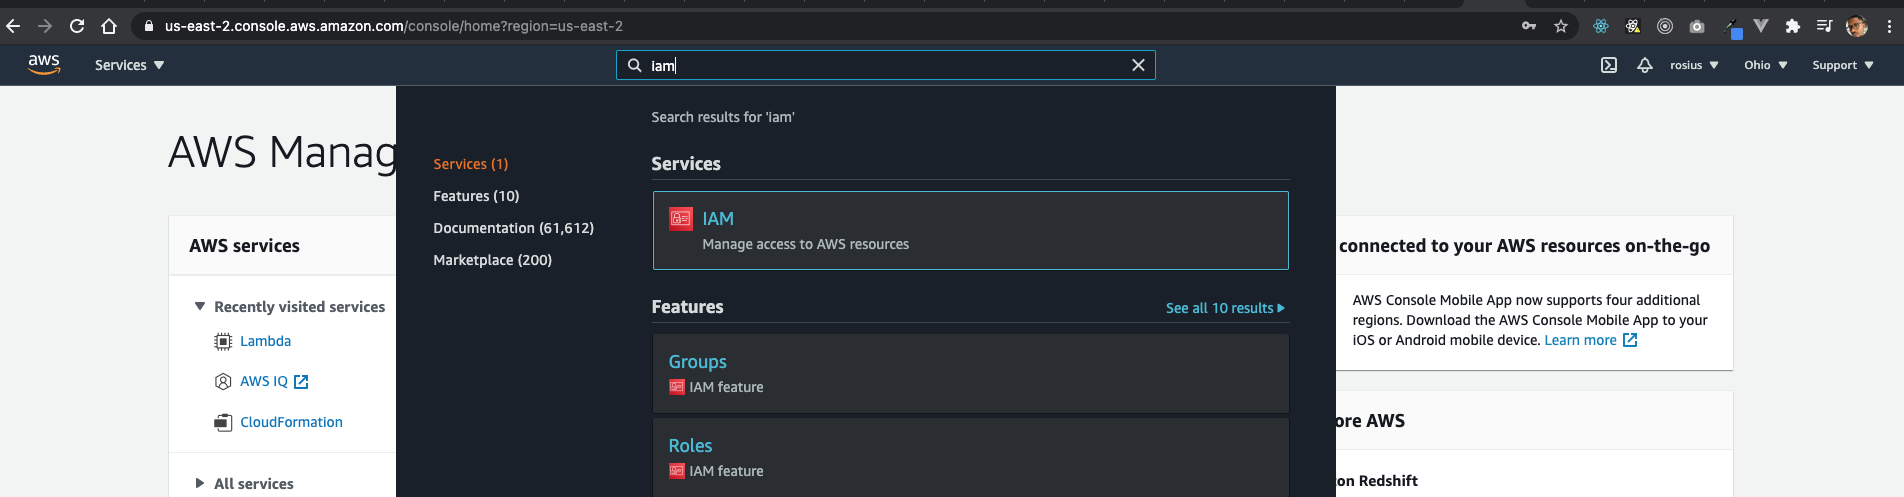
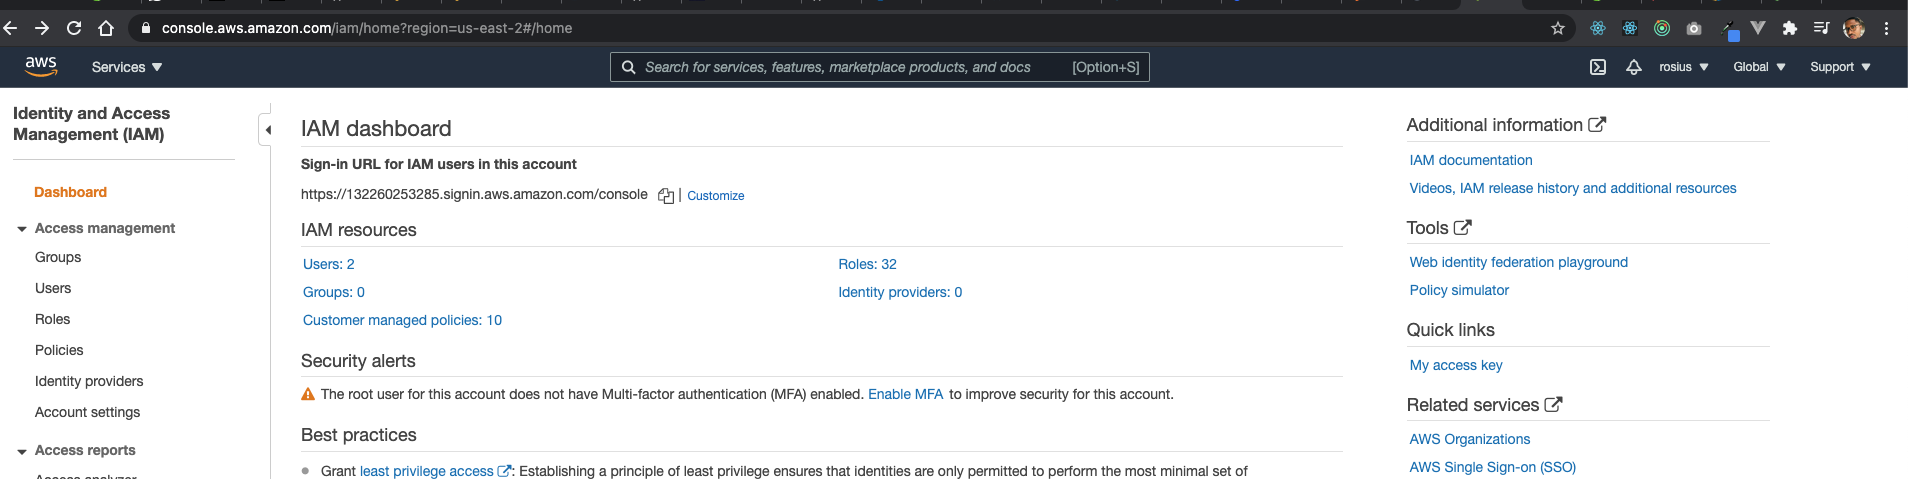
Once logged in , type IAM in the search bar at the top of the screen and press enter.
I'll provide screenshots to better illustrate what i'm talking about.
 Once on the IAM dashboard, click on users
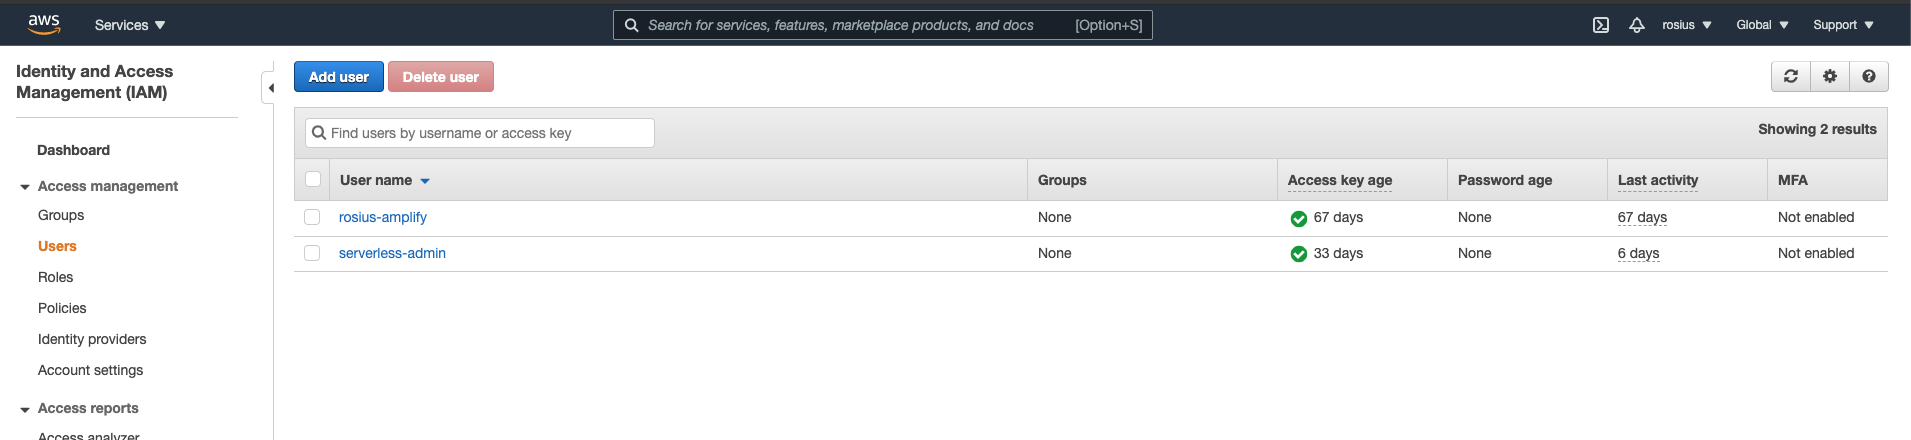
 Click on the add user button at the top of the screen to add a new user
 In the add user screen, give a name to your user. The serverless documentation recommends giving a username such as "serverless-admin". But you can give it any name you are comfortable with. We will be using this username to configure our serverless framework.
Check the programming access checkbox, which enables an access key ID and secret access key for the AWS API, CLI, SDK, and other development tools.
In the add user screen, give a name to your user. The serverless documentation recommends giving a username such as "serverless-admin". But you can give it any name you are comfortable with. We will be using this username to configure our serverless framework.
Check the programming access checkbox, which enables an access key ID and secret access key for the AWS API, CLI, SDK, and other development tools.
 Click on Next which takes you to the permissions screen. There, you have to select Attach existing policies and check administrator access. Please see the image below
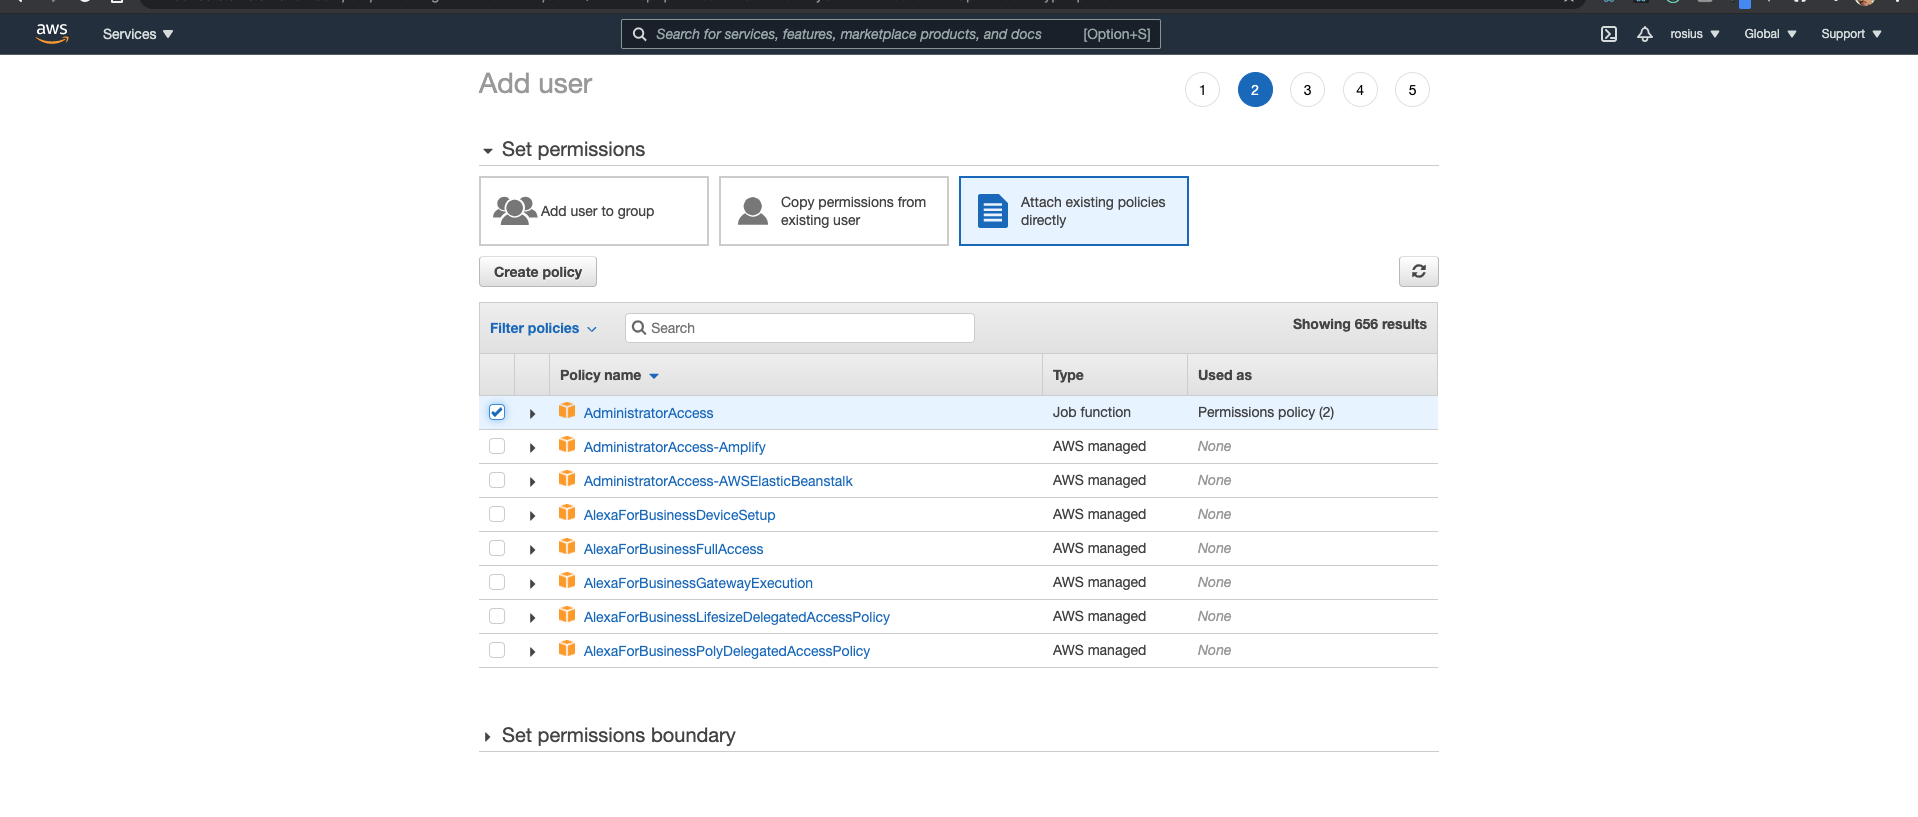 Now you've give administrator access to this user.We are giving this user admin access only for development purposes. In a production app, it's recommended you only give the user the specific permissions required to run their app.Not admin access.
Please click next, to move to the tags screen. That's an optional feature, so we'll click next and move to the reviews screen.
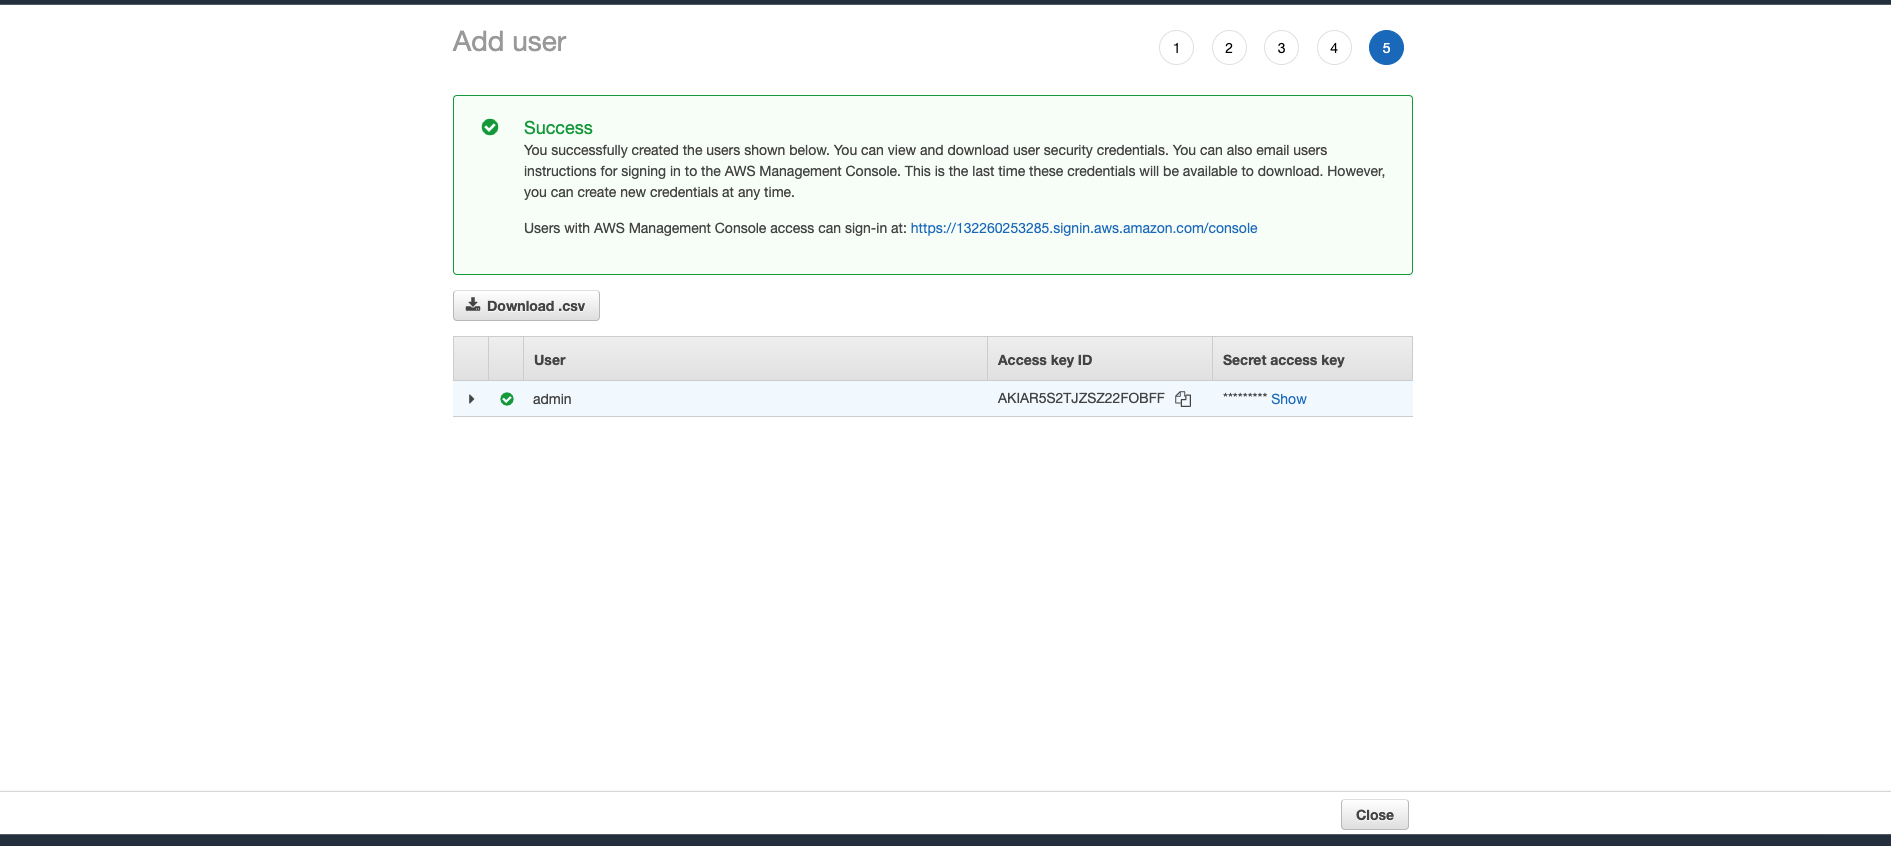
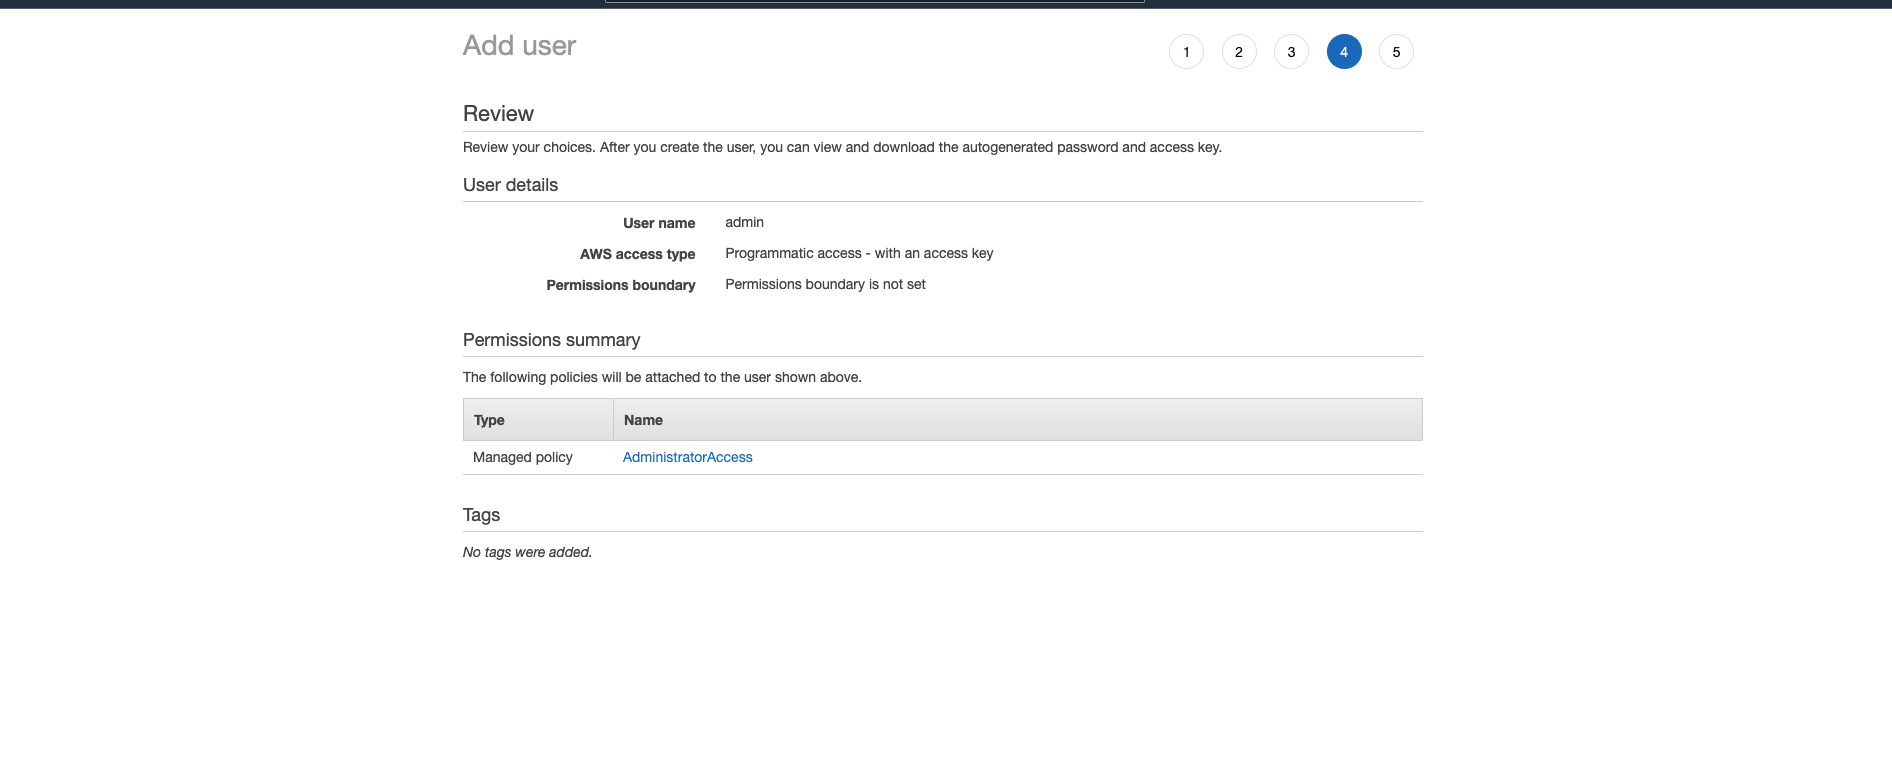 Once you confirm that the user name and AWS access type is what you entered/selected, you can go ahead and click Create User.
Once created, please click on download .csv button, to download the user security credentials which we would be using later.
Once you confirm that the user name and AWS access type is what you entered/selected, you can go ahead and click Create User.
Once created, please click on download .csv button, to download the user security credentials which we would be using later.
So now, we have to configure serverless with our user role credentials(Access Key Id and Secret Access Key ID) we got form the previous step.
Please make sure you've already installed serverless framework. (npm install -g serverless ).
Next, replace the ACCESS_KEY_ID, SECRET_KEY_ID and USERNAME with yours and run the following command
serverless config credentials --provider aws --key ACCESS_KEY_ID --secret SECRET_KEY_ID --profile USERNAME
Creating a Serverless Framework application
We'll be using python as the runtime to create our serverless application. So go ahead and type in this cmd in your command line. *sls => Serverlesssls create --template aws-python --path review-api
This command creates an aws python application called review-api at your current path. I'll go ahead to open up the folder review-api in my favorite IDE.(Vscode). Here's what i got.
 Open up the serverless.yml file and let's start making changes to it. First thing is,
- change the runtime from python2.7 to python3.8,
- add a region( Get it from your AWS url, once you log in). Mine is us-east-2

- Add a profile, which is the username of the aws user we created above under provider.
Here's how mine looks like.
provider:
name: aws
runtime: python3.8
region: us-east-2
profile: serverless-admin
environment:
    DYNAMODB_TABLE: reviews
By default, lambda functions aren't authorized to interact with other services unless they are given the right permissions. And these permissions can be given through the IAM(Identity and Access Management) Policy.
IAM allows you to secure your AWS setup.
We provide 6 actions to our iamRoleStatements. All these actions would be carried out on the resource, which is our dynamoDB table alone.It's always best to make your iam roles as restrictive as possible.
 iamRoleStatements:
    - Effect: Allow
      Action:
        - dynamodb:Query
        - dynamodb:Scan
        - dynamodb:GetItem
        - dynamodb:PutItem
        - dynamodb:UpdateItem
        - dynamodb:DeleteItem
      Resource: "arn:aws:dynamodb:${opt:region, self:provider.region}:*:table/${self:provider.environment.DYNAMODB_TABLE}"
Cloud Formation Template
A cloud formation template is required to create the resources our functions would need. Cloud formation is a very huge topic on its own, and its way beyond the scope of this article. Read more about it here (https://aws.amazon.com/cloudformation/). Here's the cloud formation template for our application.resources:
Resources:
ReviewsDynamoDbTable:
Type: 'AWS::DynamoDB::Table'
DeletionPolicy: Retain
Properties:
AttributeDefinitions:
-
AttributeName: id
AttributeType: S
KeySchema:
-
AttributeName: id
KeyType: HASH
ProvisionedThroughput:
ReadCapacityUnits: 1
WriteCapacityUnits: 1
TableName: ${self:provider.environment.DYNAMODB_TABLE}
ReviewsDynamoDbTable is the name of the resource.The Type is dynamoDb table. With the DeletionPolicy attribute, you can preserve and in some cases, backup a resource when its stack is deleted. You specify a DeletionPolicy attribute for each resource that you want to control. If a resource has no DeletionPolicy attribute, AWS CloudFormation deletes the resource by default.
The above snippet contains an Amazon DynamoDB table resource with a Retain deletion policy. When this stack is deleted, CloudFormation leaves the bucket without deleting it.
AttributeDefinitions represents an attribute for describing the key schema for the table and indexes. Therefore, the attribute name is id, and the type is a String (S).
One read capacity unit represents one strongly consistent read per second, or two eventually consistent reads per second, for an item up to 4 KB in size
One write capacity unit represents one write per second for an item up to 1 KB in size. If you need to write an item that is larger than 1 KB, DynamoDB must consume additional write capacity units
Routes
| Method | Path | Description |
|---|---|---|
| POST | /reviews | Create a review |
| GET | /reviews | Get all reviews |
| GET | /reviews/{id} | Get a single review based on it's ID |
| UPDATE | /reviews/{id} | Update a single review based on it's ID |
| DELETE | /reviews/{id} | Delete a single review based on it's ID |
Functions
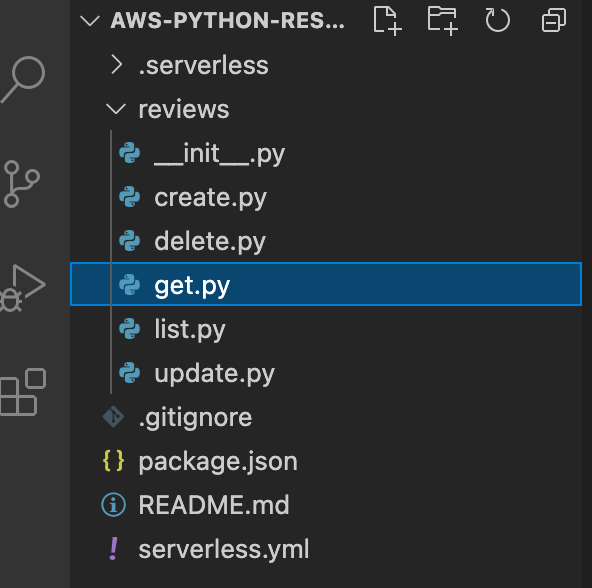
Enough with all these boring talks, let's get down to coding. Within our serverless application, create a directory called reviews.Create 5 python files within the reviews directory.- create.py
- get.py
- update.py
- list.py
- delete.py
Your folder structure should look like this now.
Create A Review
Copy and paste the following code inside of your create.py file.import json
import logging
import os
import time
import uuid
import random
#boto3 is the python SDK for AWS, which allows you to directly create,
# update and delete AWS resources from your python scripts.
import boto3
dynamodb = boto3.resource('dynamodb')
#a list of random names to apply to our review
names = [
"Evan You",
"John Lindquist",
"Jen Looper",
"Miriam Suzanne",
"Chris Coyier",
"Geoff Graham",
"Divya Sasidharan",
"Lea Verou",
"Rachel Andrew",
"Vitaly Friedman",
"Ryan Florence",
"Dan Abramov",
"Jen Simmons",
"Robin Rendle",
"Nicole Sullivan"
]
def create(event, context):
data = json.loads(event['body'])
if 'review' not in data:
logging.error("Validation Failed")
raise Exception("Couldn't create the review item")
timestamp = str(time.time())
table = dynamodb.Table(os.environ['DYNAMODB_TABLE'])
item = {
'id': str(uuid.uuid1()),
'review': data['review'],
"created_by":random.choice(names),
'createdAt': timestamp,
'updatedAt': timestamp,
}
# write the review to the database
table.put_item(Item=item)
# create a response
response = {
"statusCode": 200,
'headers': {
'Access-Control-Allow-Origin': '*',
'Access-Control-Allow-Credentials': True
},
"body": json.dumps(item)
}
return response
In this python script, we import boto3 which is a python sdk for aws and it'll help us create, update and delete python scripts on AWS. We grab a dynamoDb resource from boto3 which we'll use to access our dynamo Db table.
Next, we have a list of names which we'll randomly assign to every review we create. Using json.loads, we grab the data from the body of the request, create a table item and add that item to our dynamoDb table using table.put_item(Item=item) .
After the item is added to the dynamoDB table, we send a response back.
Now we have to go back to the serverless.yml file and add our function.The name of the function is create. Our function called create is inside a file called create.py located in the reviews folder. That's why you see the handler as :reviews/create.create.
For the events, you have the path, the method, which is a post method and we set CORS(Cross-Origin Resource sharing) to true.
Cors helps us access the resources on our api.
functions:
  create:
    handler: reviews/create.create
    events:
      - http:
          path: reviews
          method: post
          cors: true
Get a review
In-order to get a review, we need to send an ID of the review with the GET requestdef get(event, context):
table = dynamodb.Table(os.environ['DYNAMODB_TABLE'])
# fetch review from the database
result = table.get_item(
Key={
'id': event['pathParameters']['id']
}
)
# create a response
response = {
"statusCode": 200,
"body": json.dumps(result['Item'])
}
return response
We use the get_item function to get the review if available while passing in the review ID.
Add the function to the serverless.yml
  get:
    handler: reviews/get.get
    events:
      - http:
          path: reviews/{id}
          method: get
          cors: true
Update a review
def update(event, context):
    data = json.loads(event['body'])
    if 'review' not in data:
        logging.error("Validation Failed")
        raise Exception("Couldn't update the review item.")
        return

    timestamp = int(time.time() * 1000)

    table = dynamodb.Table(os.environ['DYNAMODB_TABLE'])

    # update the review in the database
    result = table.update_item(
        Key={
            'id': event['pathParameters']['id']
        },

        ExpressionAttributeValues={
          ':review': data['review'],
          ':updatedAt': timestamp,
        },
        UpdateExpression='review = :review, '
                         'updatedAt = :updatedAt',
        ReturnValues='ALL_NEW',
    )

    # create a response
    response = {
        "statusCode": 200,
        "body": json.dumps(result['Attributes'])
    }

    return response
Add the function to the serverless.yml
  update:
    handler: reviews/update.update
    events:
      - http:
          path: reviews/{id}
          method: put
          cors: true
Get a list of all reviews
def list(event, context):
    table = dynamodb.Table(os.environ['DYNAMODB_TABLE'])

    # fetch all reviews from the database
    result = table.scan()

    # create a response
    response = {
        "statusCode": 200,
        'headers': {
           'Access-Control-Allow-Origin': '*',
            'Access-Control-Allow-Credentials': True


        },
        "body": json.dumps(result['Items'])
    }

    return response
Add the function to the serverless.yml
  list:
    handler: reviews/list.list
    events:
      - http:
          path: reviews
          method: get
          cors: true
Delete a review
def delete(event, context):
    table = dynamodb.Table(os.environ['DYNAMODB_TABLE'])

    # delete the review from the database
    table.delete_item(
        Key={
            'id': event['pathParameters']['id']
        }
    )

    # create a response
    response = {
        "statusCode": 200
    }

    return response
Add the function to the serverless.yml
  delete:
    handler: reviews/delete.delete
    events:
      - http:
          path: reviews/{id}
          method: delete
          cors: true
Please grab the complete code on github before deploying. https://github.com/trey-rosius/serverless_python_api
Deploying and Testing
After getting the complete code on Github and making sure you've changed the region and profile, deploy your app using the command serverless deploy.
Once deployed successfully, you should see your generated endpoints in the command line.
 POST - https://xuie8z3bb5.execute-api.us-east-2.amazonaws.com/dev/reviews
  GET - https://xuie8z3bb5.execute-api.us-east-2.amazonaws.com/dev/reviews
  GET - https://xuie8z3bb5.execute-api.us-east-2.amazonaws.com/dev/reviews/{id}
  PUT - https://xuie8z3bb5.execute-api.us-east-2.amazonaws.com/dev/reviews/{id}}
  DELETE - https://xuie8z3bb5.execute-api.us-east-2.amazonaws.com/dev/reviews/{id}
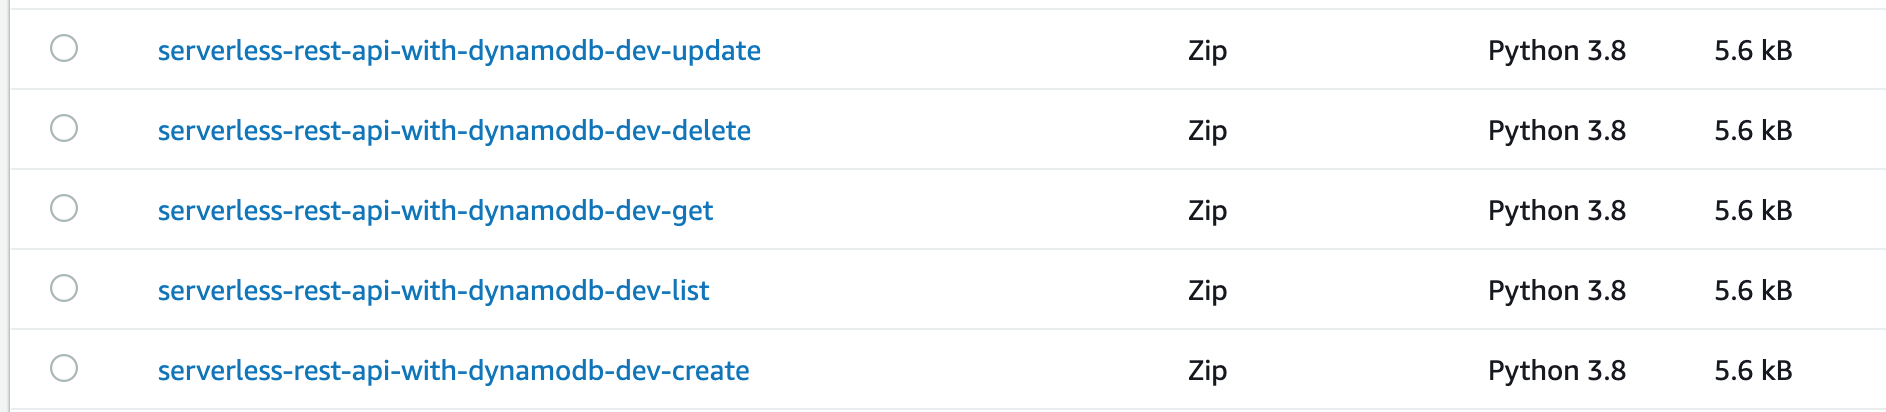
You can find the lambda functions on AWS.
 I'll be using PostMan to test the endpoints. You can download it here
.
Let me insert some data into my database. Here's a screenshot of the result.

Feel free to play around with the other endpoints.
Once done, you can remove the serverless applications using
serverless remove
Here's a sample web app on codepen, illustrating how to interact with the api. Please replace the endpoint's in the js file with yours. https://codepen.io/atehrosius/pen/yLVQZqr
Conclusion
Woww. Thanks for reading. That's all about creating a serverless rest api using aws lambda, dynamoDB and api-gateway.
The most important parts where, creating the functions and doing the configurations in the serverless.yml file.
We've barely touched the surface of serverless api developments.
You can build on this example by added a User Object, instead of just the name as we did.Add authentication and a lot more.
I'll be creating and writing more tutorials on api's and Jamstack application. Stay tuned.
Please leave a like if you loved the post, comment incase you find a mistake or have a suggestion, and i'll be sure to make the adjustment.
Let's keep learning together.
❤️Happy Coding