Step-by-Step Tutorial on Building Apps with AWS Step Functions

I love creating and writing about the creation of software.
Introduction
In this tutorial series, we’ll learn how to build a step functions workflow for a simple real life scenario in 3 different ways:
- Using the Step functions visual Studio editor on the AWS Console.
- Using CDK for Infrastructure as Code
- Using Sam for Infrastructure as Code
And then invoke the workflow from a mobile application built with AWS Amplify and flutter.
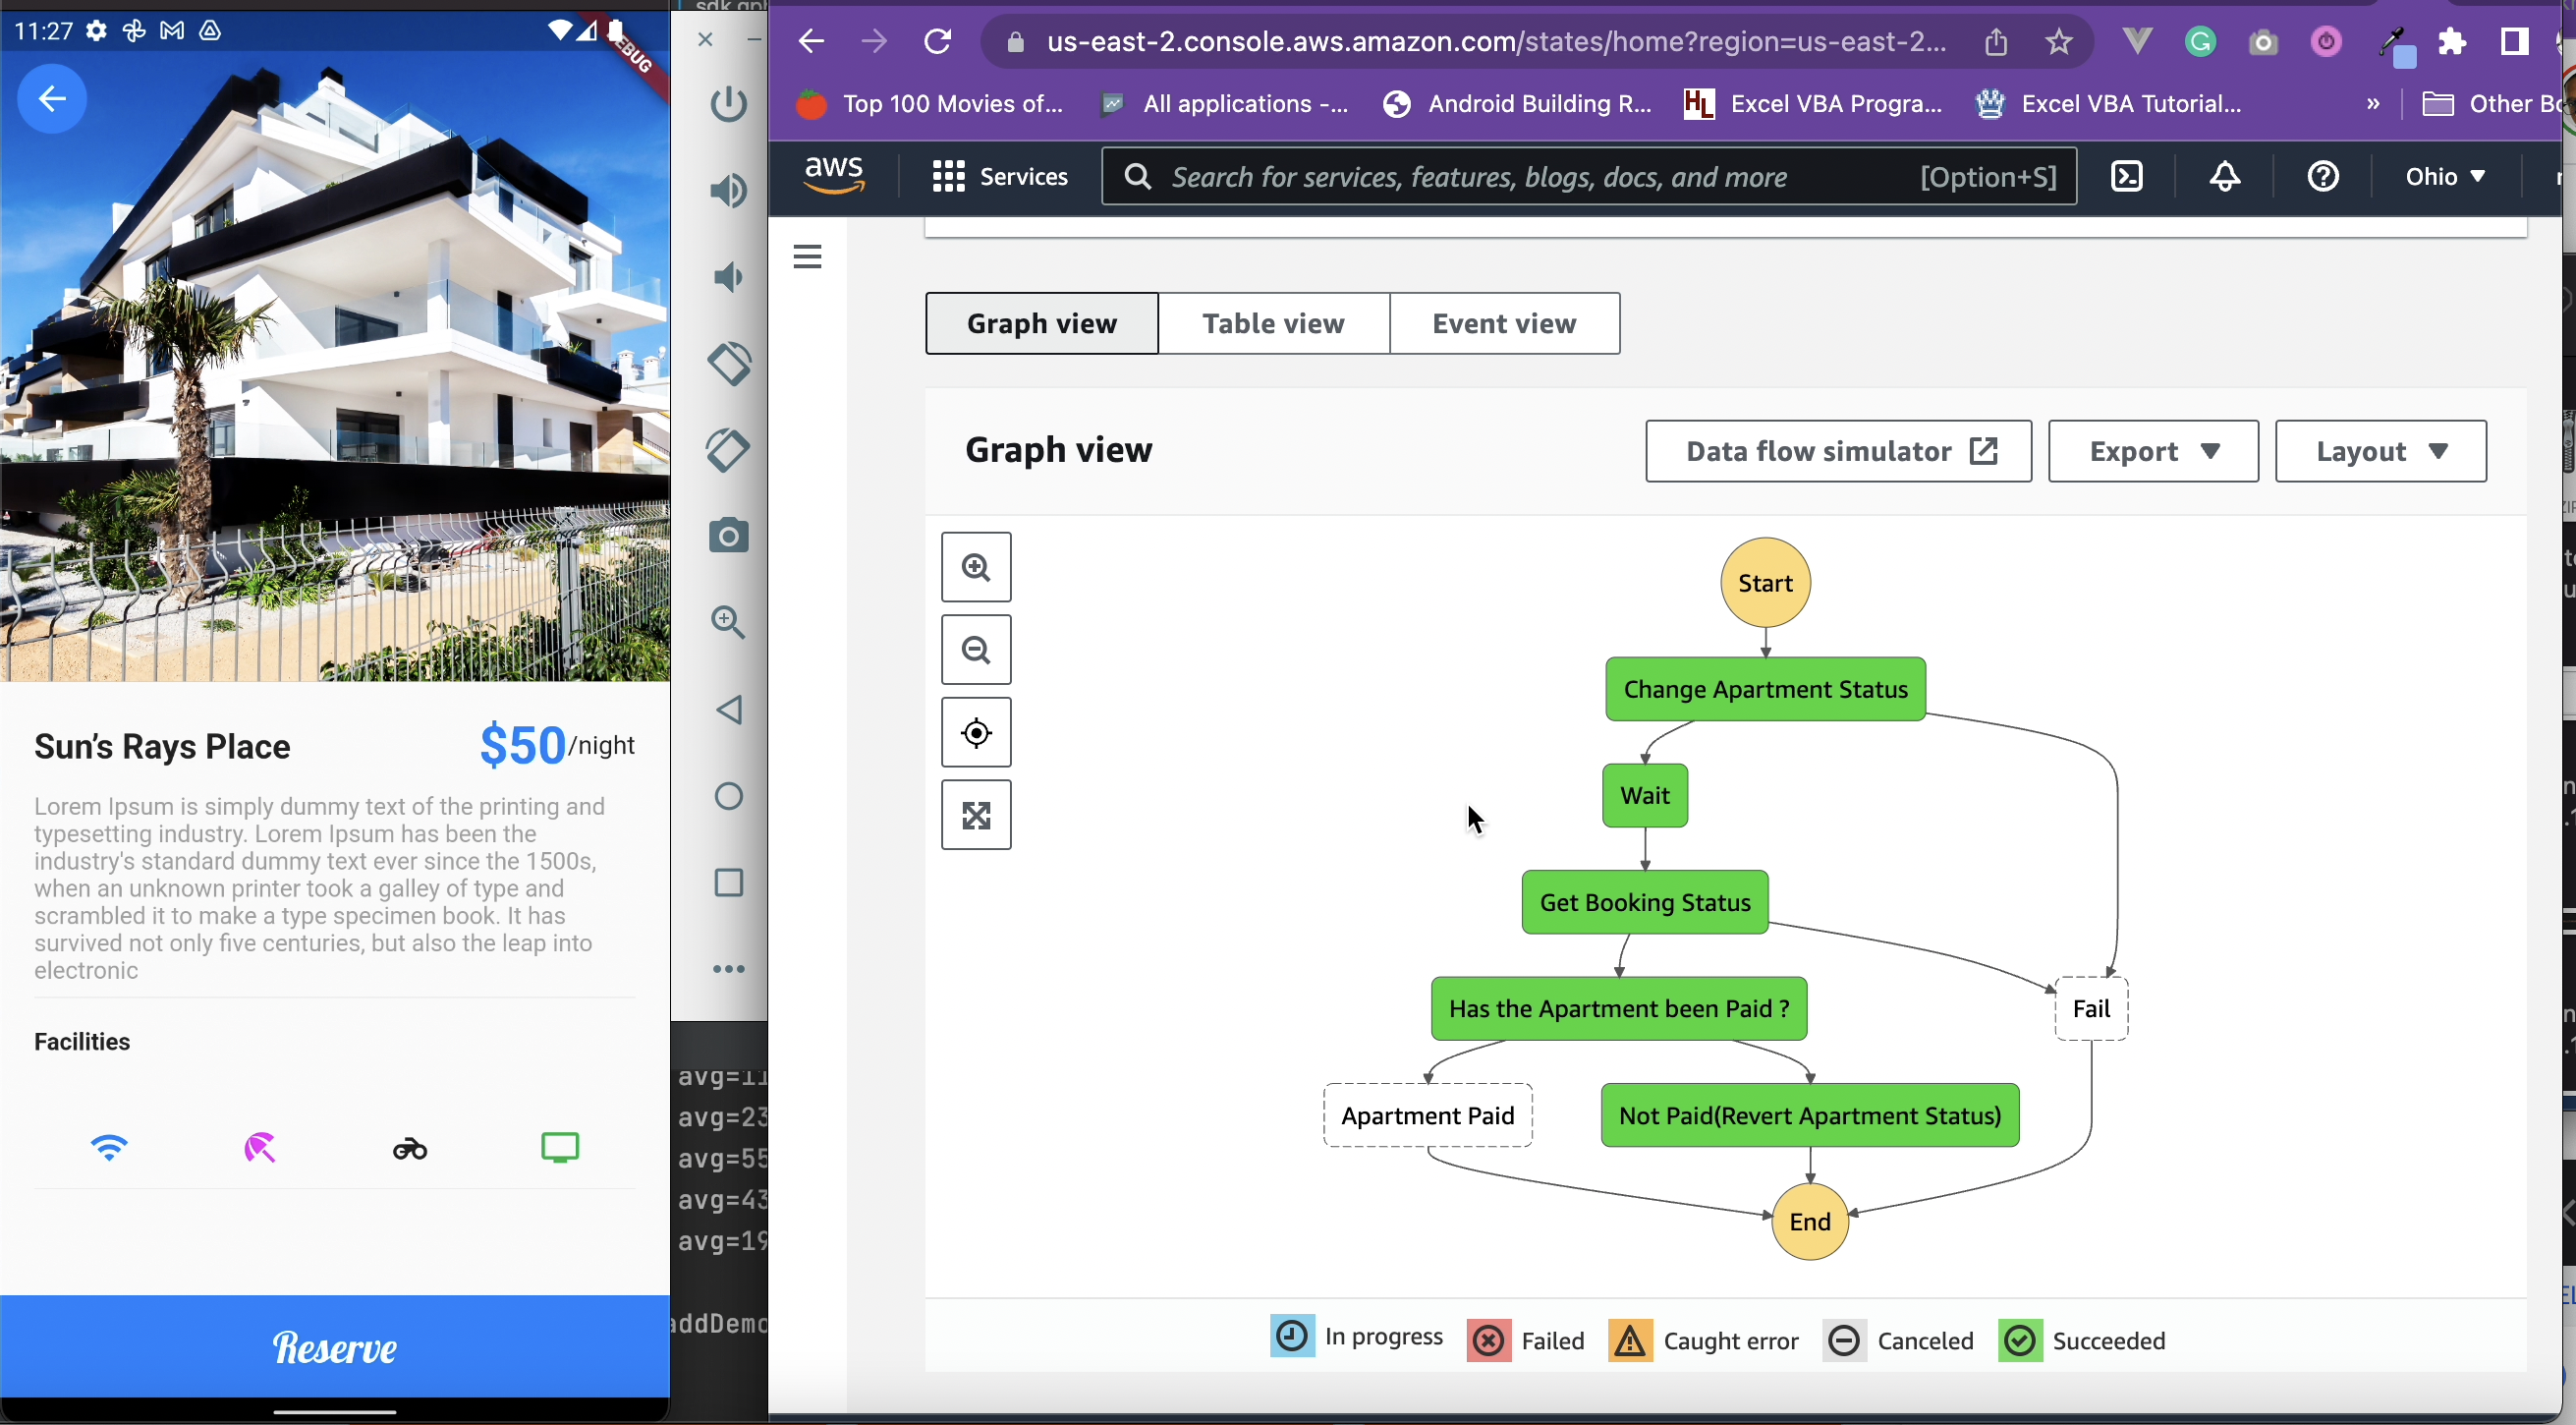
Here’s what the final product looks like.
You can watch the video here
https://drive.google.com/file/d/1_OgzUQ5gXQZJ9vIS1y-iGV9cLfGPieNY/view?usp=sharing
Problem Statement
What are we trying to solve ?
So while building out a bigger system(Apartment Complex Management System) I came across an interesting problem.
I’ll assume that most of us have reserved or booked either an apartment, hotel room, or flight online. For this scenario, let’s go with an apartment. So when you reserve or book an apartment, here’s a breakdown in the simplest form of the series of steps that occur after that:
- The apartment is marked as reserved, probably with a status change. Let’s say the apartment’s status changes from vacant to reserved.
- This apartment is made unavailable for reserving by others for a particular period of time.
- The client(reserver) is required to make payment within that period of time.
- If payment isn’t made within the required timeframe, the reservation is canceled, and the apartment status changes back from reserved to vacant.
- If payment is made, then apartment status changes from reserved to occupied/paid
Building out this business logic using custom code or without using step functions is very possible but inefficient.
Why ?
Because as developers, it’s always best to be on the lookout for tools that’ll help us carryout tasks in an efficient and scalable manner.
The series of steps outlined above serves as a good use case for AWS step functions:
- The sequence of service interaction is important.
- State has to be managed with AWS service calls.
- Decision trees, retries, and error handling logic are required.
Step Functions, Step Functions ……What the Heck is an AWS Step Function 🤔 ?
I’m glad you asked 😂 . Let’s look at a brief overview of what step functions are and how we can leverage its strength and capabilities to build out workflows with ease.
AWS Step Functions is a low code visual workflow service that orchestrates other AWS services and supports common workflow patterns that simplify the implementation of common tasks so developers can focus on higher-value business logic.
In other words “AWS Step Functions lets you coordinate individual tasks into a visual workflow so that you can build and update apps quickly.”
Step functions are written in ASL(Amazon States Language) and are defined as state machines.
These state machines are composed of steps(states).
States can perform a variety of actions in your state machine:
| State | Action |
| Choice | Make a choice between branches of execution |
| Task | Do Some work |
| Pass | Simply pass its input to its output or inject some fixed data |
| Fail or Succeed | Stop an execution with a failure or a success |
| Parallel | Begin parallel branches of execution |
| Map | Dynamically iterate steps |
Input and output processing
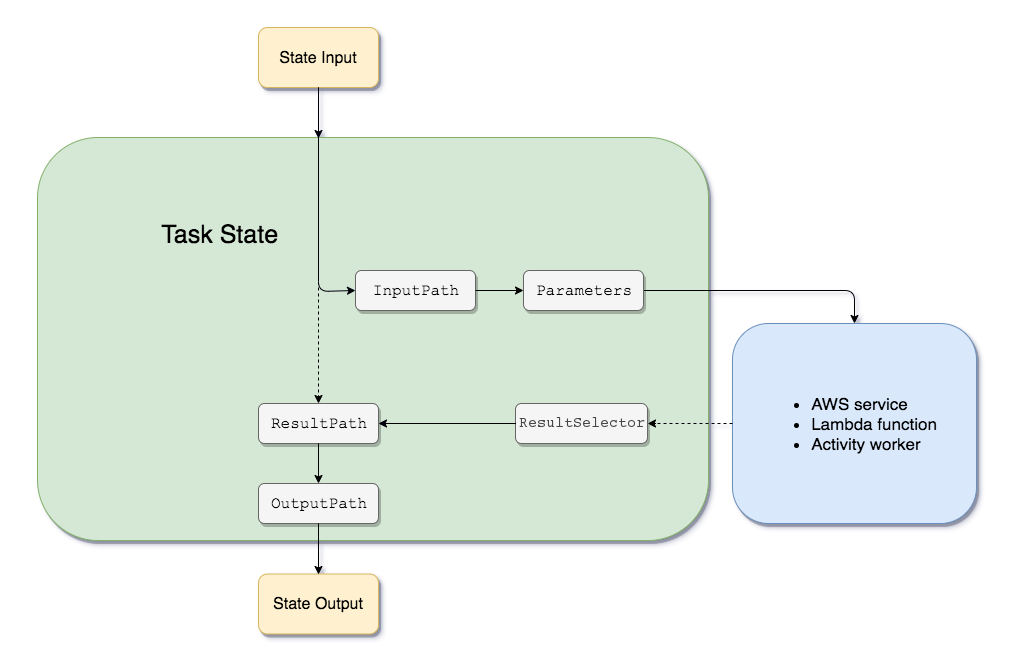
A Step functions execution receives a JSON text as input and passes that input to the first state in the workflow.
Individual states receive JSON as input and usually pass JSON as output to the next state.
ASL provides tools to filter, manipulate and transform input and output between states.
Types of Workflows
Standard Workflows
- Ideal for long-running, durable, and auditable workflows.
- Can last for up to 1 year.
- Supports all patterns such as sync or callback pattern.
Express Workflows
- Ideal for high-volume event processing workloads such as IoT data ingestion, data streaming etc.
- Can last for only 5 minutes
- Doesn’t support Sync or the callback pattern
Step functions integrate with 200+ supported AWS services and support 9000+ API Actions.
Please read more about step functions here
https://docs.aws.amazon.com/step-functions/latest/dg/welcome.html
https://catalog.workshops.aws/stepfunctions/en-US/
Scenario 1
(Using the Step functions visual Studio editor on the AWS Console)
Solutions Architecture
Assumptions
Let’s assume there’s one DynamoDB table with apartmentId’s and apartmentStatus.
Let’s also assume that the default value for apartmentStatus is vacant.
With both of those assumptions in mind, let’s get started building out the workflow.
Ready, Steady, Go
Since we made an assumption of already having an available DynamoDB database with a list of apartments, let’s go ahead and create that in the aws console.
Sign in to your aws console and type “DynamoDb” in the search box
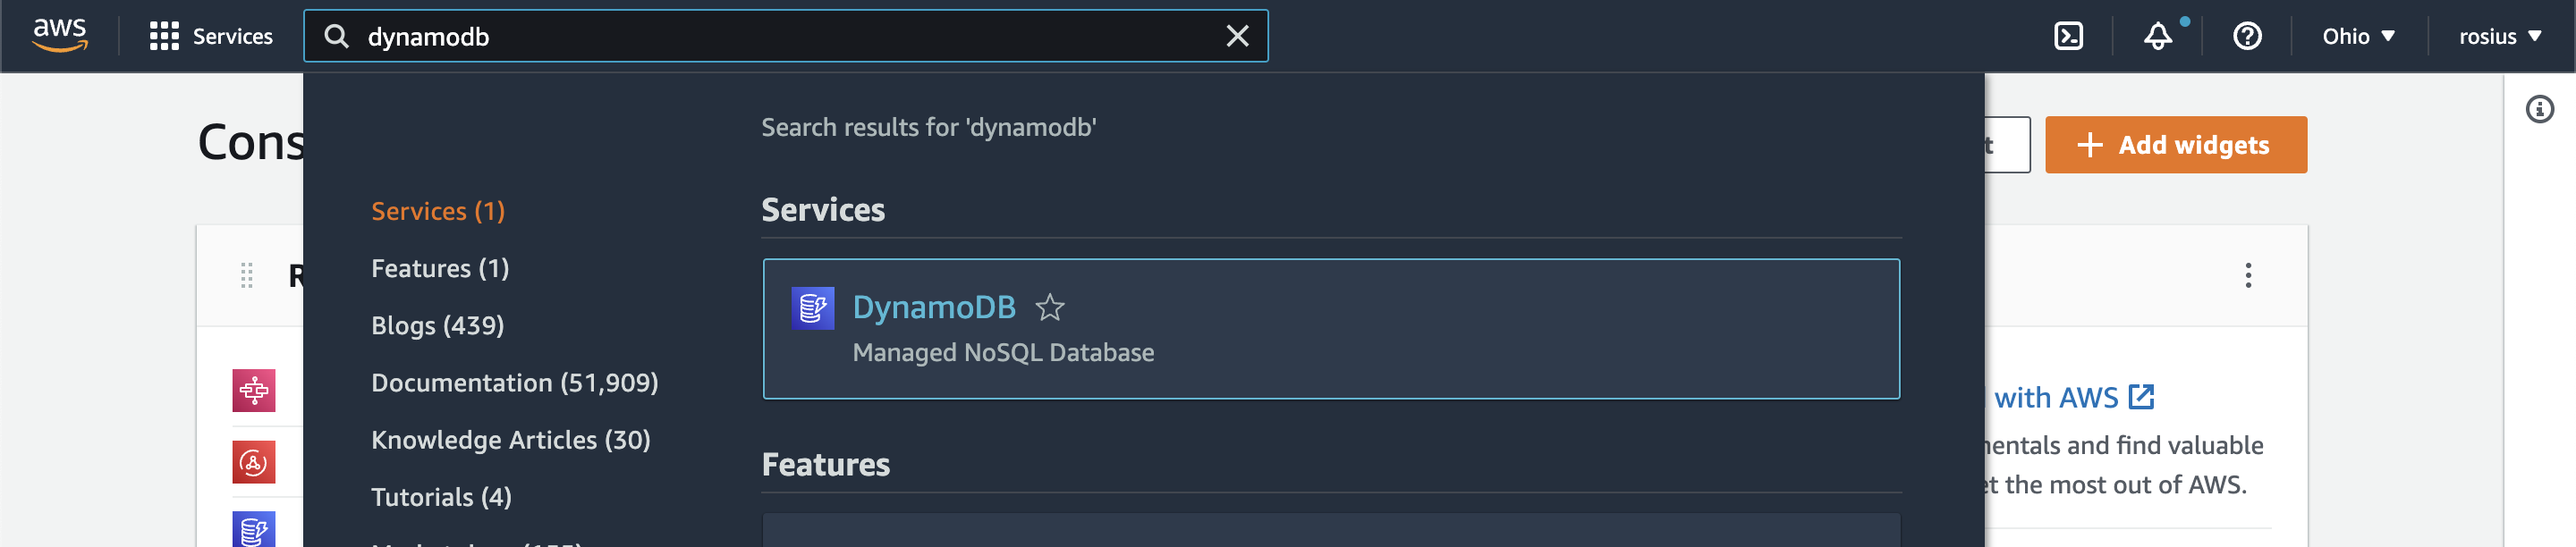
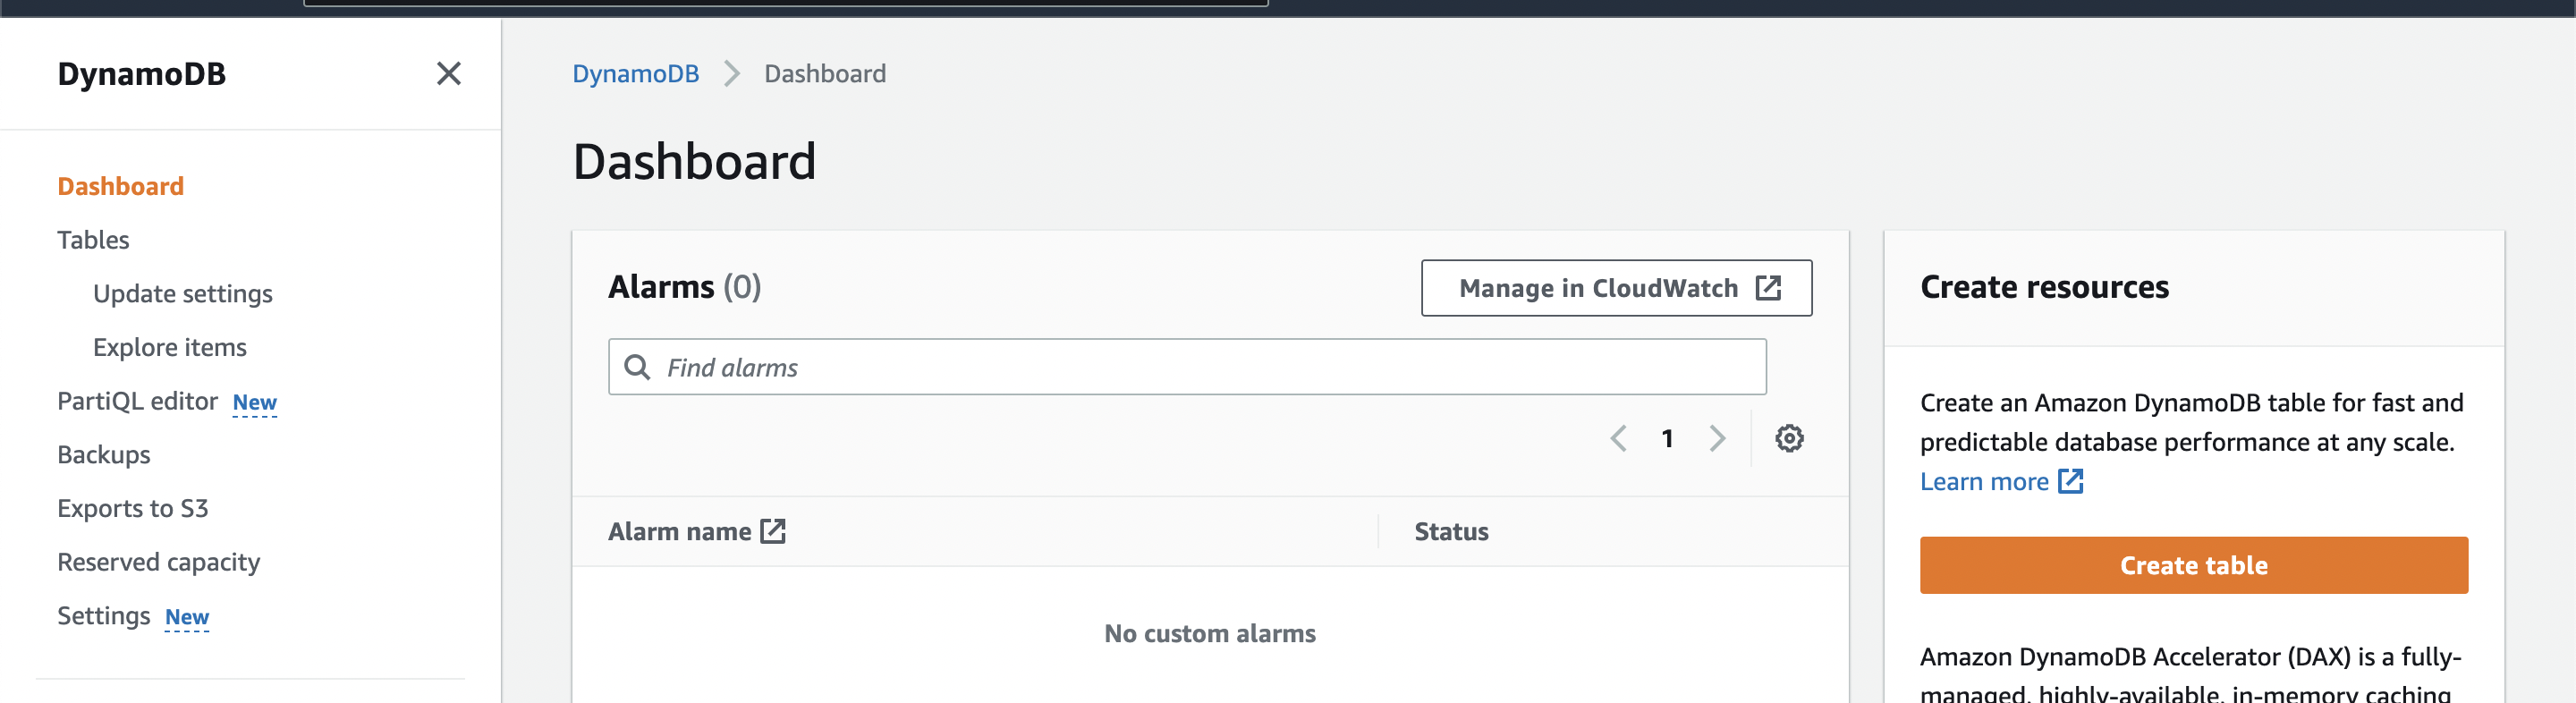
Click on the DynamoDB menu, and on the next screen, click the create table orange button on the far right.
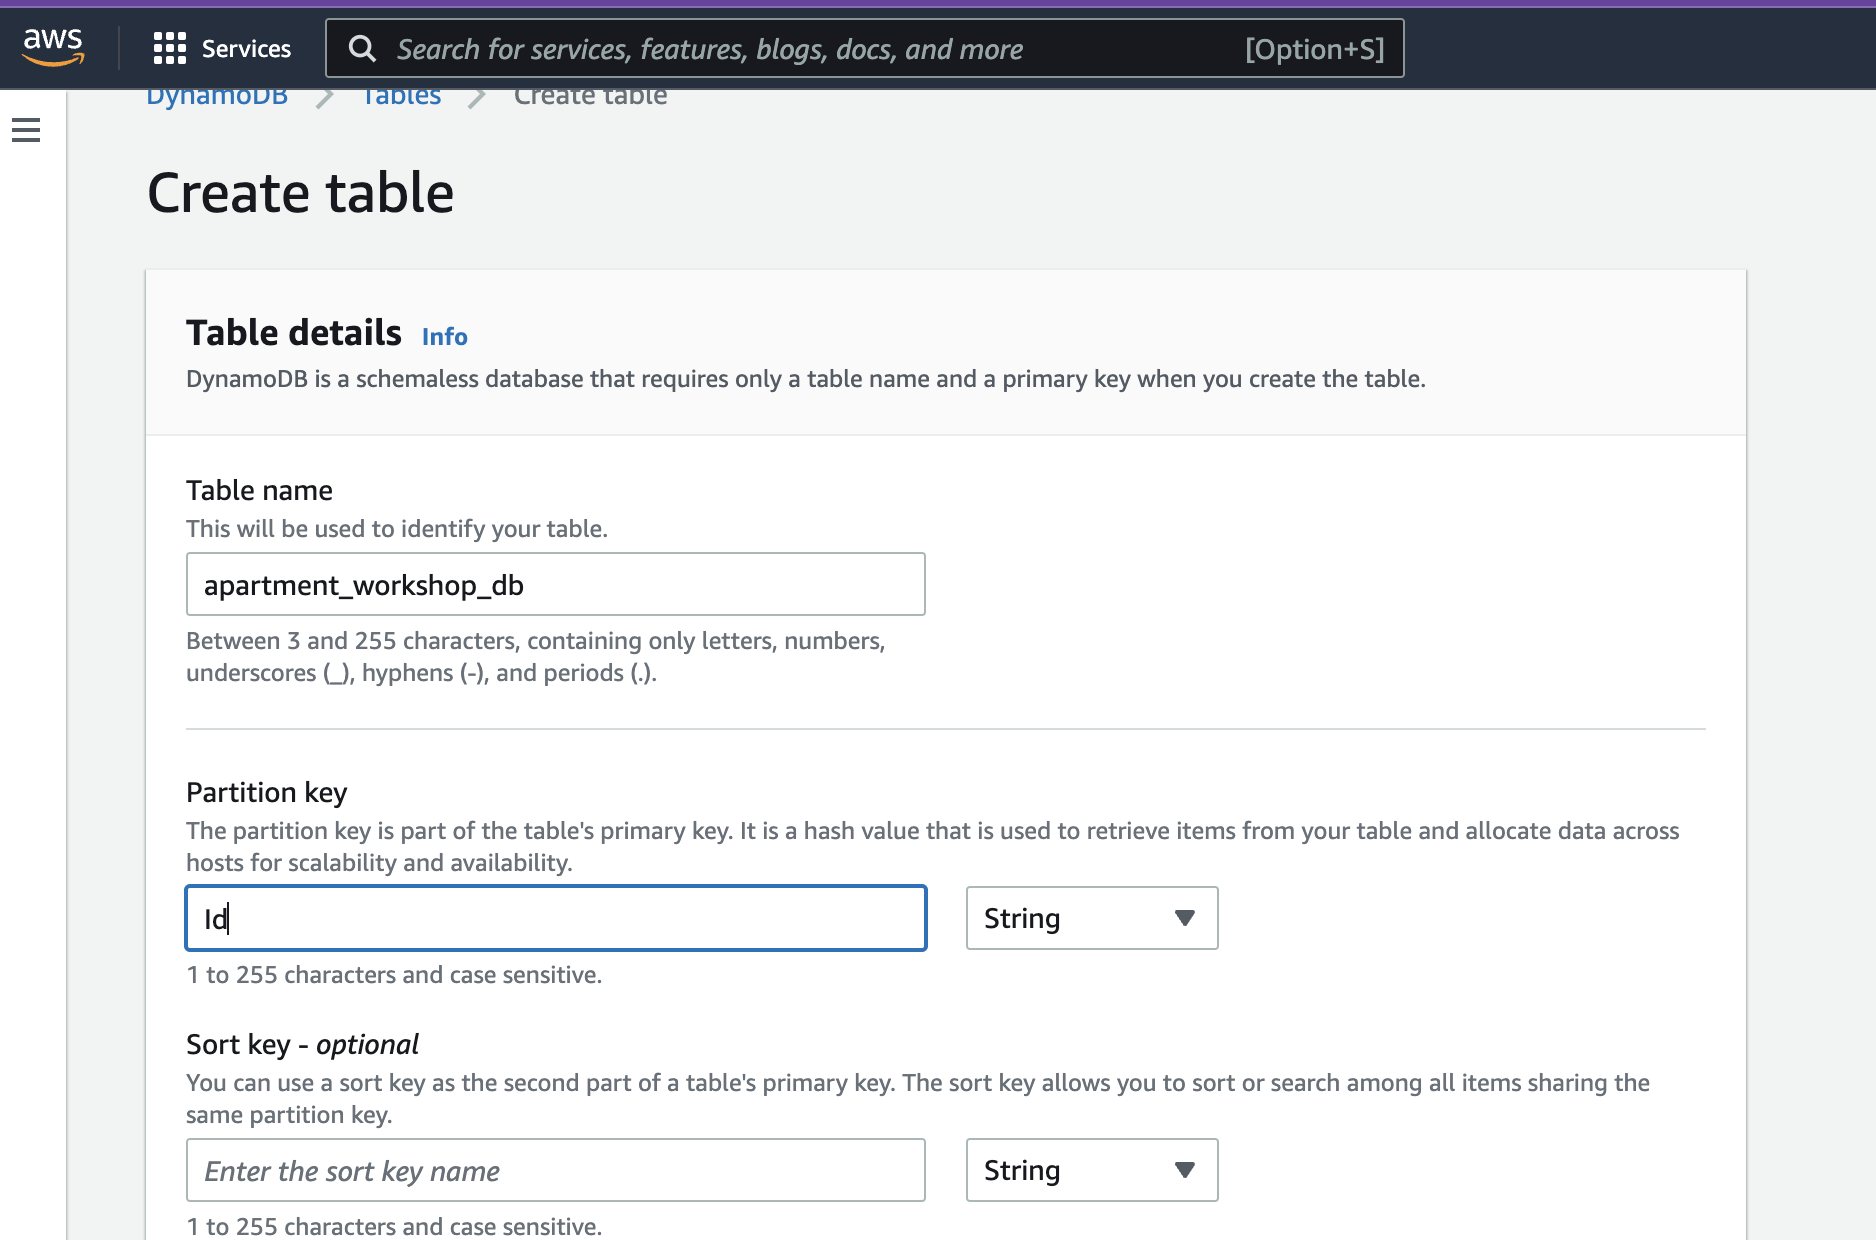
In the create table screen, enter a friendly DynamoDB table name.
For the partition key, enter Id and leave the rest as defaults.
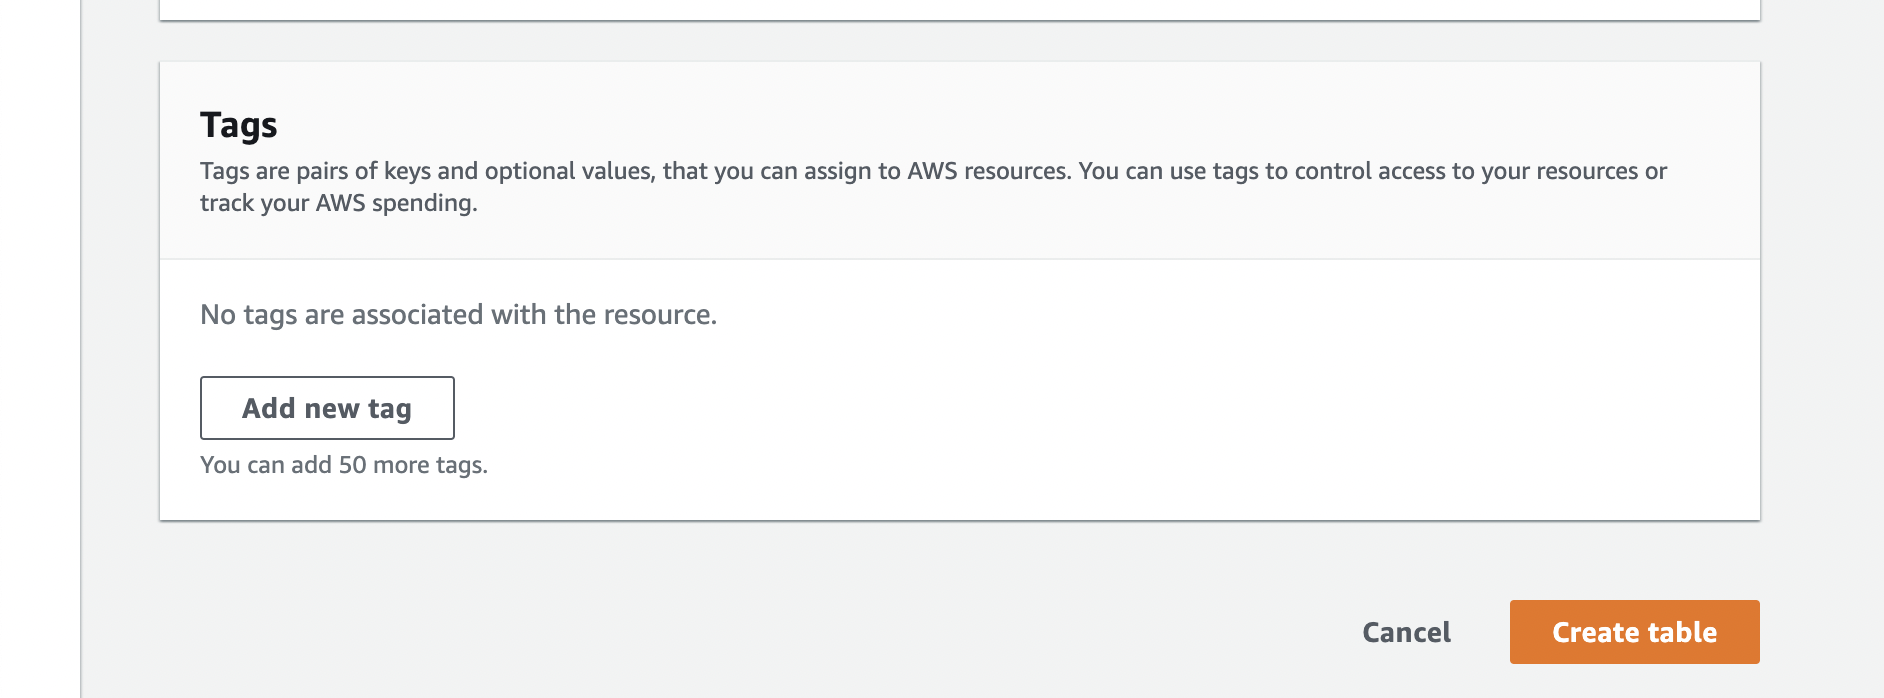
Scroll down to the bottom of the screen and click Create table.
 Once created, click on the table name and open up the table.
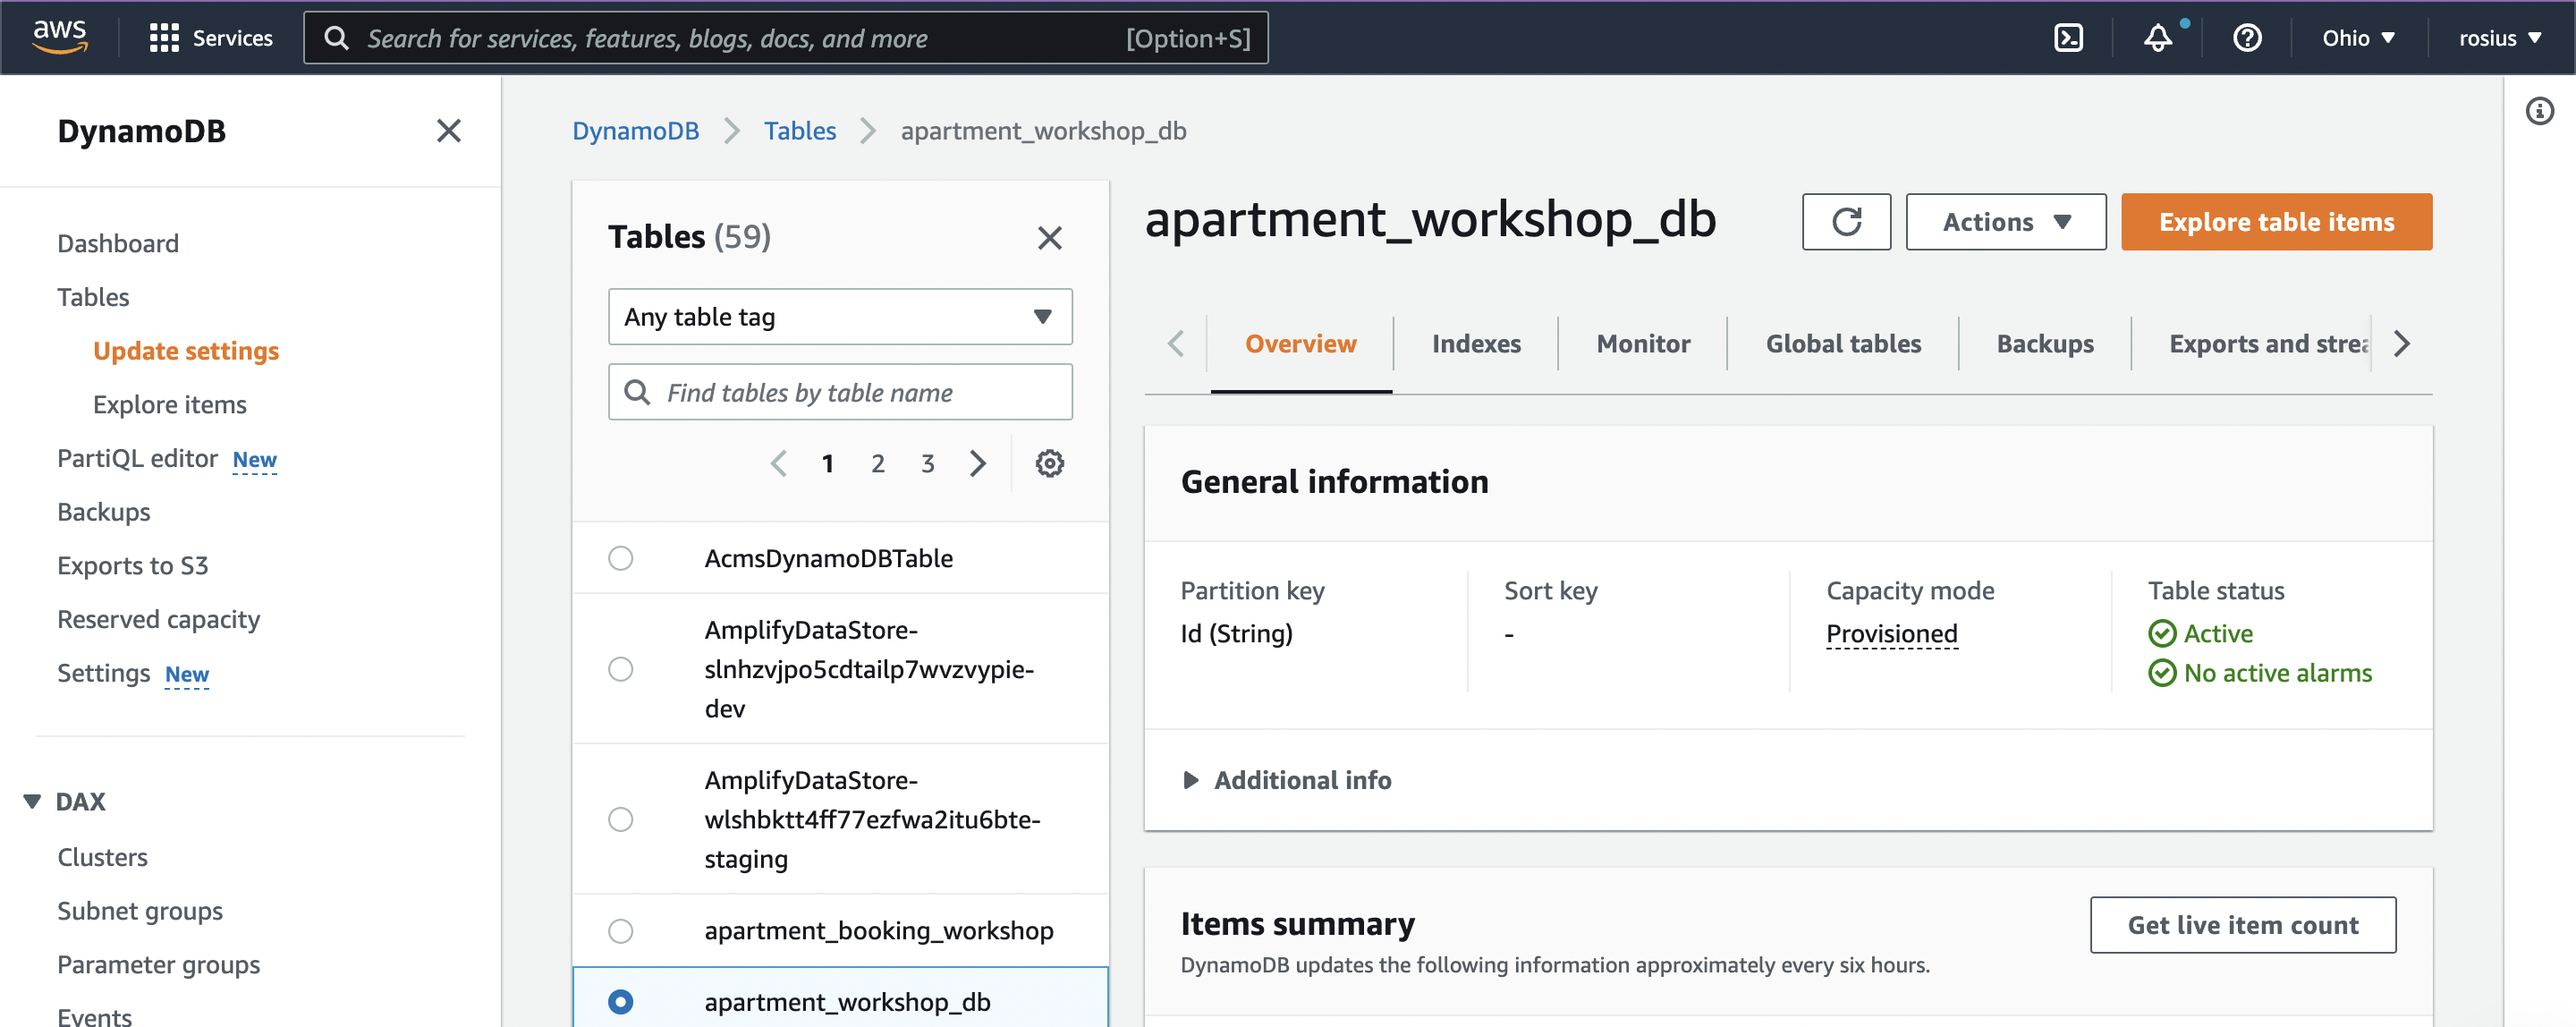
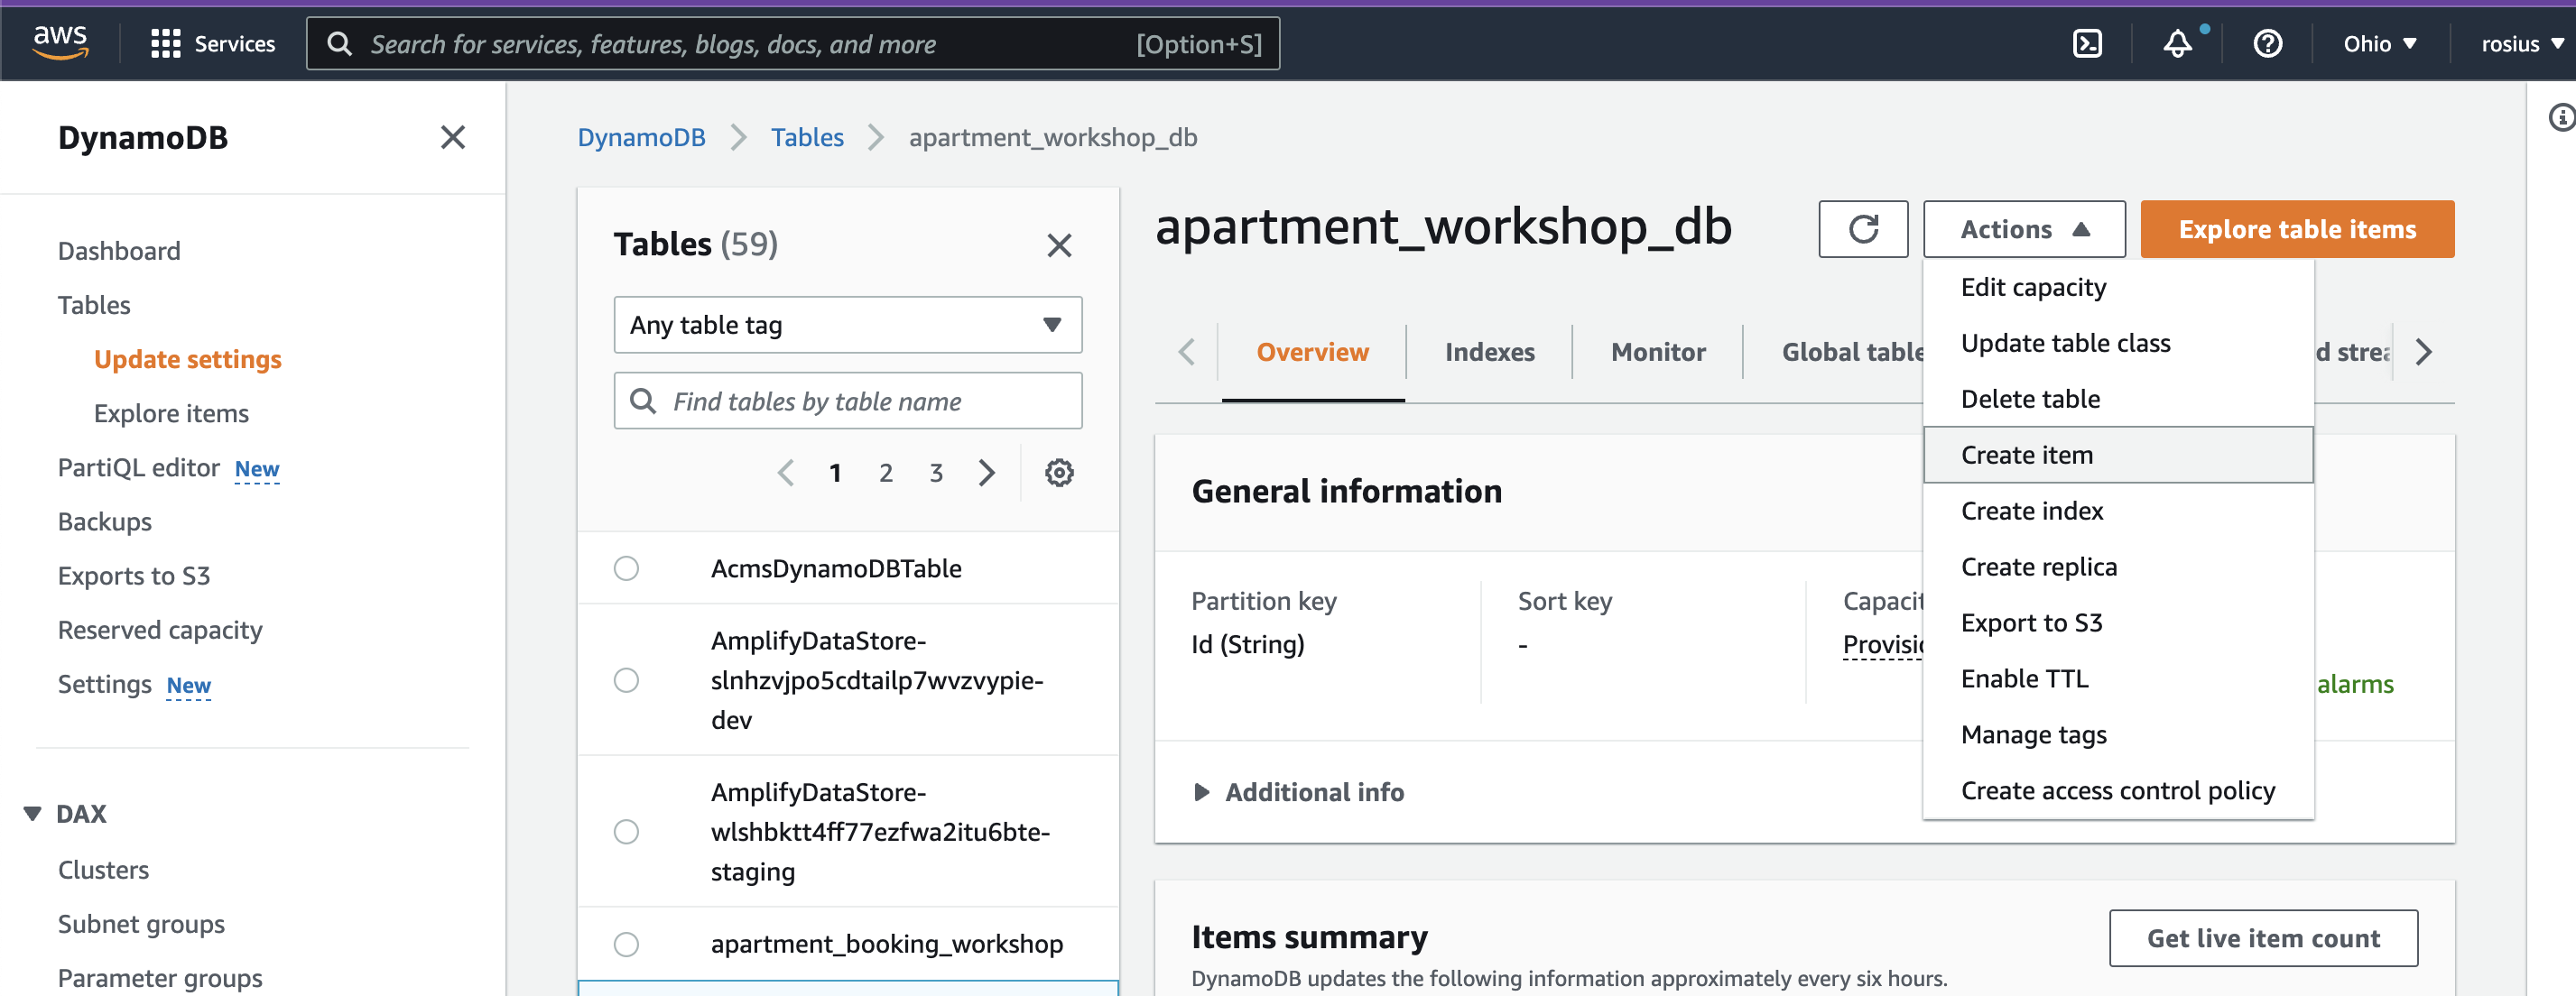
At the top right-hand corner of the screen, click on actions and select Create Item from the drop-down menu.
We are about to create our first vacant apartment. So we’ll add the apartmentId and status of the apartment.
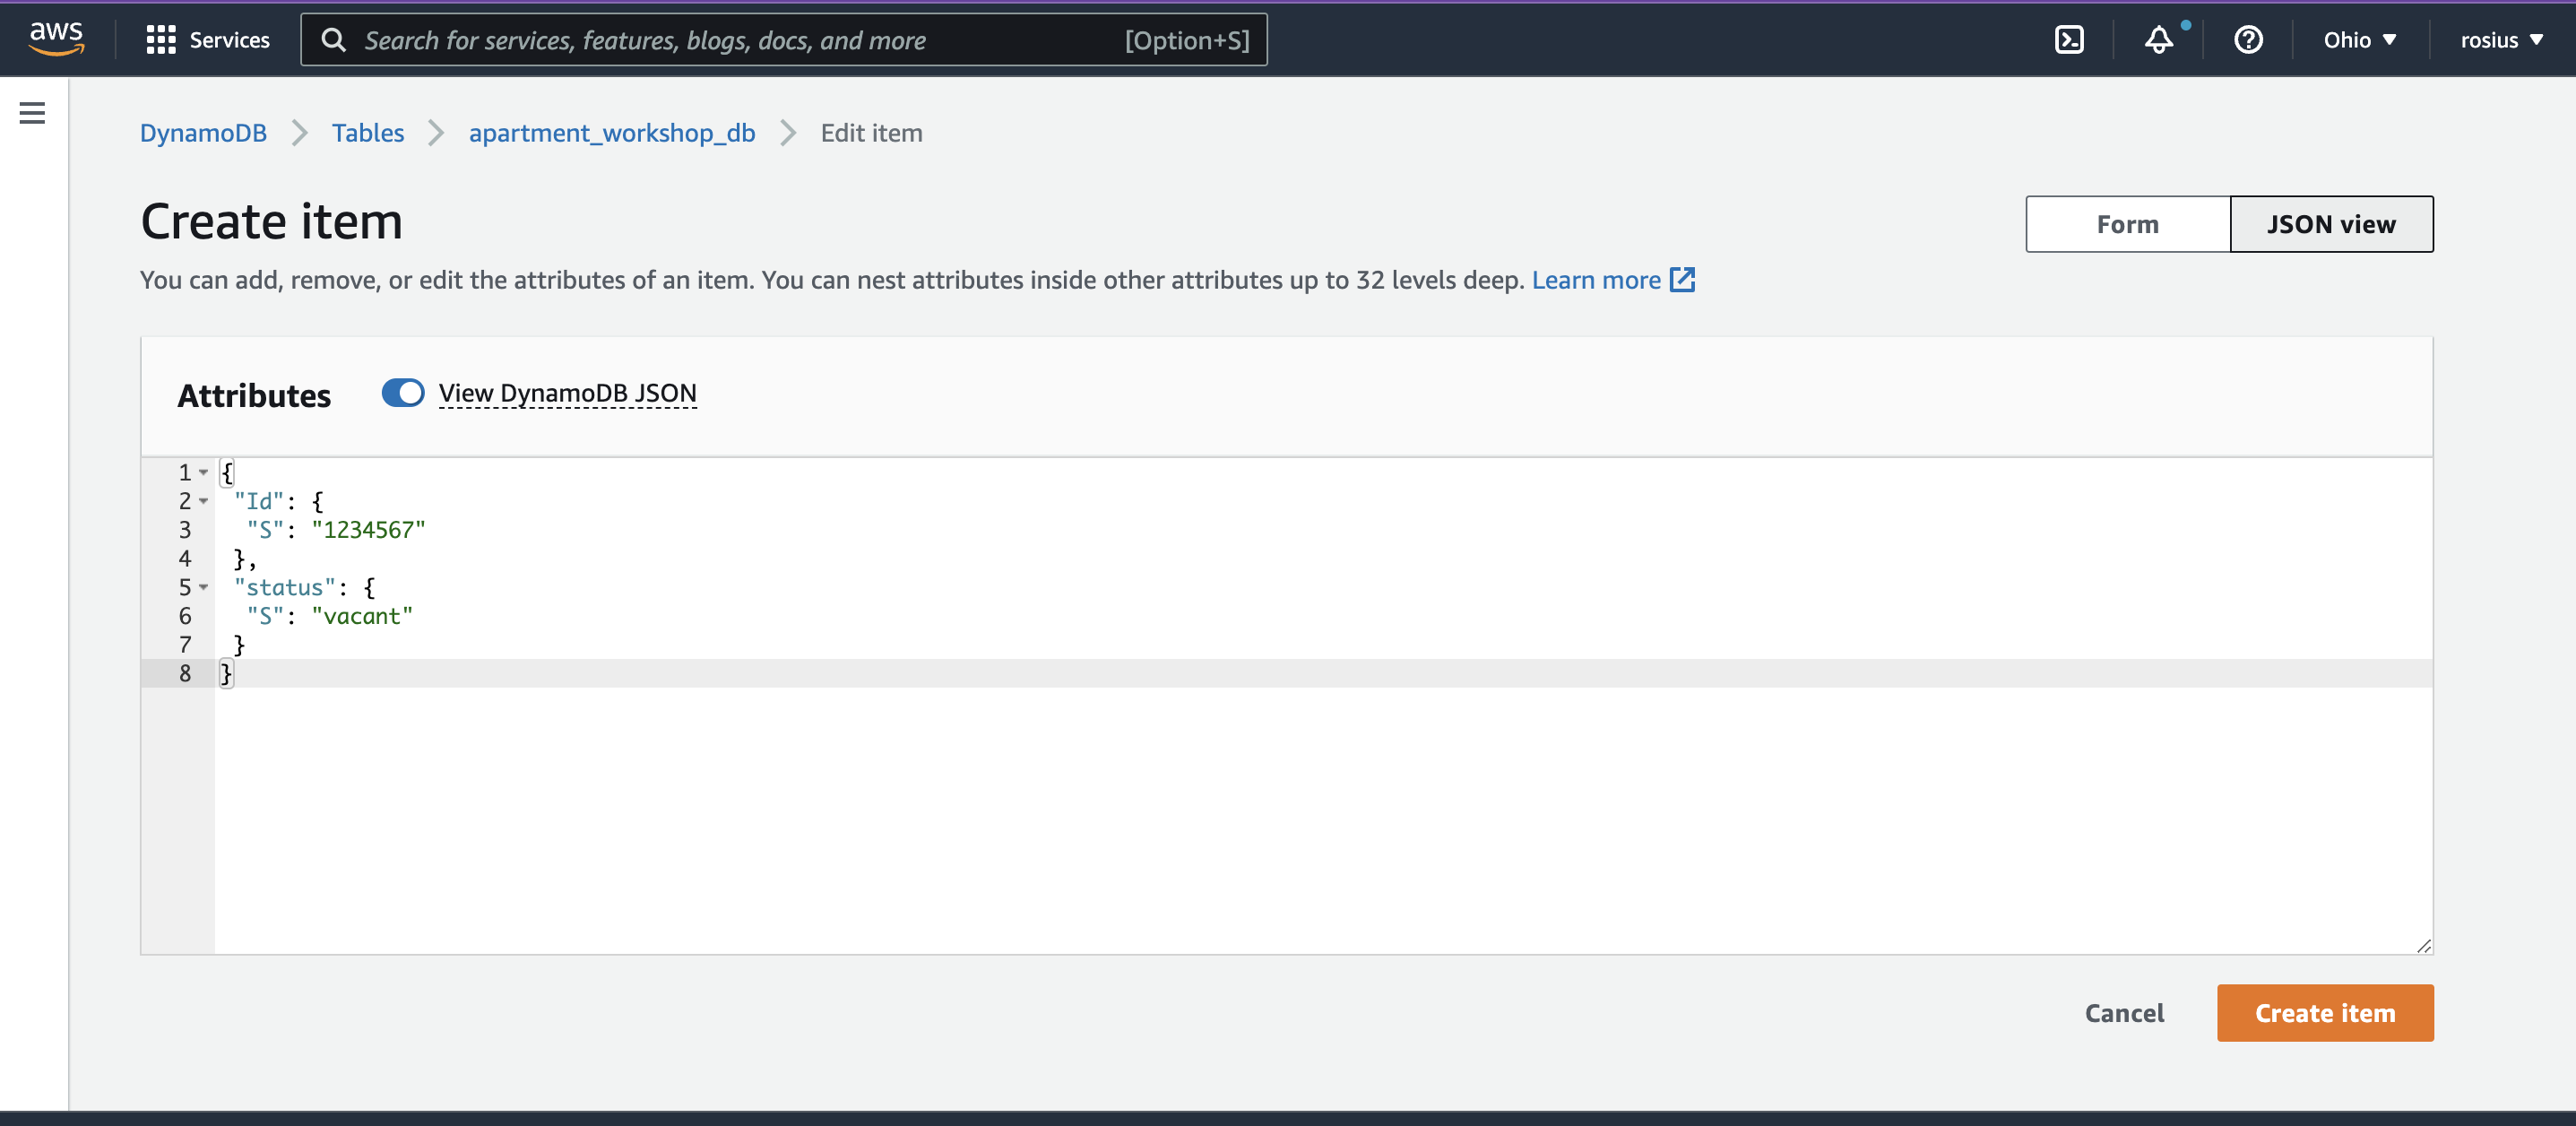
Click “Create item” and confirm the item is actually created in your table.

That’s it for the database; let's move on to creating the workflow in StepFunctions now.
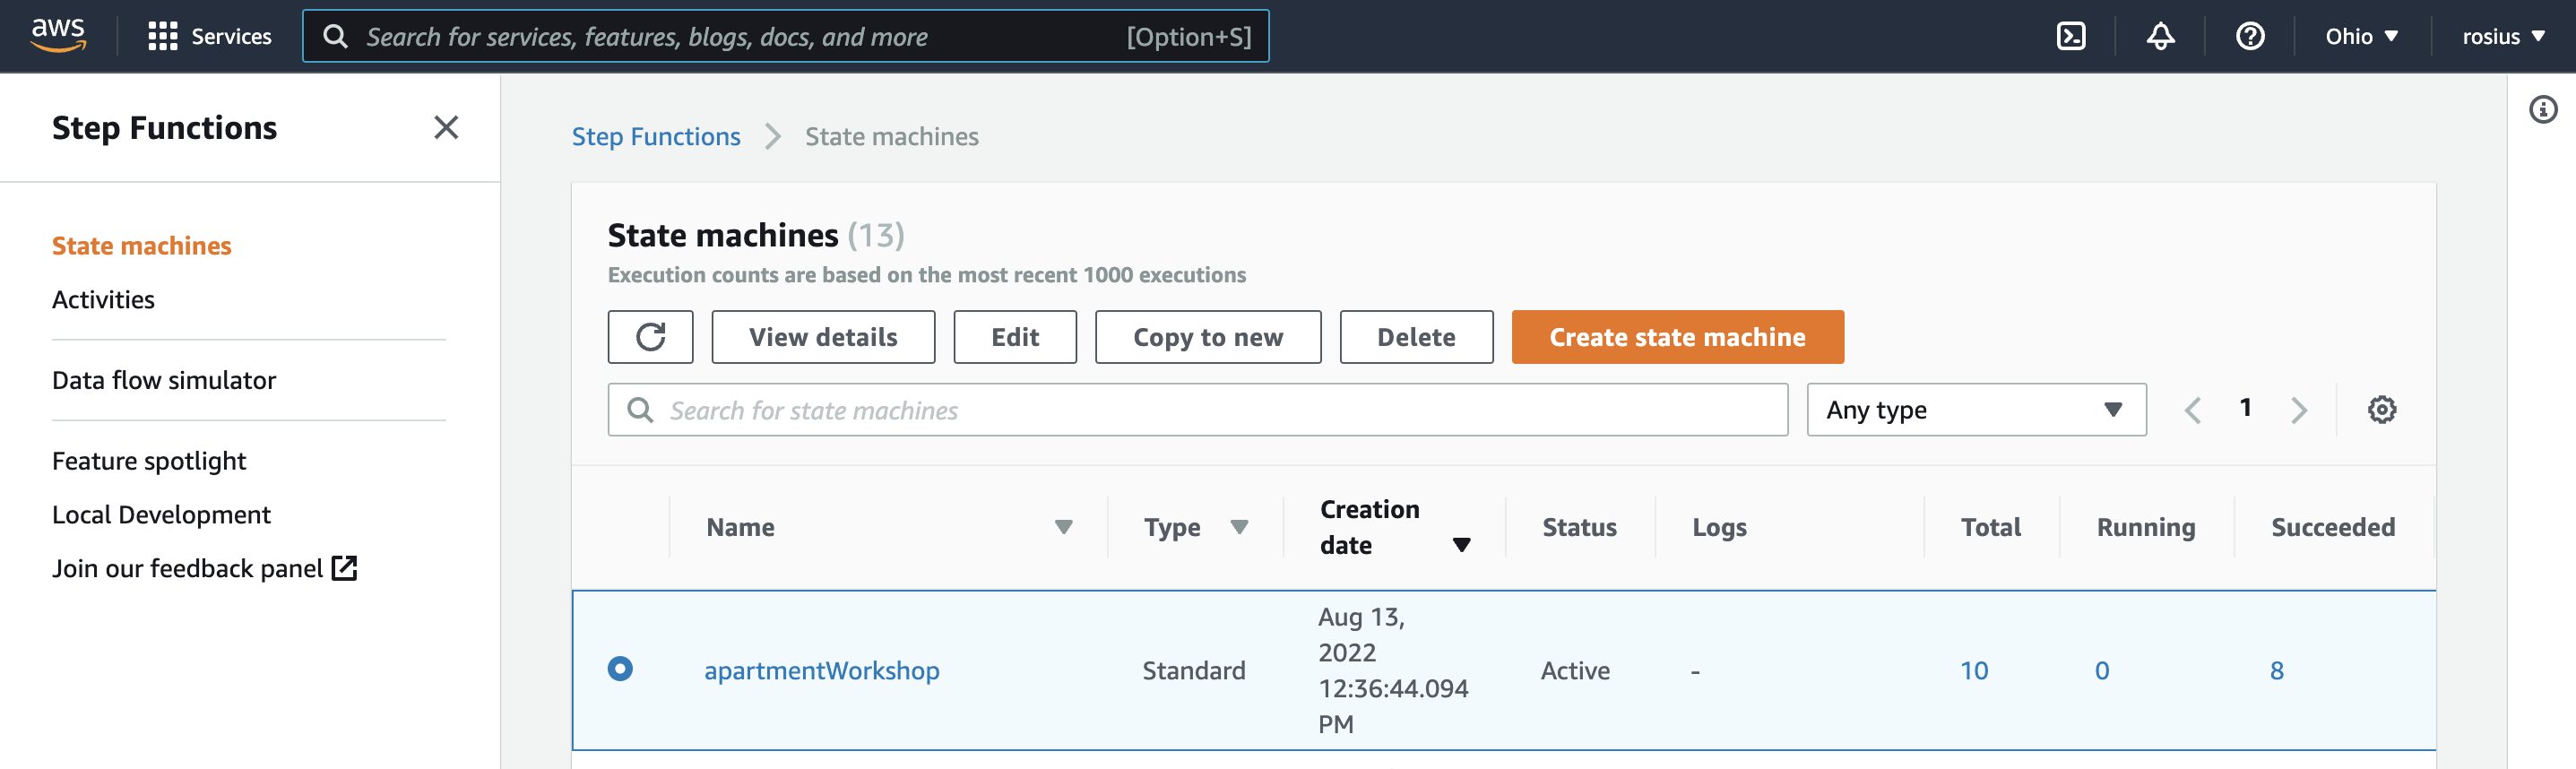
From the search box, type in “step functions” and click on it in the services menu, as shown below.

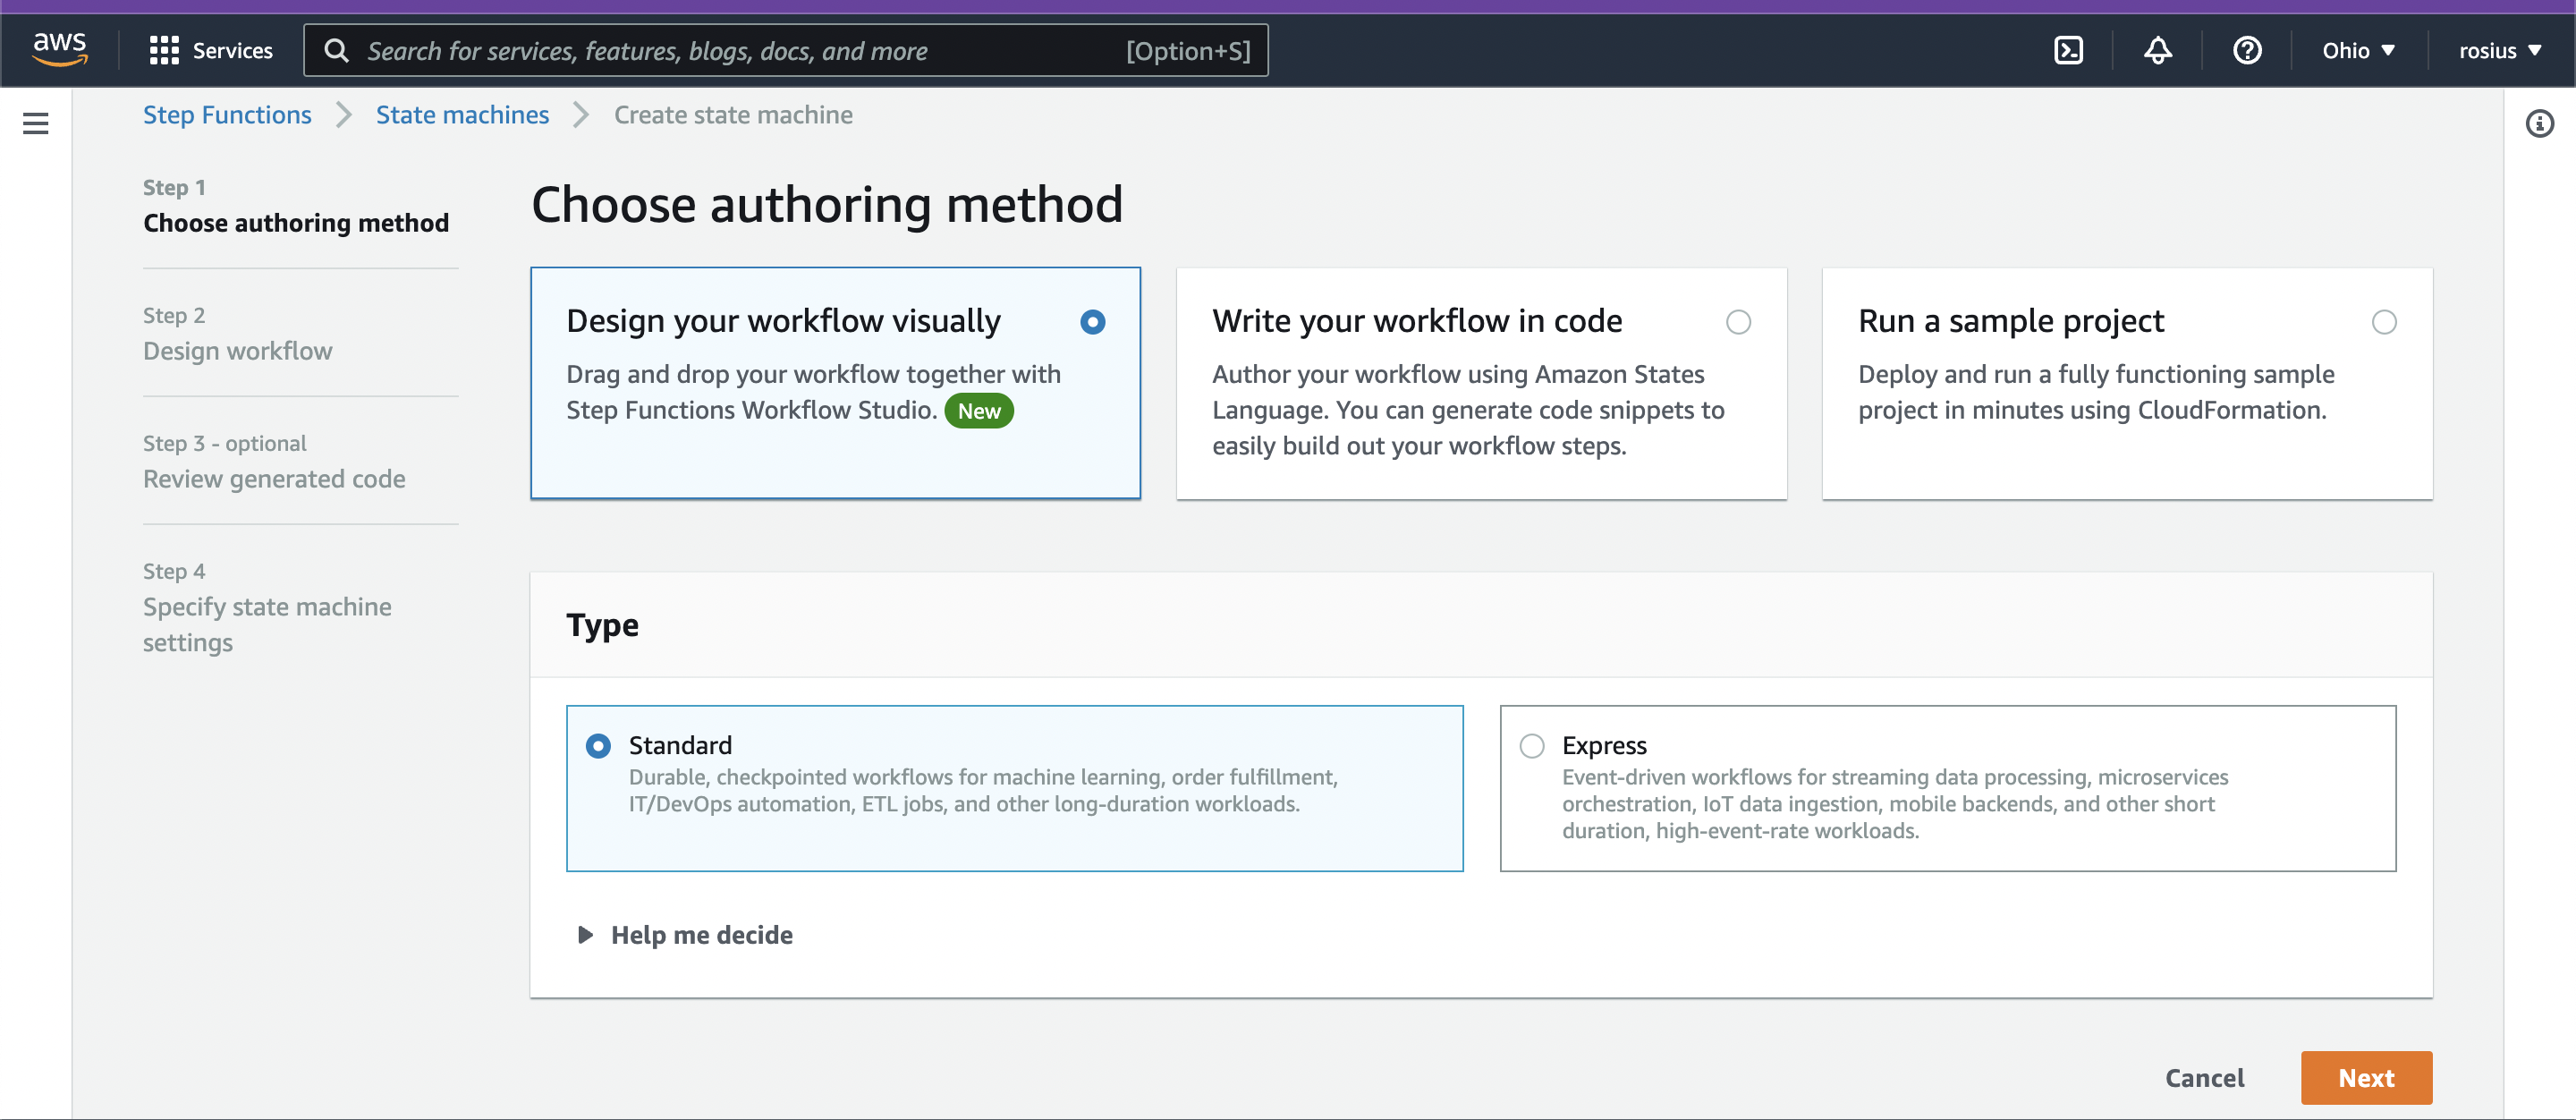
On the next screen, click on Create State Machine
The step functions workflow is a long-running task. So by default, we’ll go with the Standard option and build the workflow visually.
So in the Create State Machine screen, leave the defaults as-is and click next. As shown below
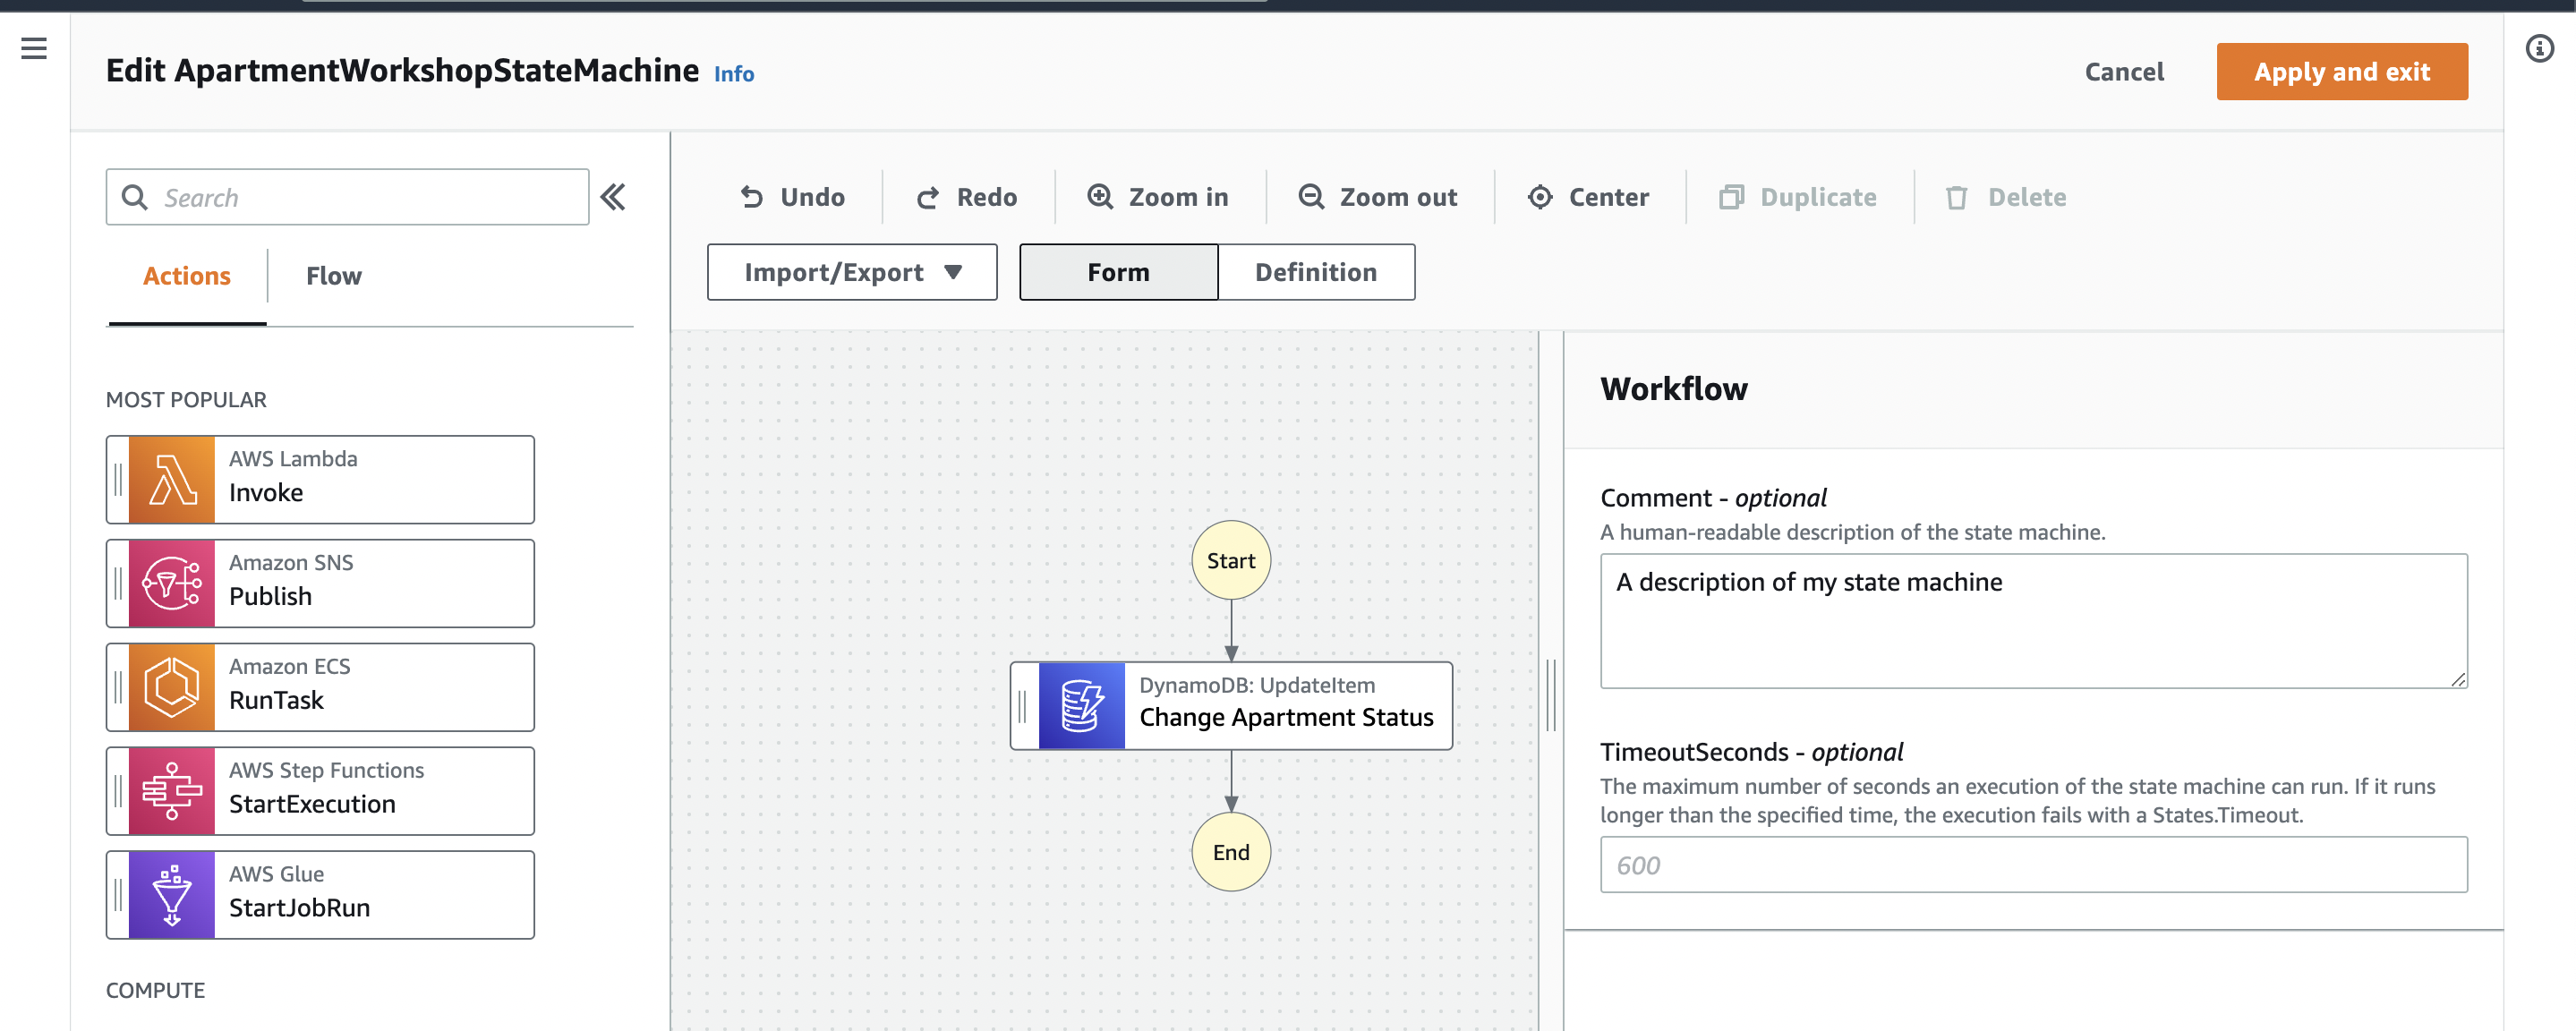
In the Design Workflow Screen, let’s talk about a couple of points:
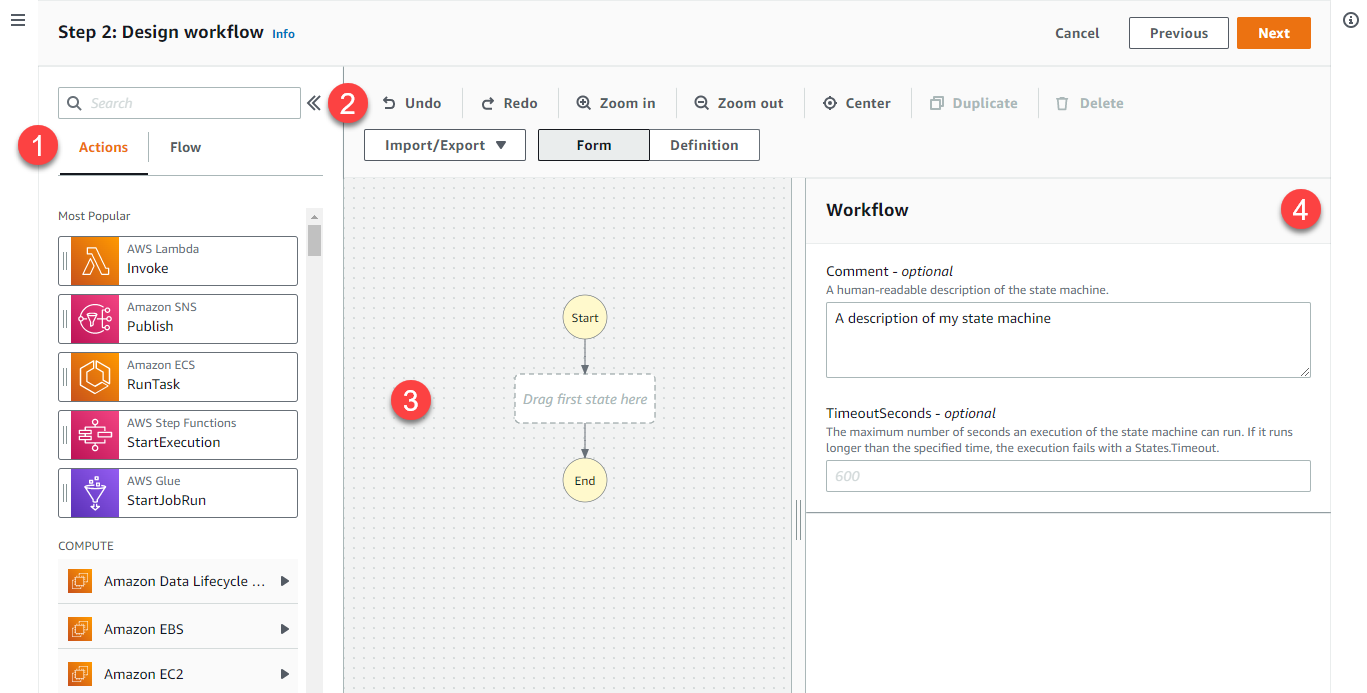
On this tab, you can choose between Actions and Flow. Actions represent steps you can take with AWS services, such as invoking an AWS Lambda function. Flow shows options to manage control flow logic, such as choice states or parallel logic.
The toolbar at the top enables you to undo or redo changes or change the layout of the workflow visualization.
The workflow visualization shows a flowchart of the current workflow. You can click on elements in this flow and drag and drop to make changes.
The right panel shows options for the currently selected element. In a new workflow like this, you can set a comment or a timeout value for the entire workflow.
Reserve an Apartment
Let’s begin dragging and dropping elements into the visual builder.
The first step is letting the client reserve an apartment. Meaning that the apartment status would have to change from vacant to reserved.
Therefore, we’ll be using a DynamoDB UpdateItem task to do the update based on a Json input.
To begin, select the Action tab and then drag a DynamoDB UpdateItem task from the menu on the left to the box in the workflow visualization that reads Drag first state here.
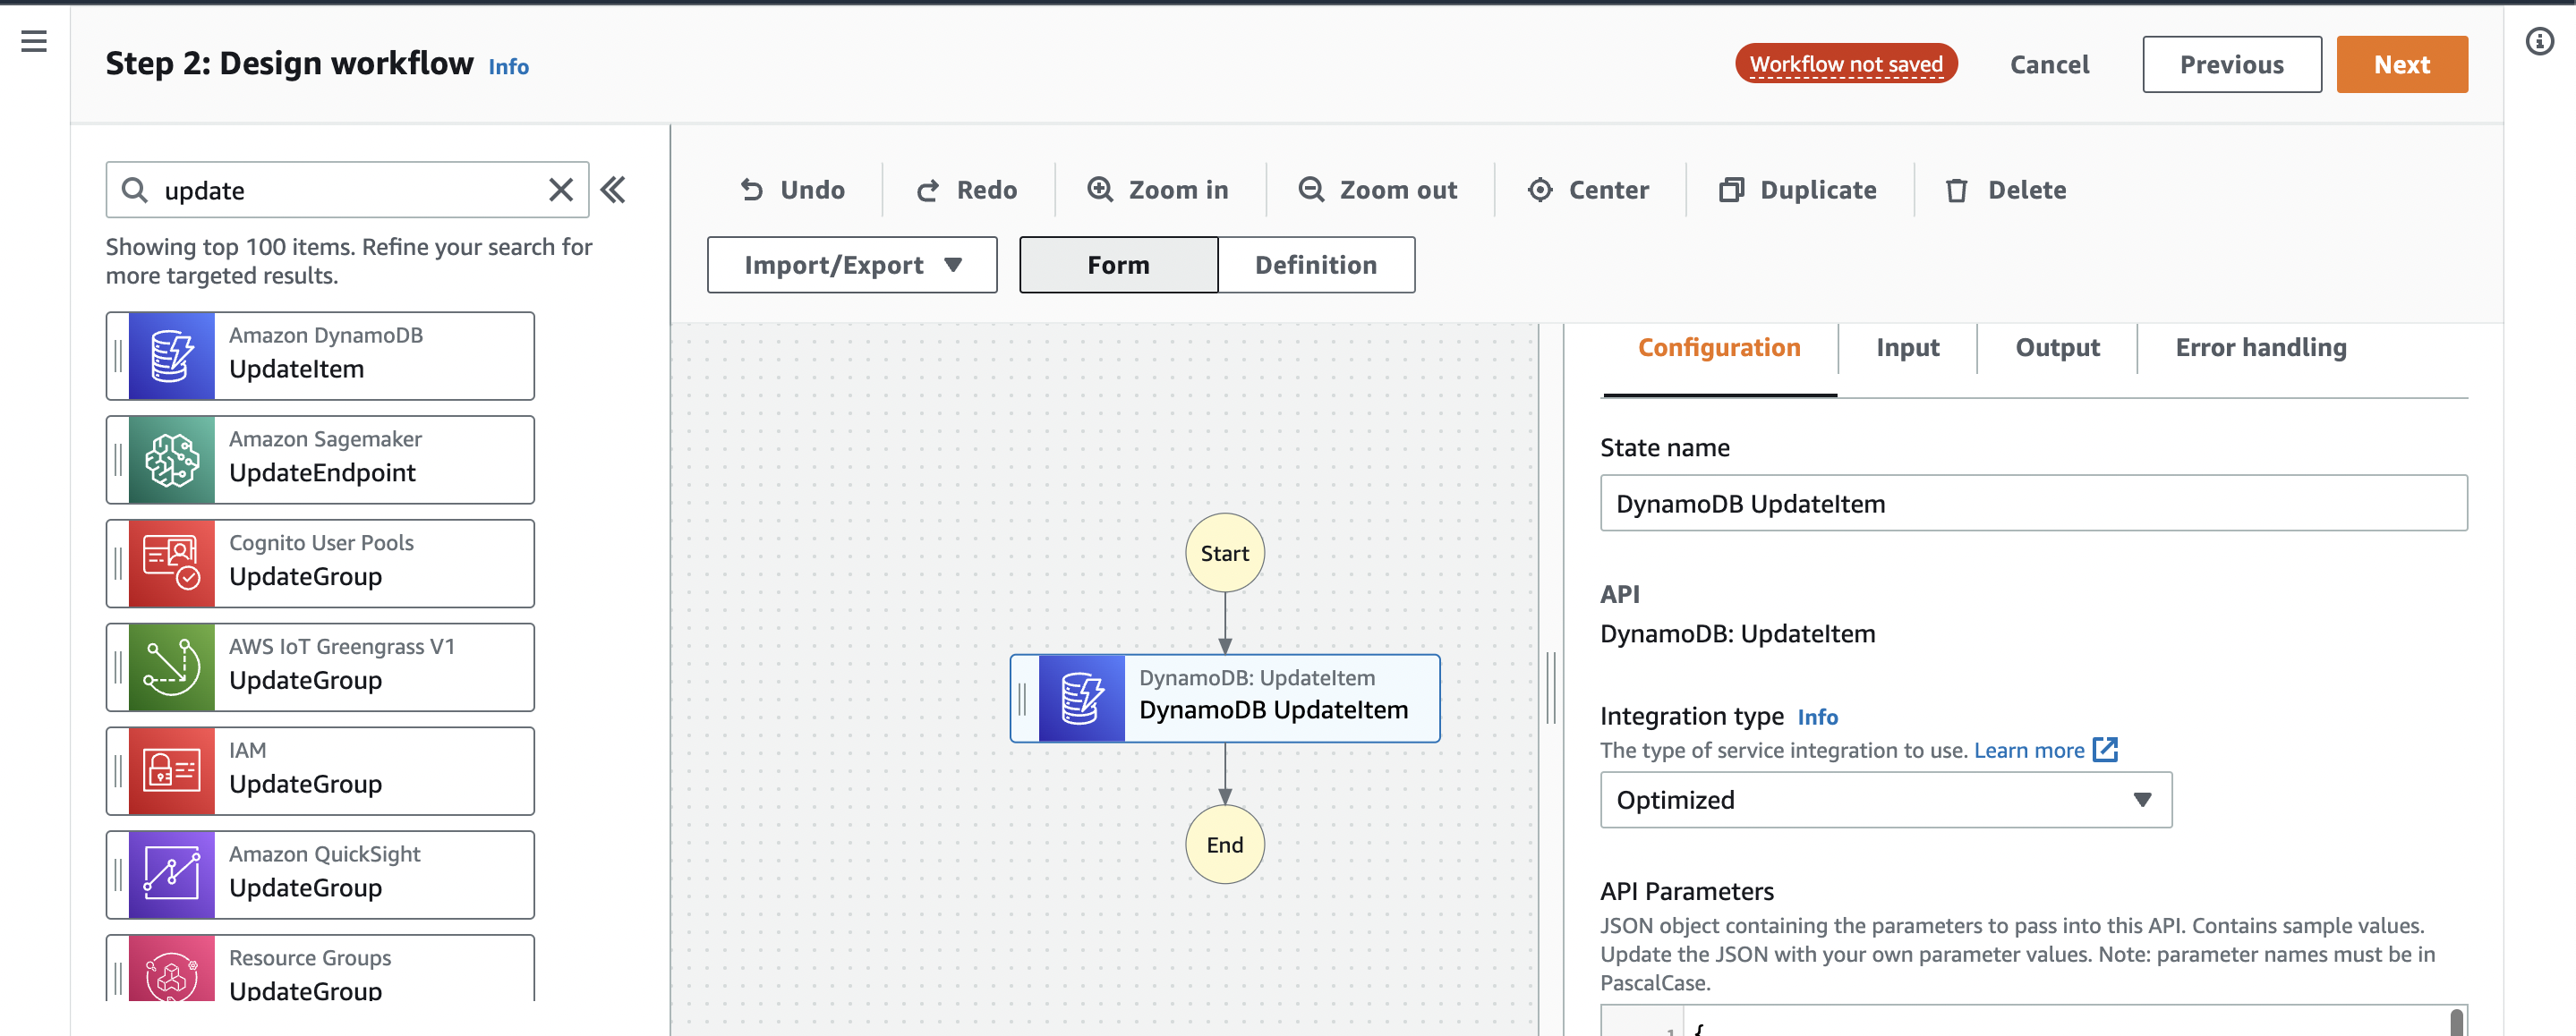
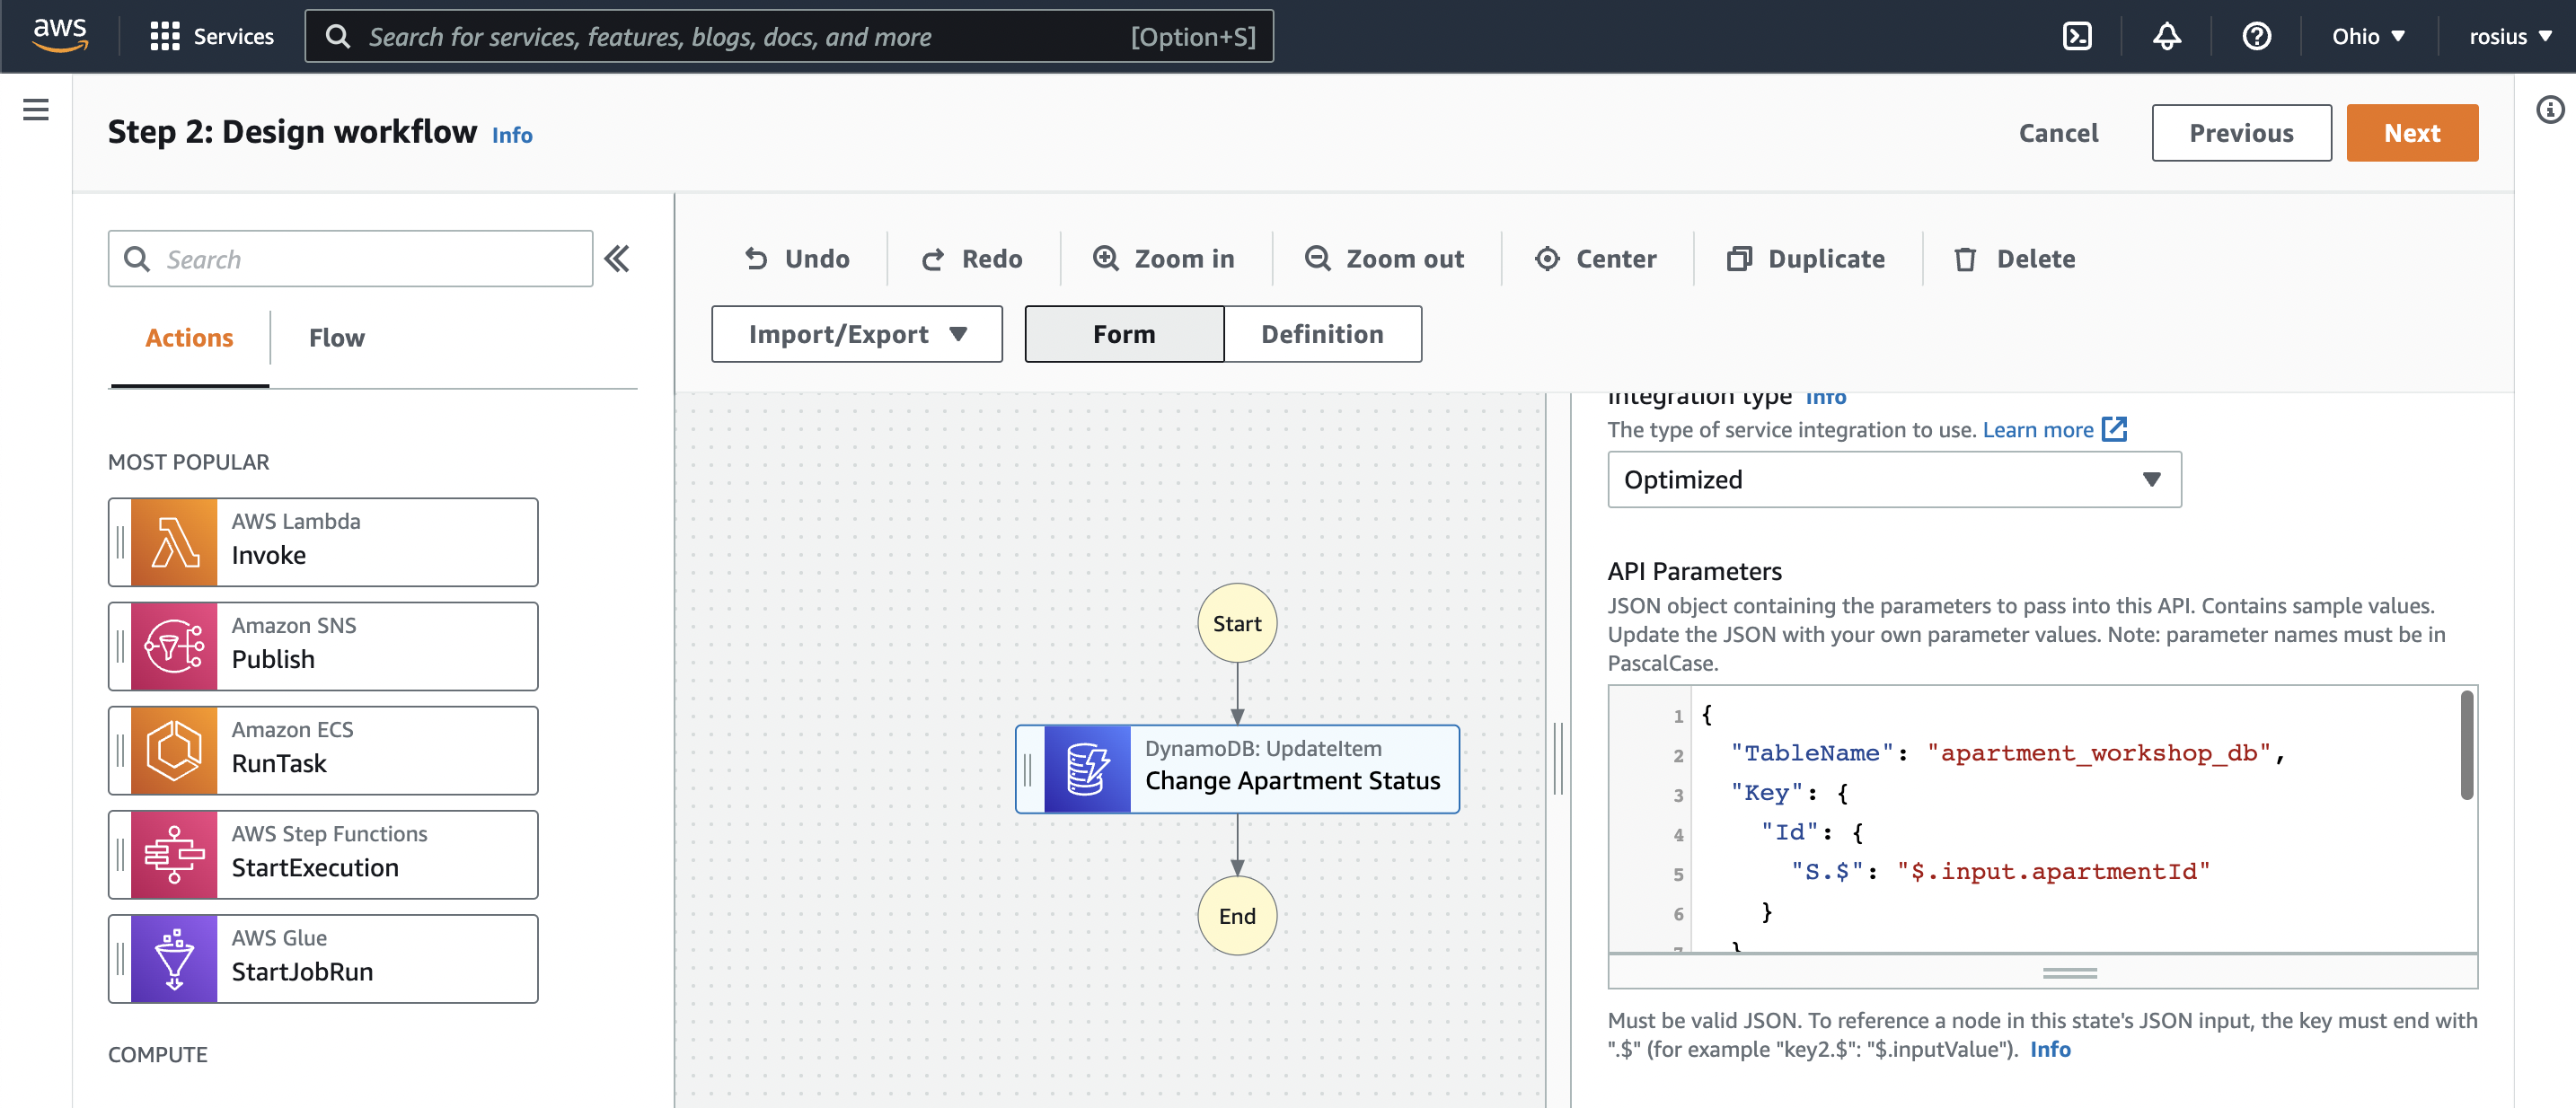
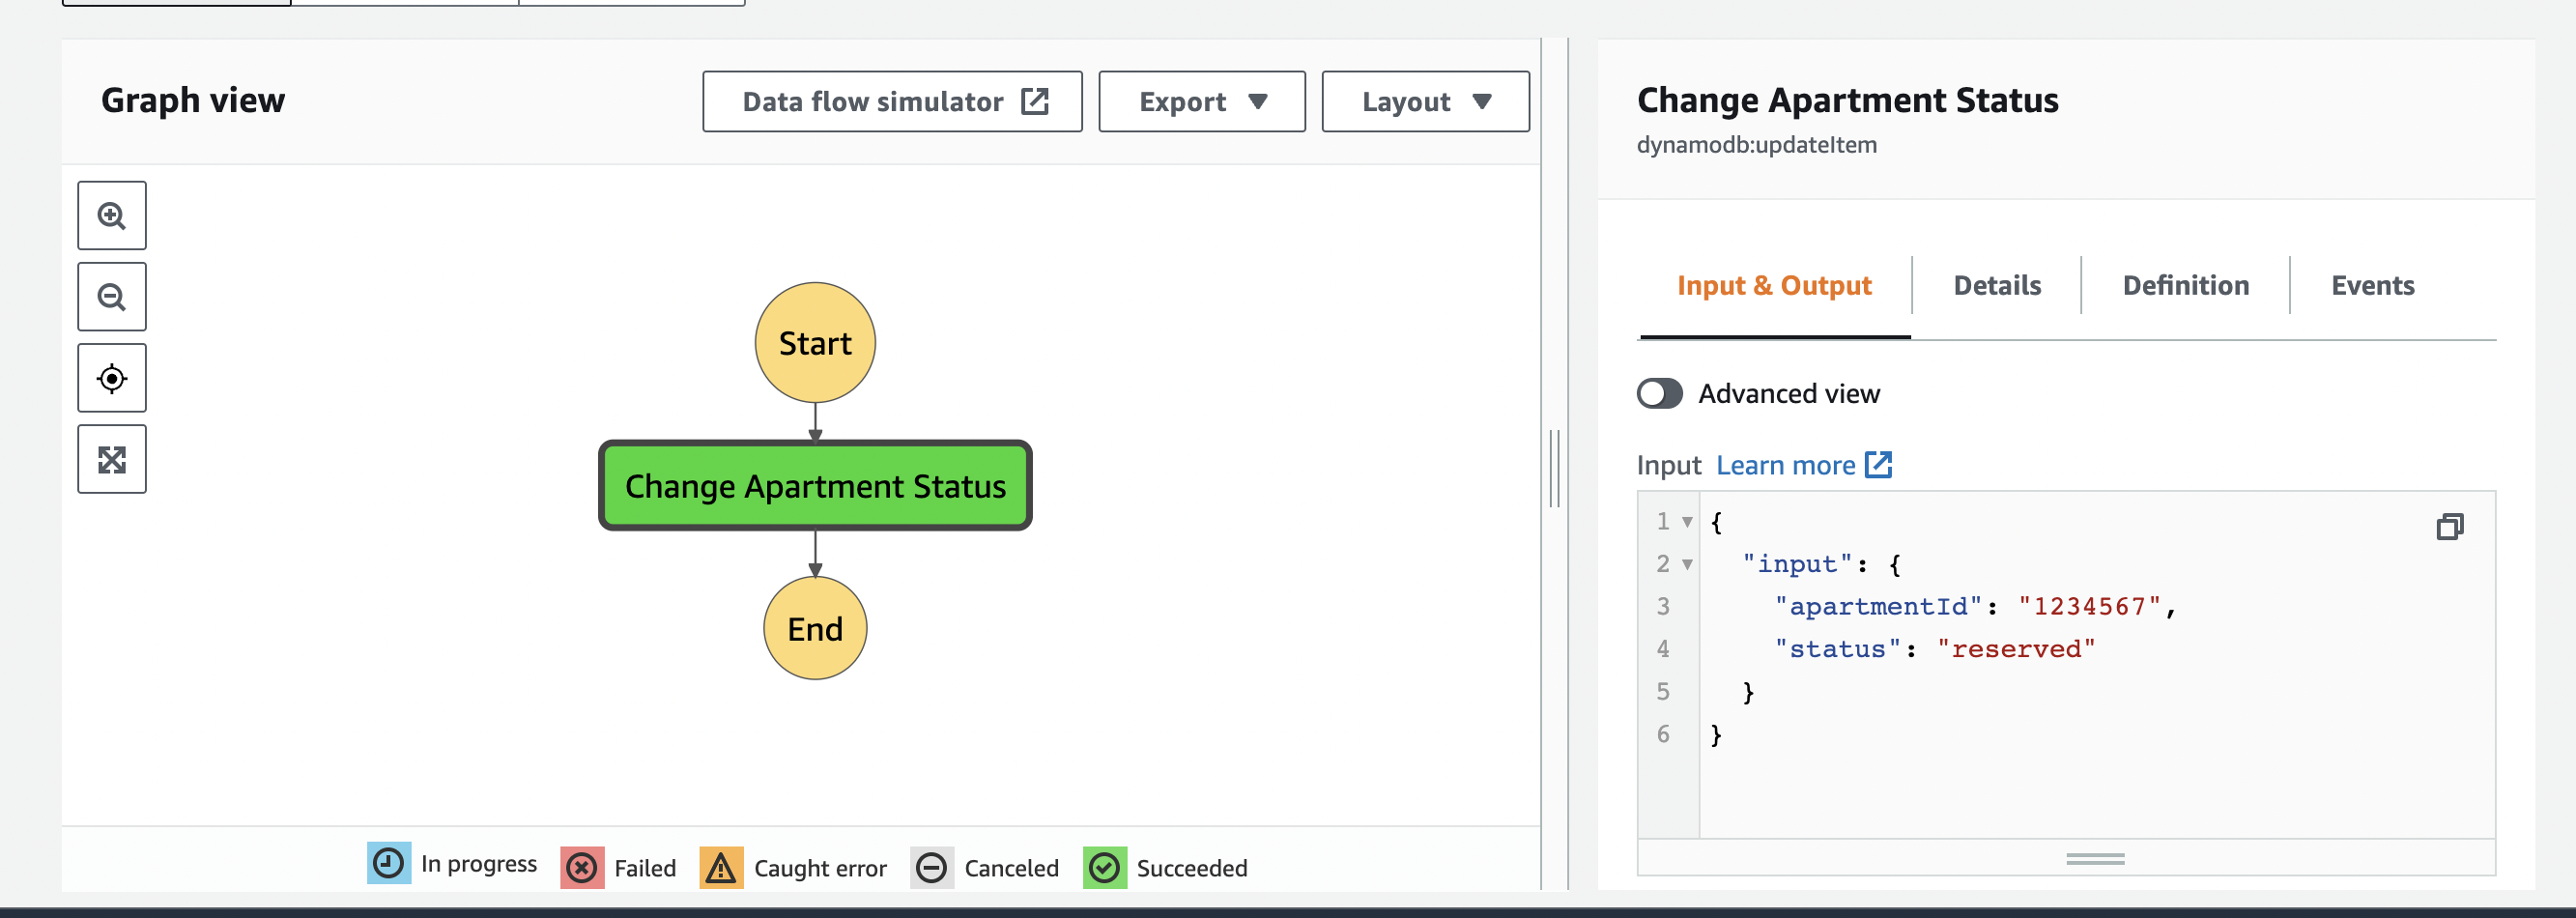
On the right side, change the state name to Change Apartment Status.
In the API Parameters box, add this piece of code to update the status of our apartment.
Notice that we get the apartmentId and status as path references from an input object sent as start input.
Path references always begin with $
{
  "TableName": "apartment_workshop_db",
  "Key": {
    "Id": {
      "S.$": "$.input.apartmentId"
    }
  },
 "UpdateExpression": "SET #apartmentStatus = :status",
 "ExpressionAttributeNames": {
     "#apartmentStatus": "status"
   },
  "ExpressionAttributeValues": {
    ":status": {
      "S.$": "$.input.status"
    }
  },
  "ConditionExpression": "attribute_exists(Id)"
}
The input to this task is:
{
    "input":{
      "apartmentId":"1234567",
      "status":"reserved"
    }
}
Click on the Next button at the top right-hand side of the screen.
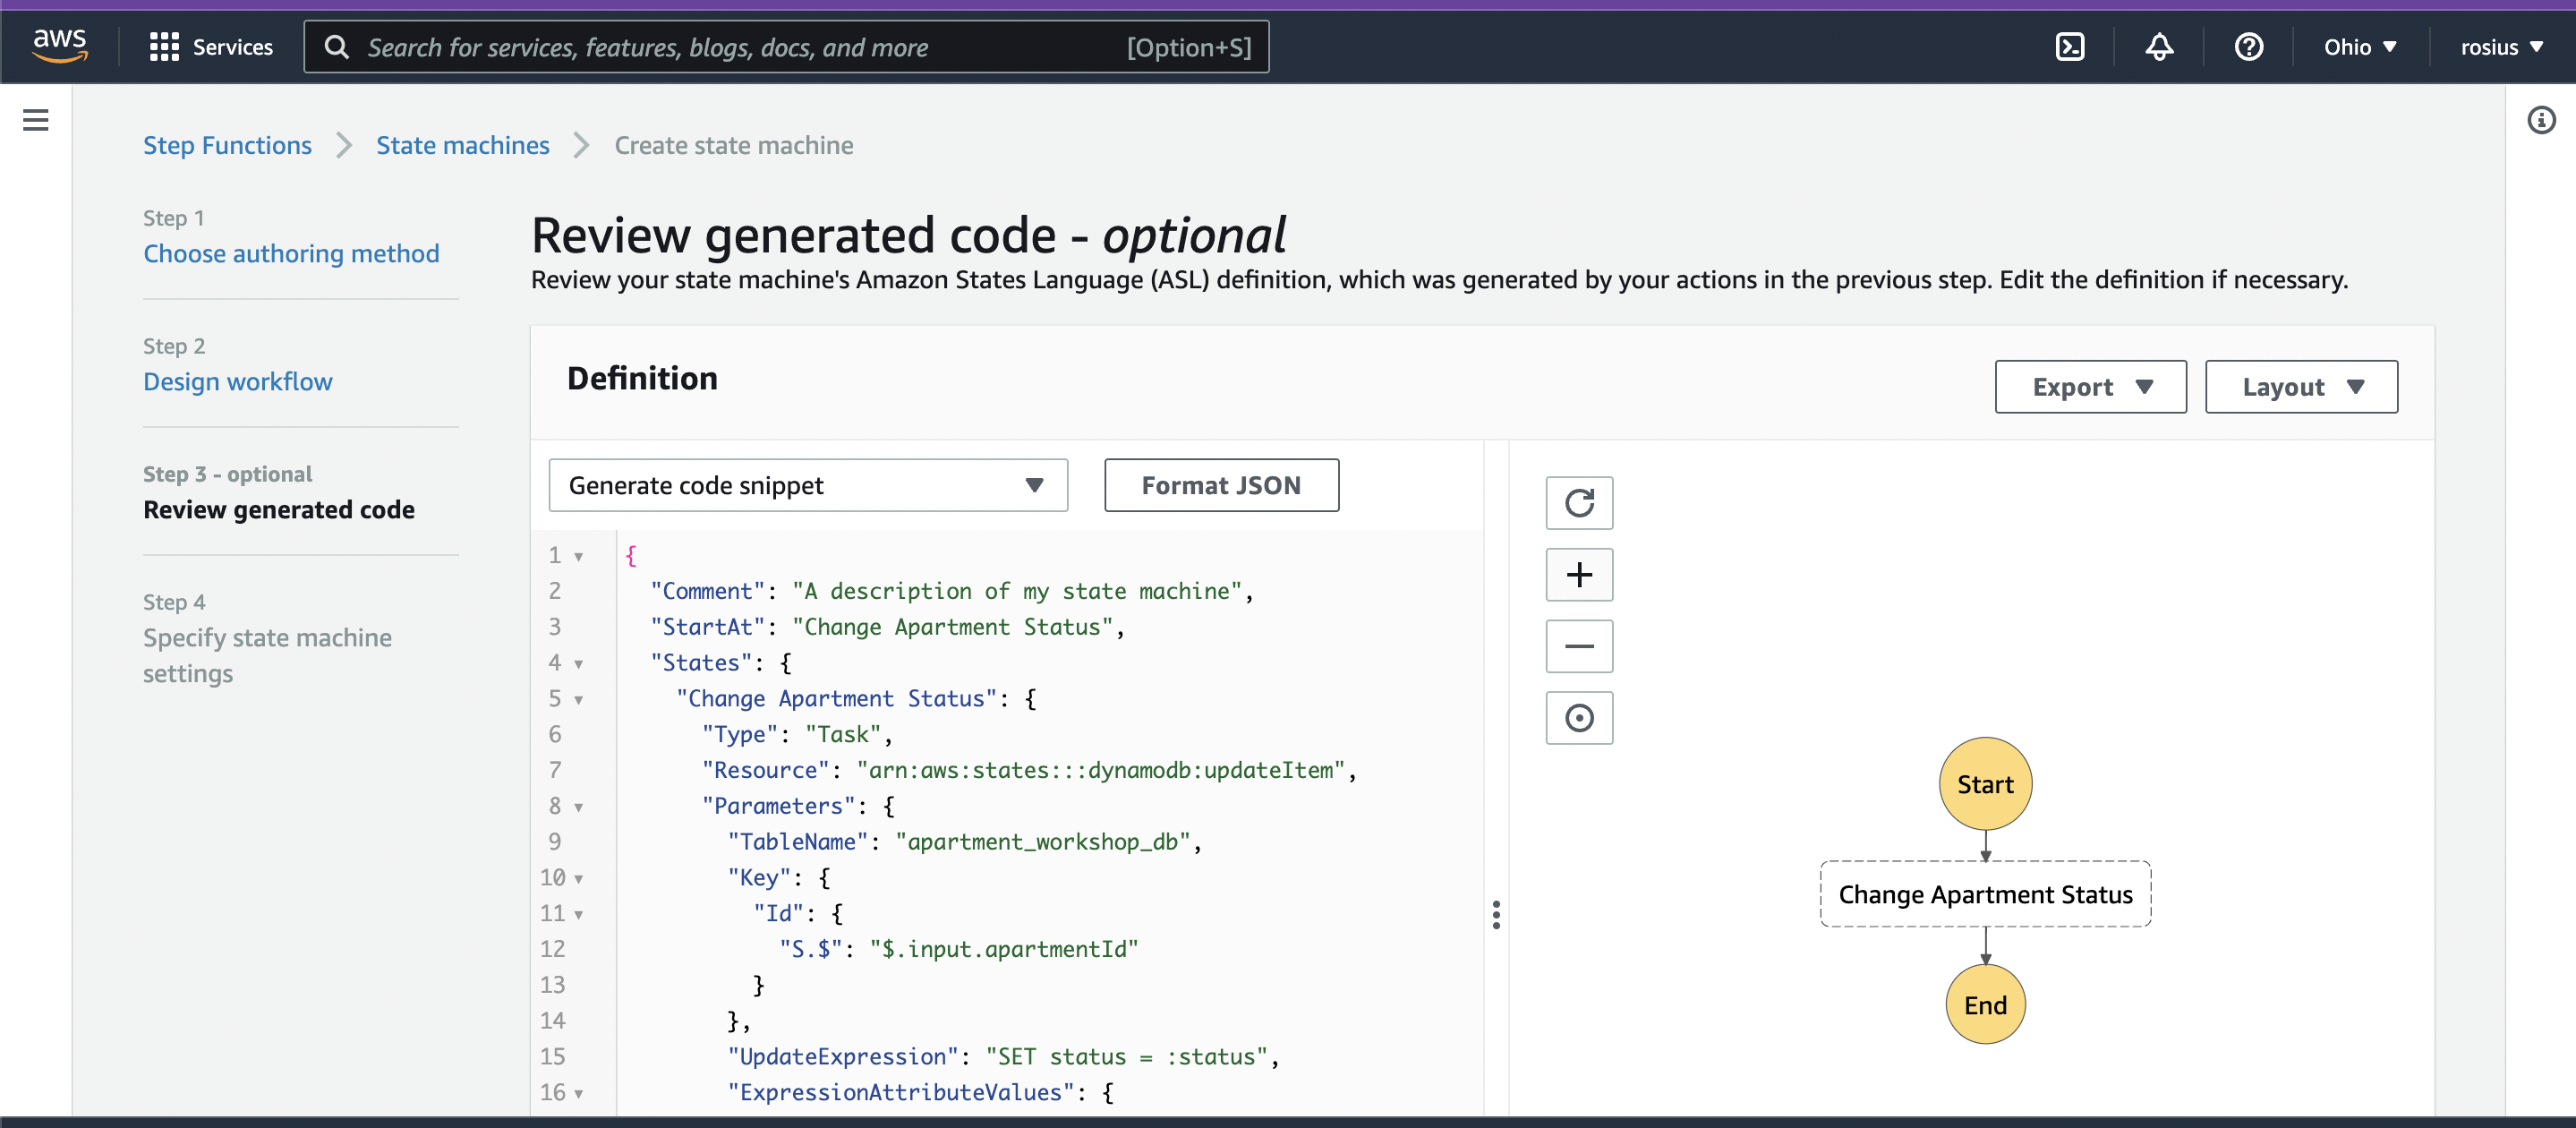
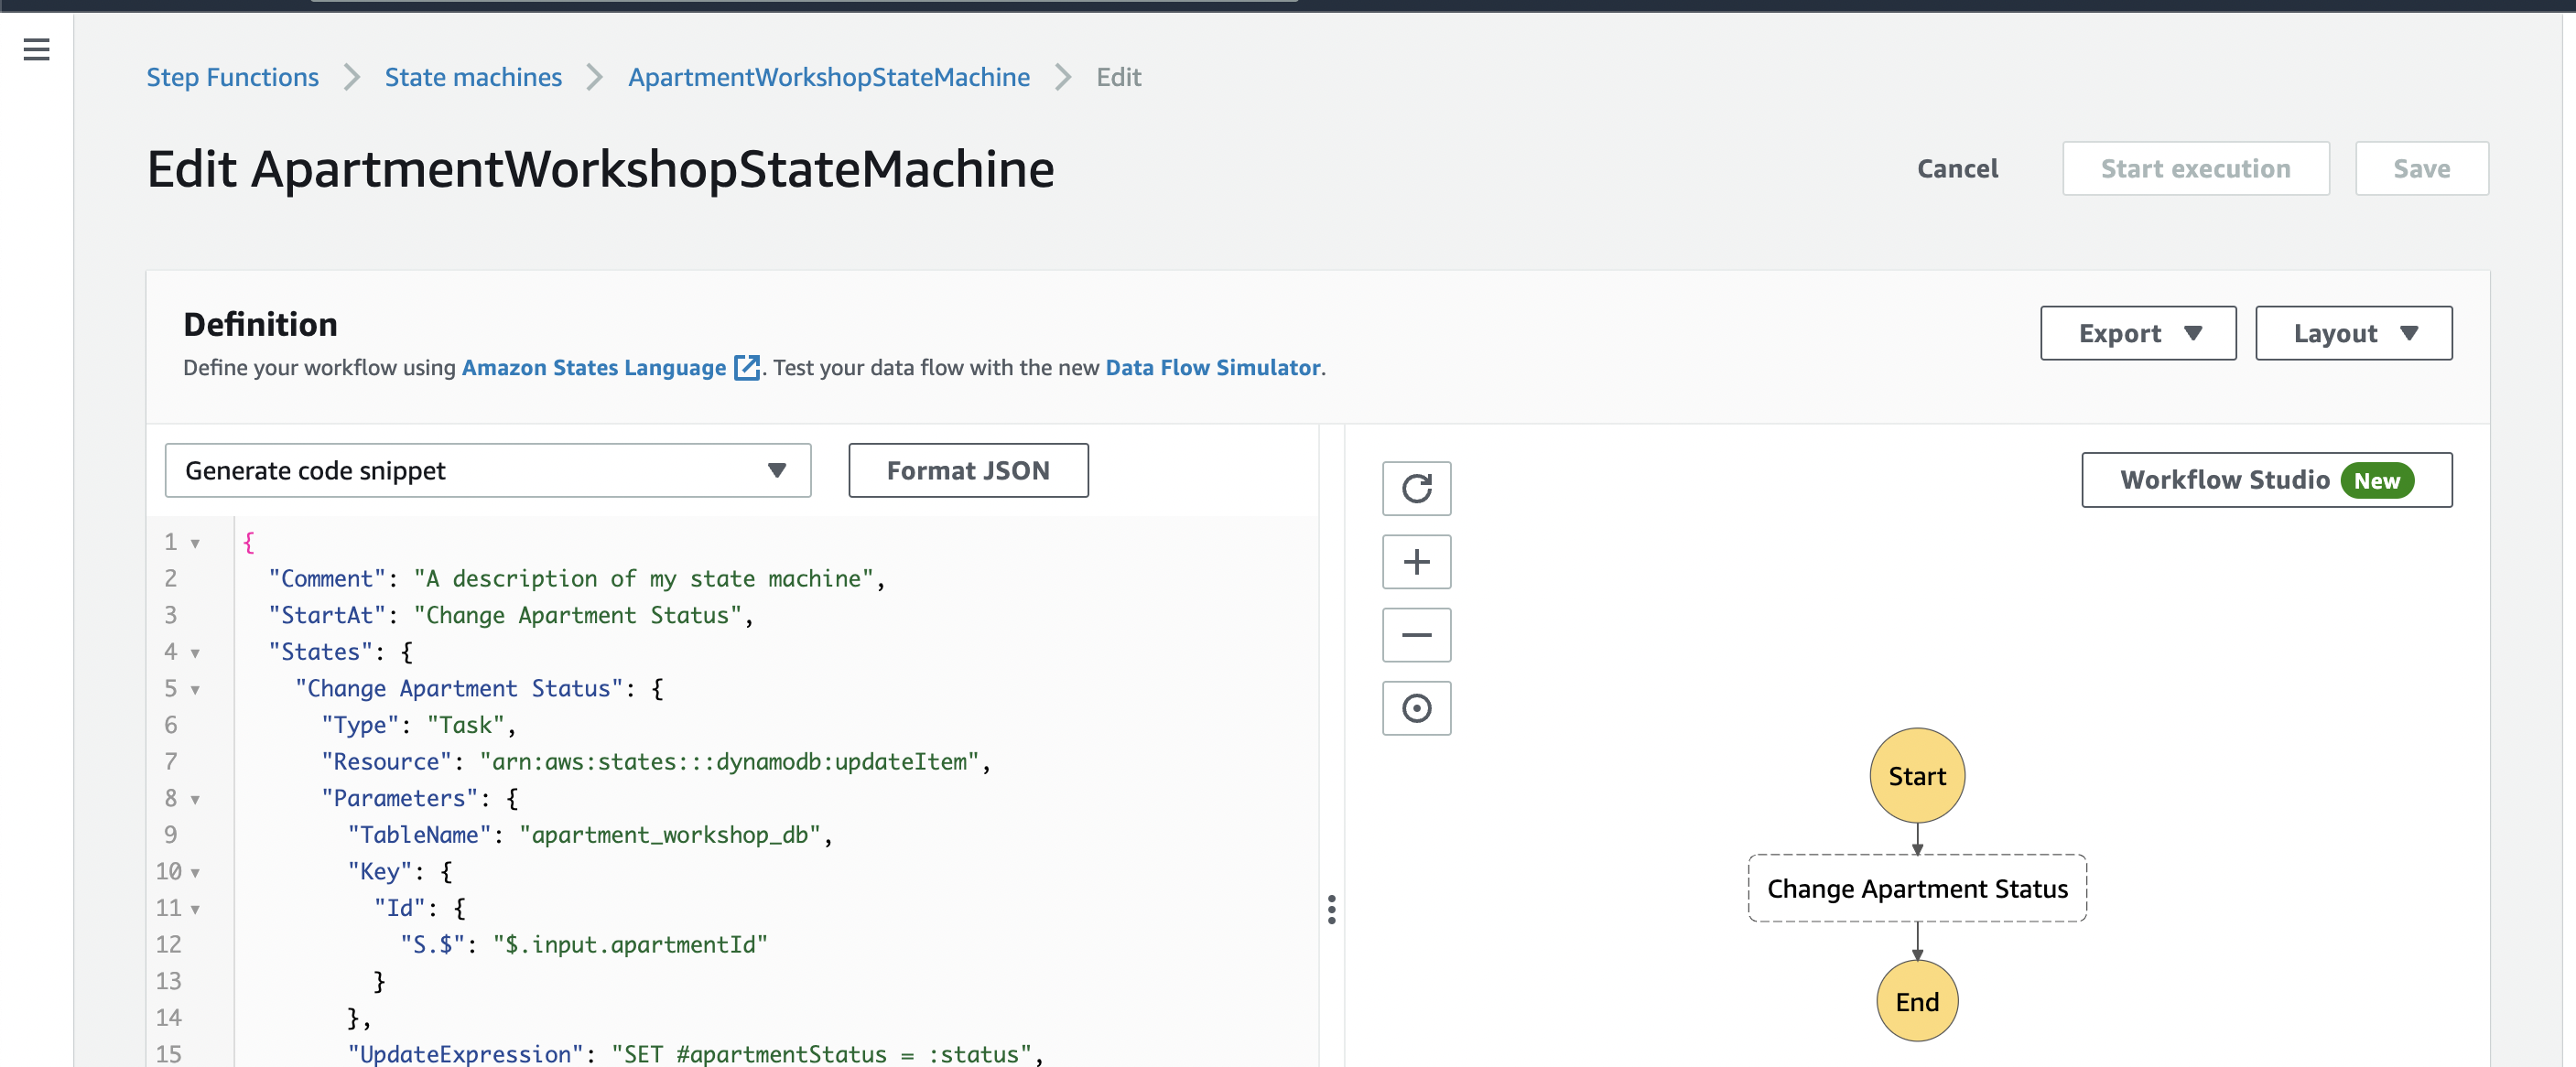
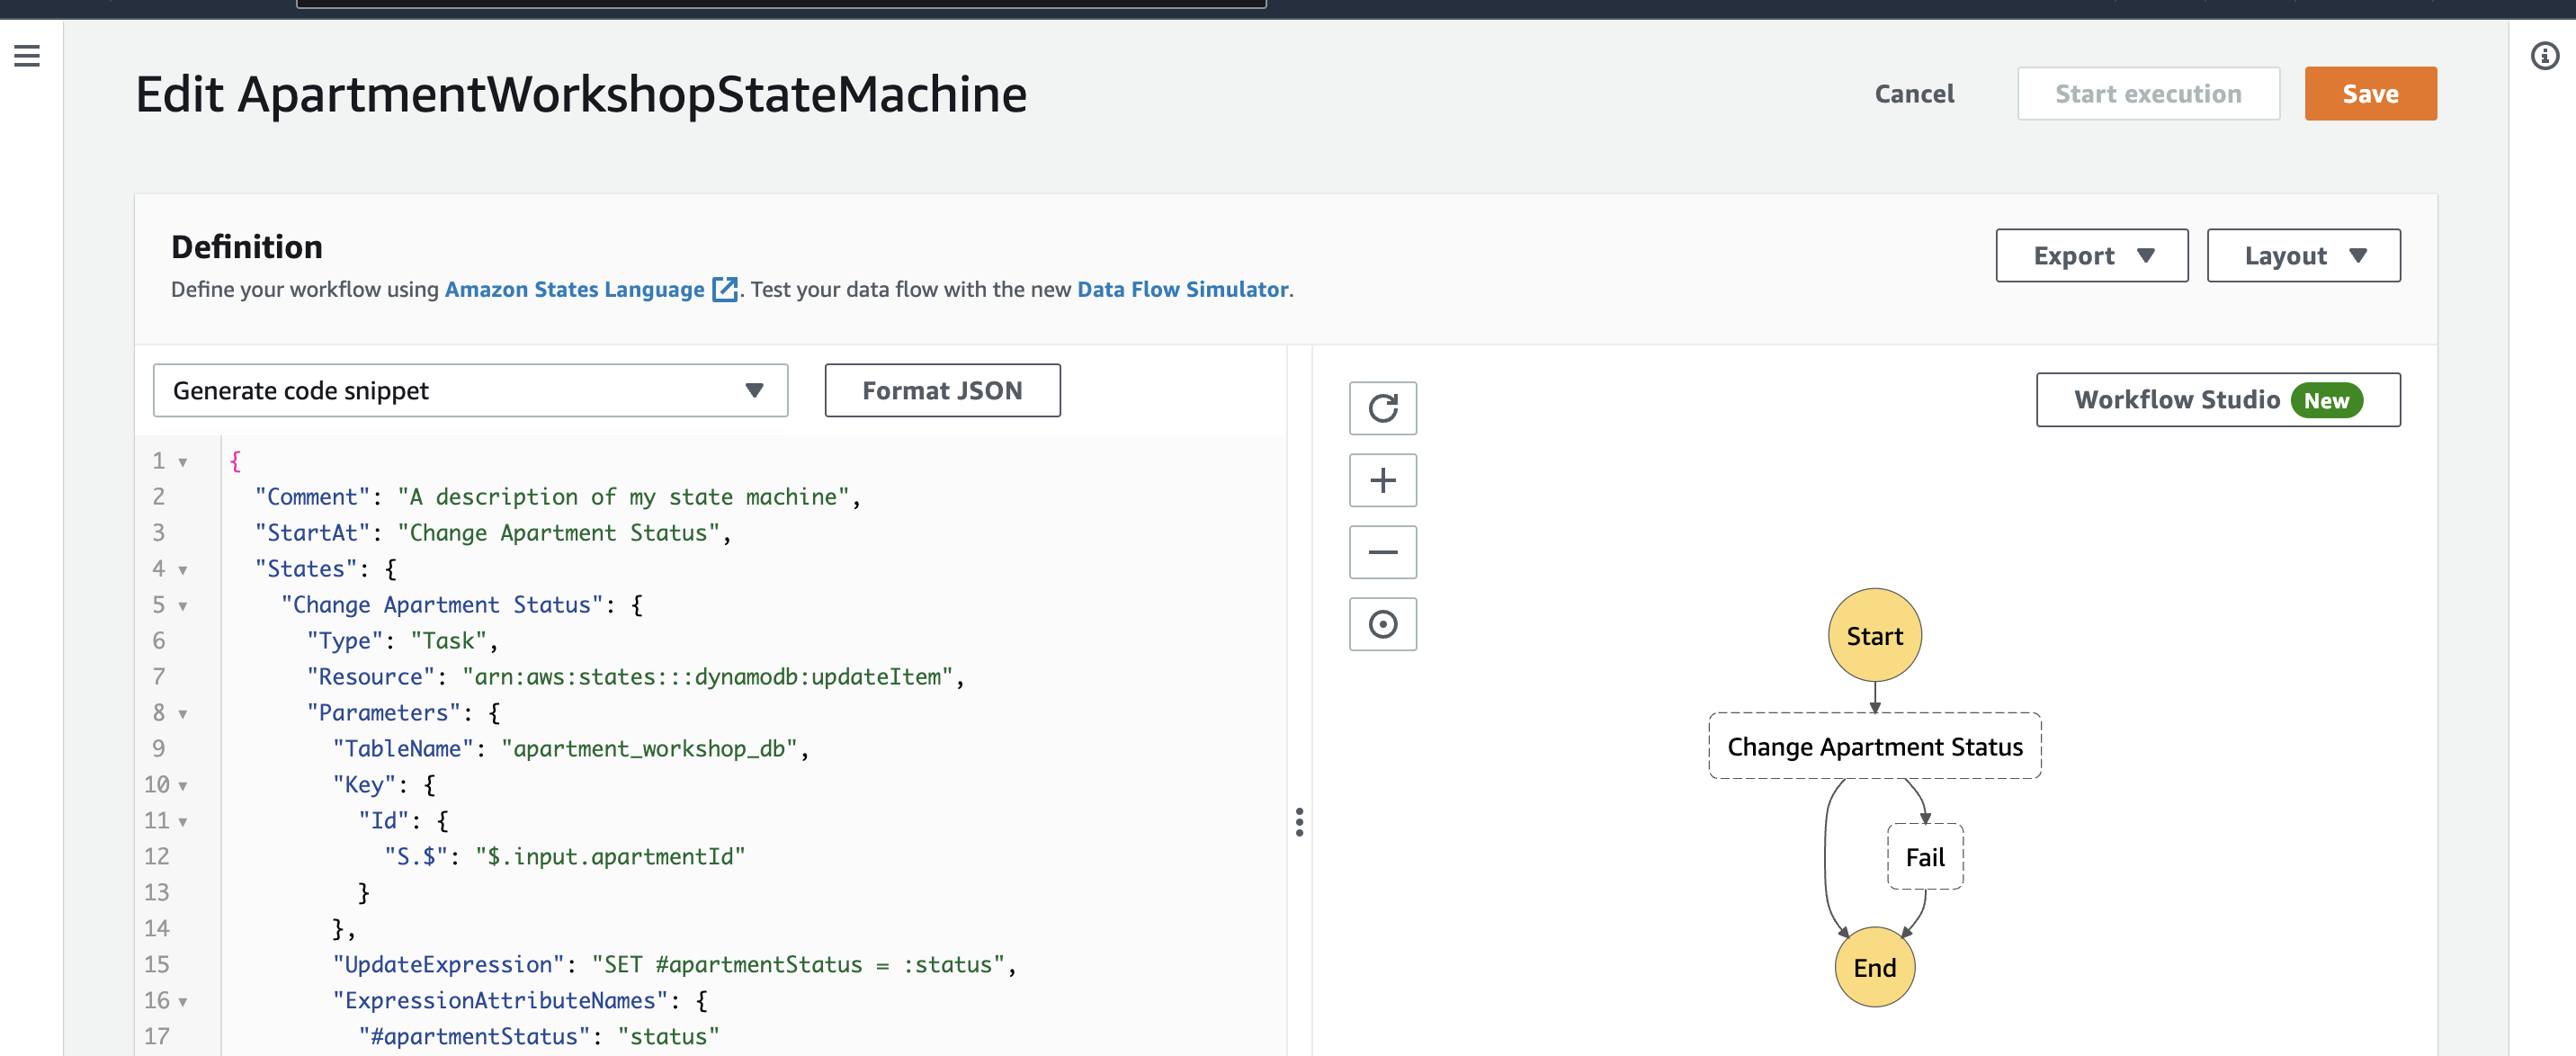
On the Review generated code page, this shows the definition of the workflow you’ve built so far. The left panel shows the Amazon States Language (ASL) language definition in JSON; the right shows a visual flowchart of the workflow. Choose Next
The Specify state machine settings page shows the settings for the new workflow. You can always edit these later.
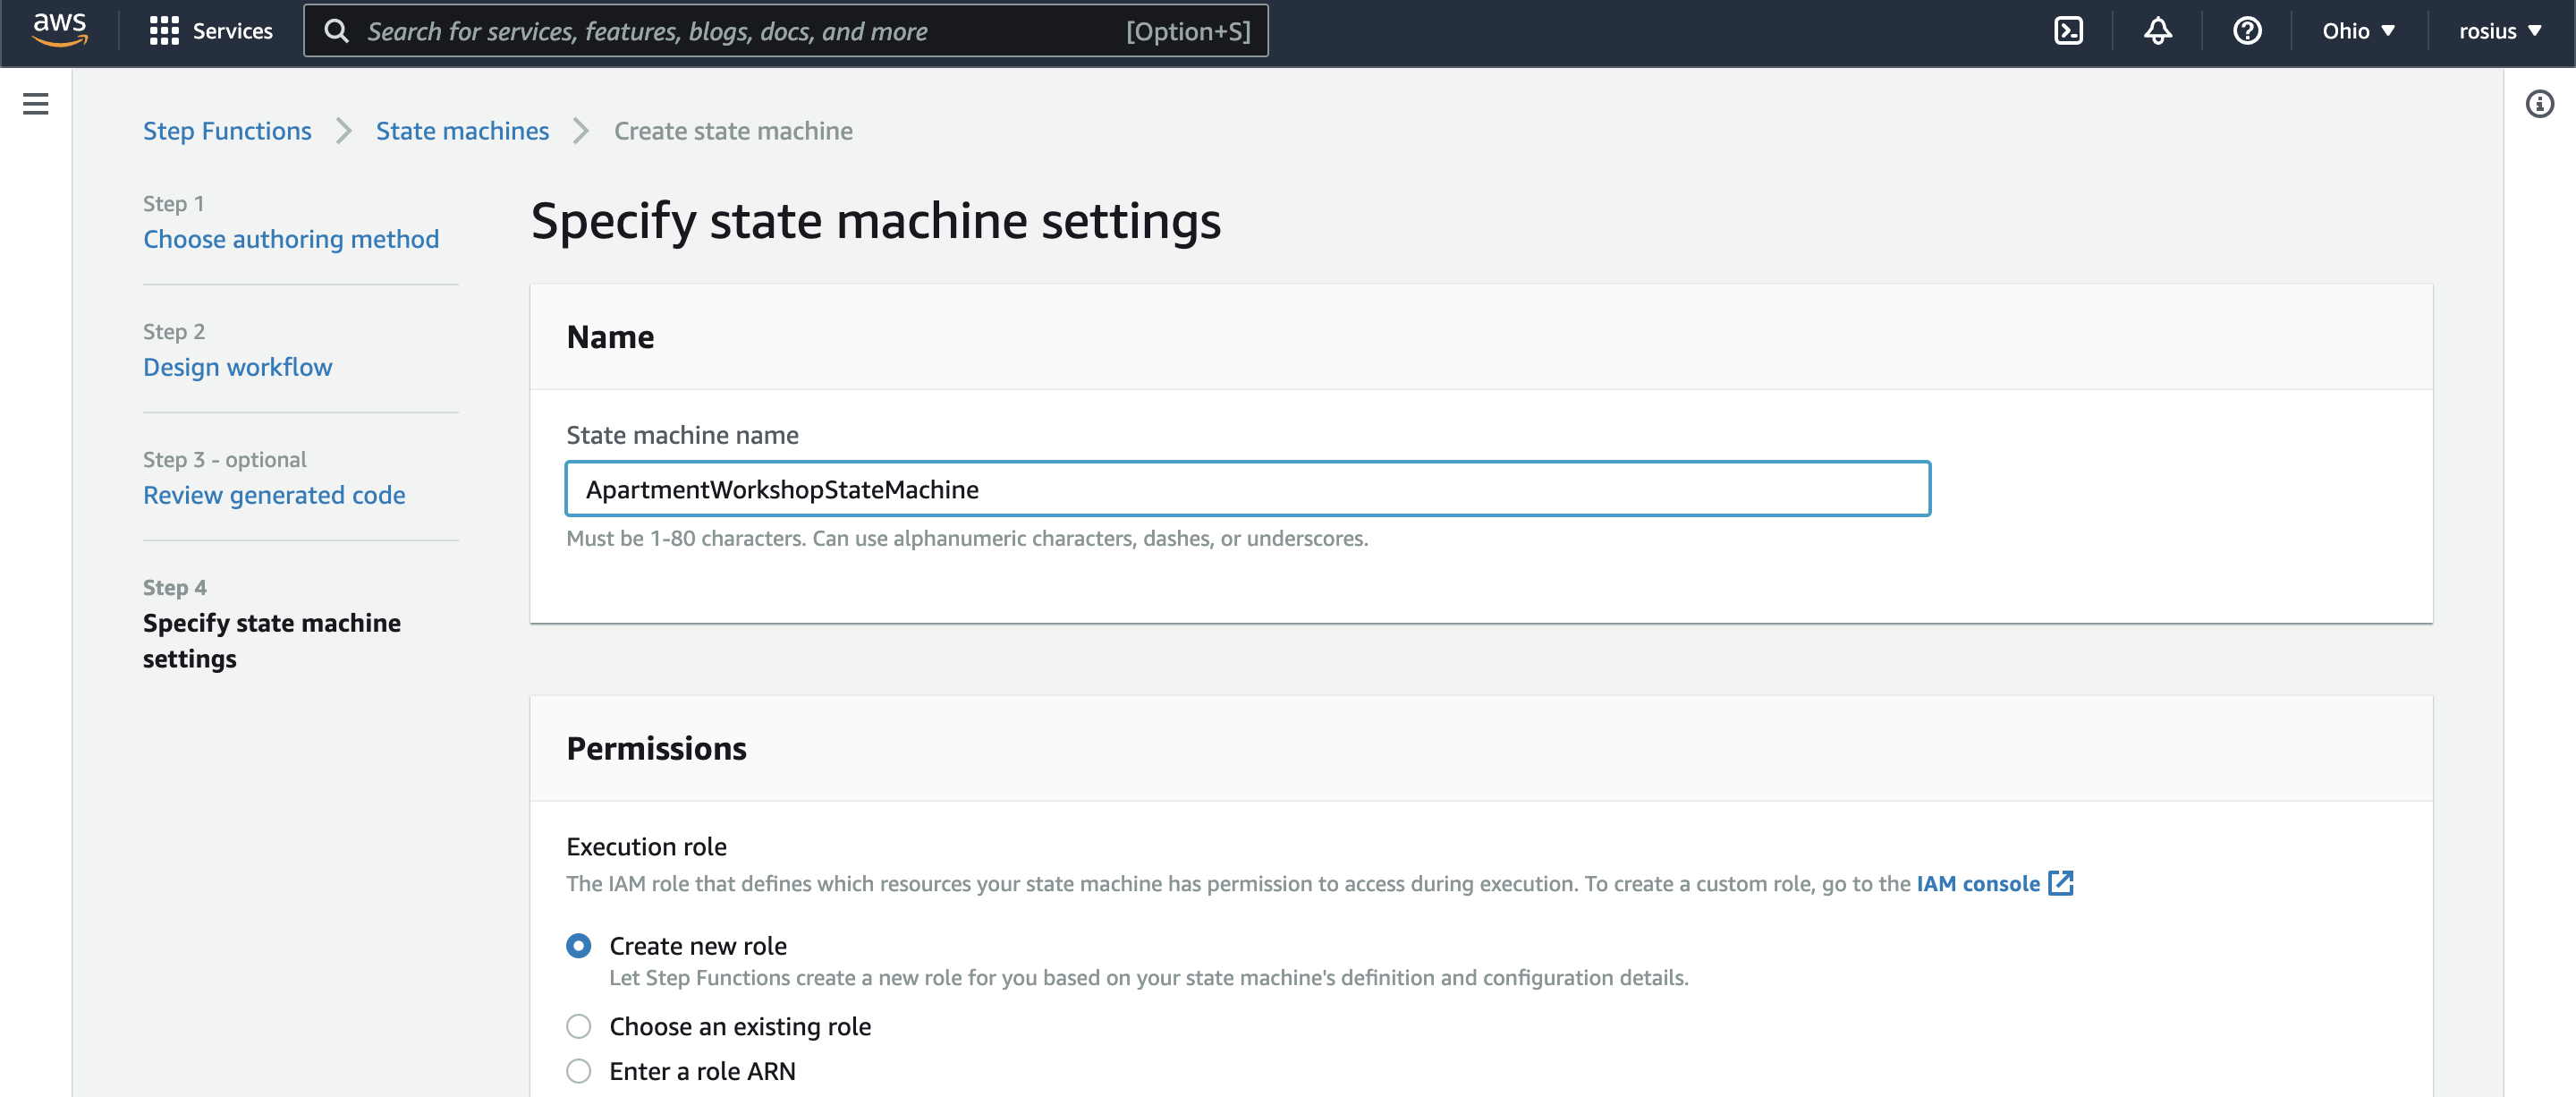
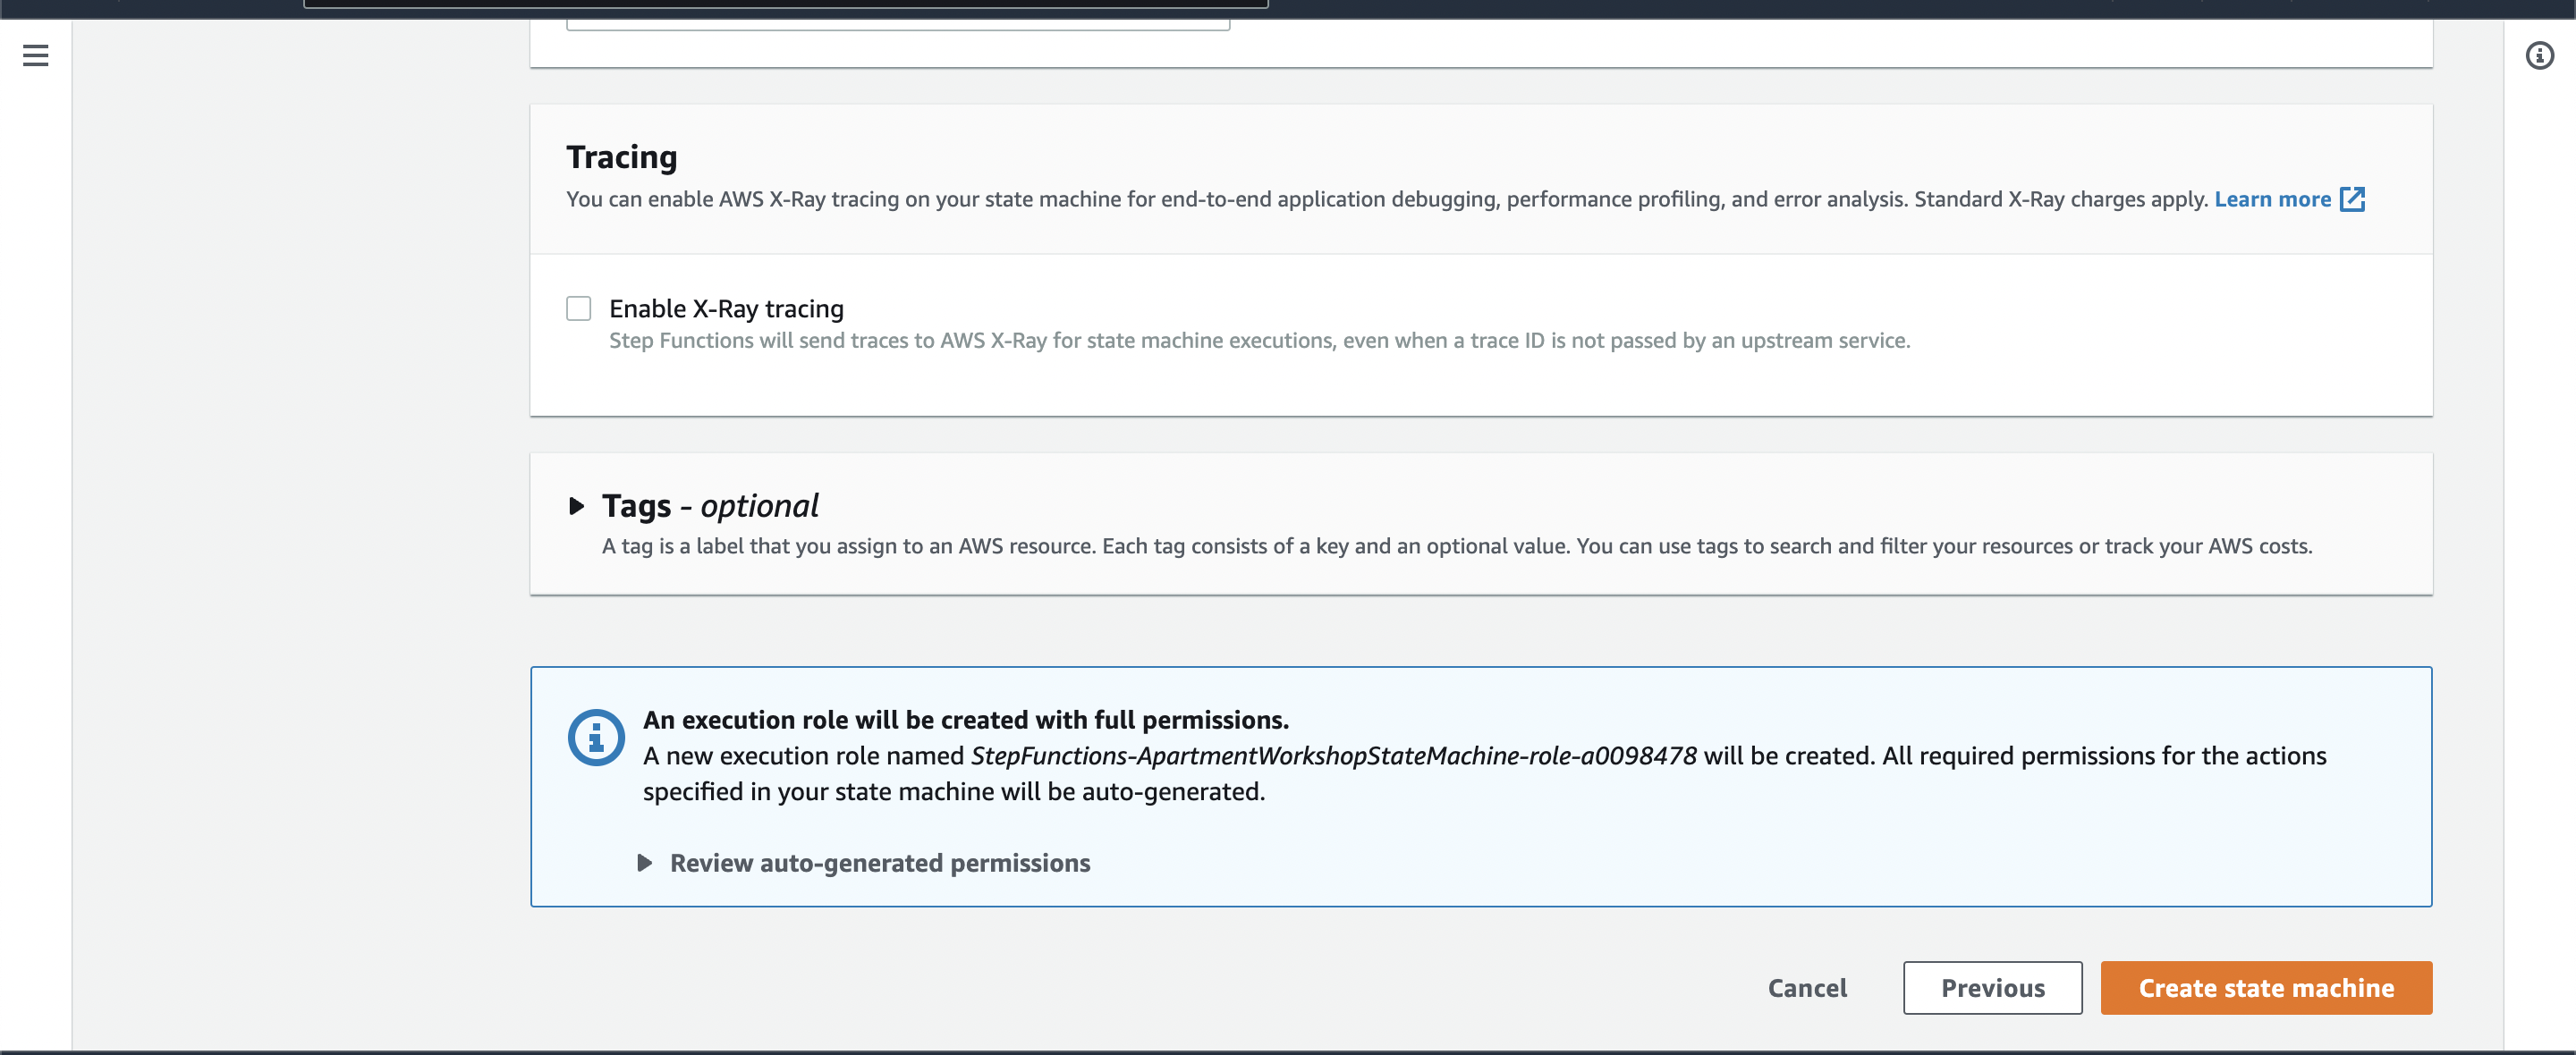
Click Create State Machine once you’ve added a state machine name. Leave the rest as defaults for now.
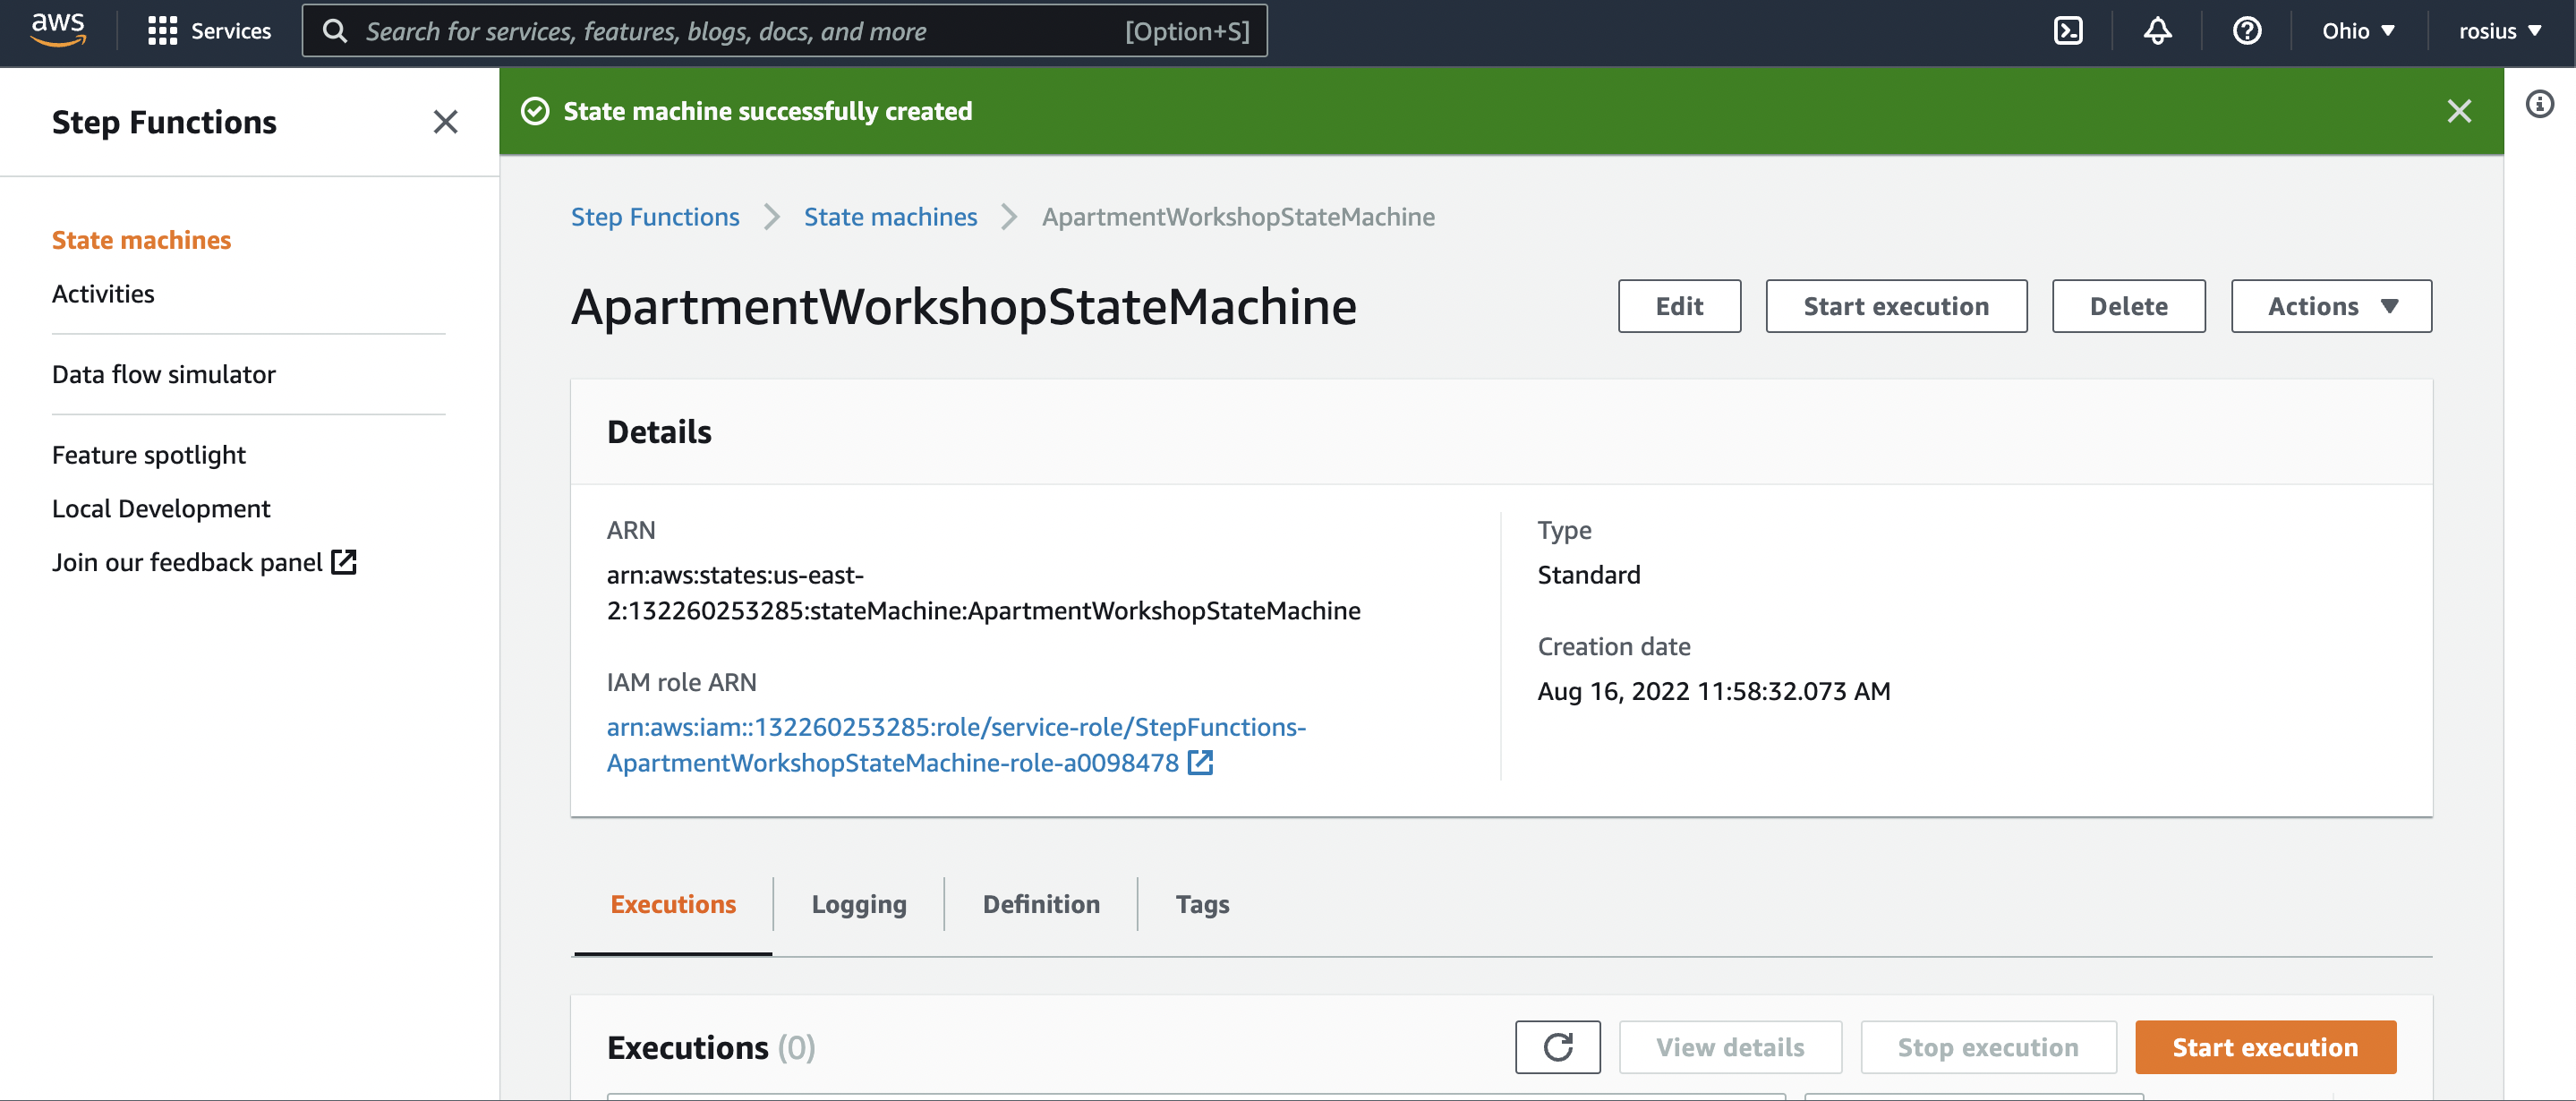
Congratulations🎉🎉 you’ve created your first workflow.
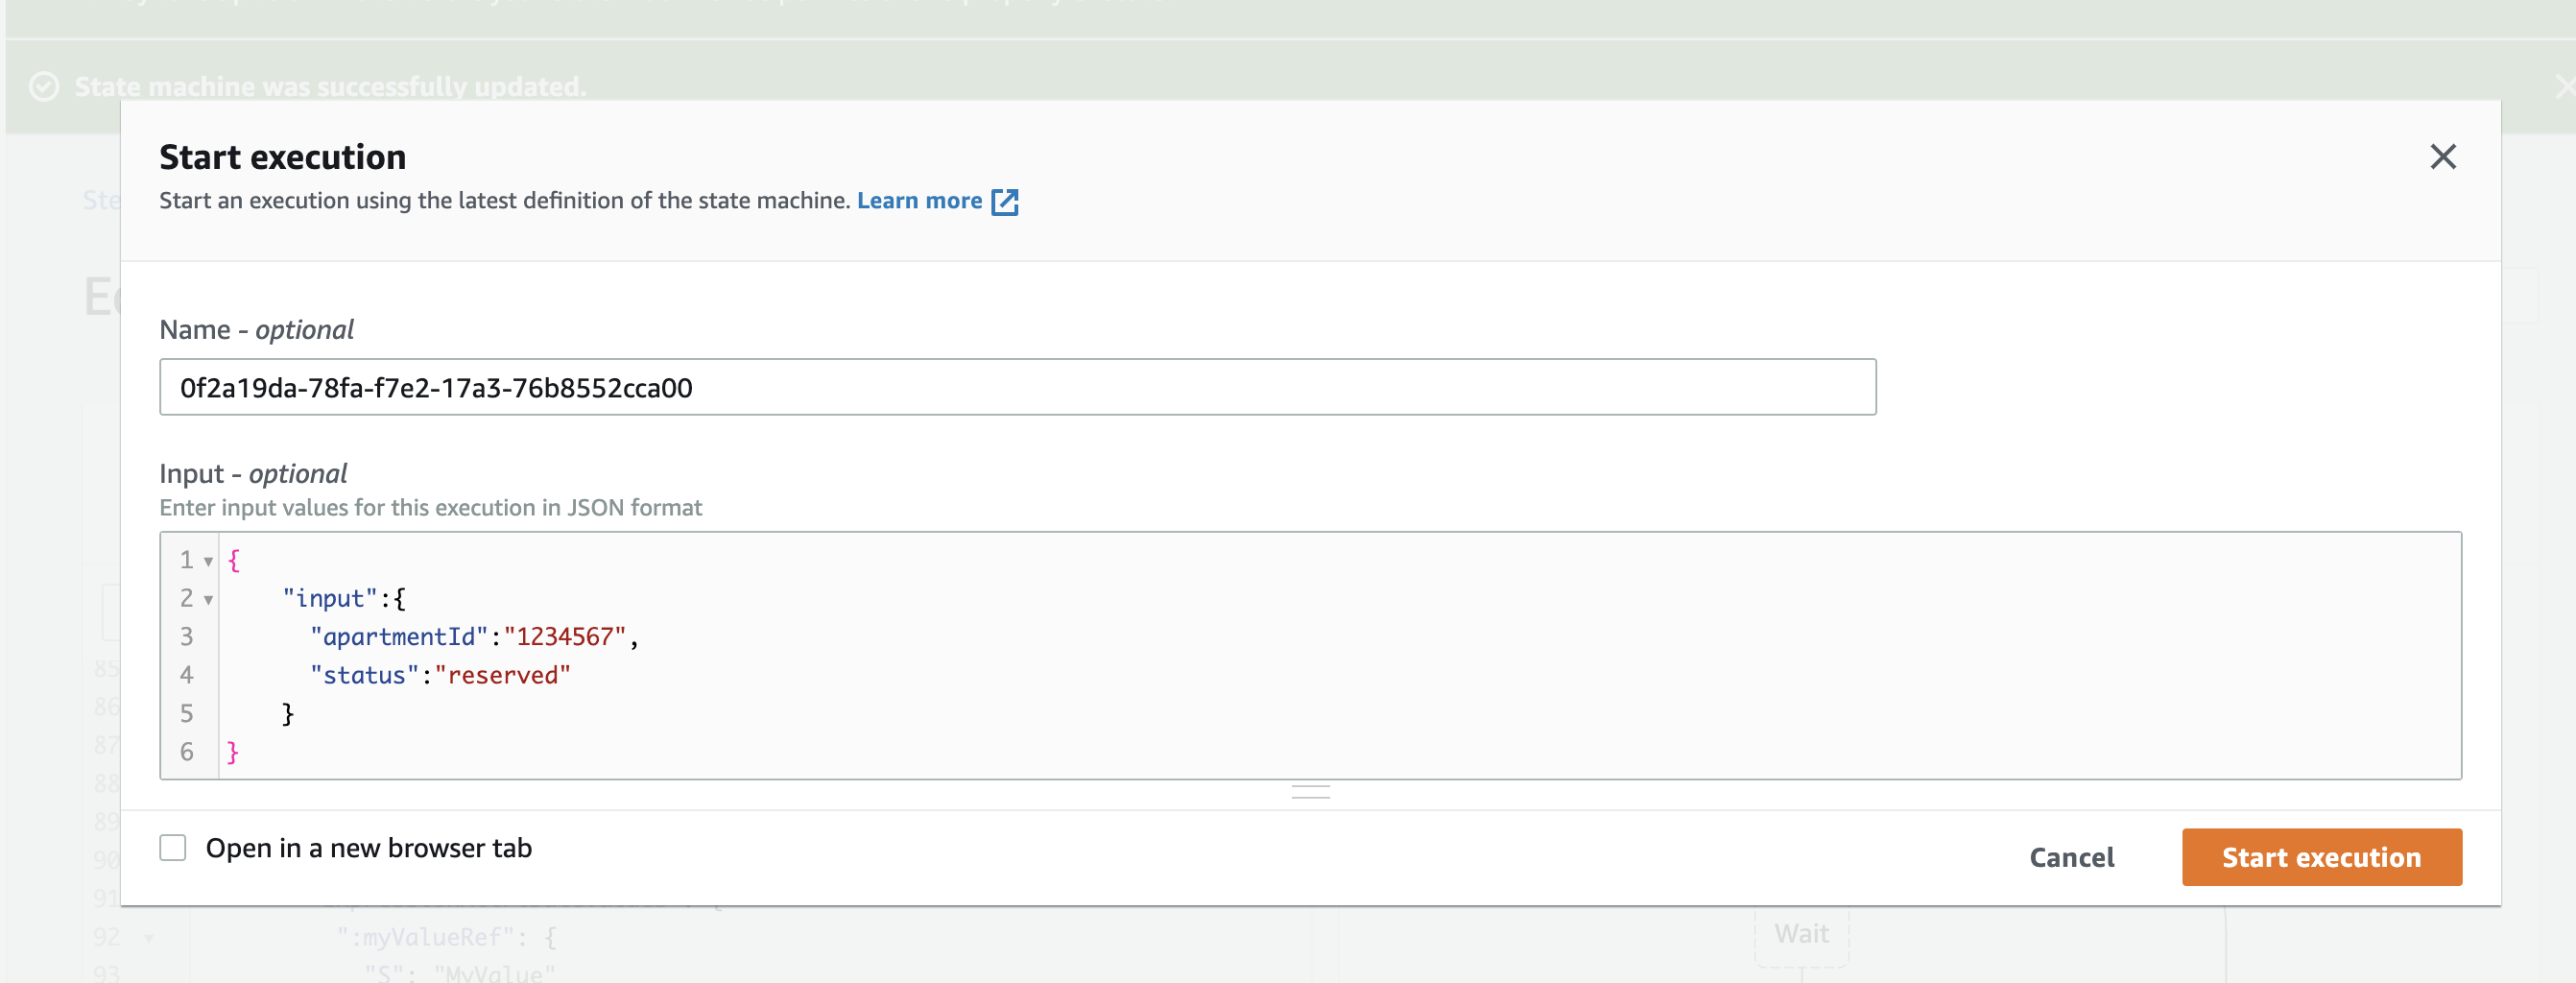
Let’s test it by running an execution. Click “Start Execution”
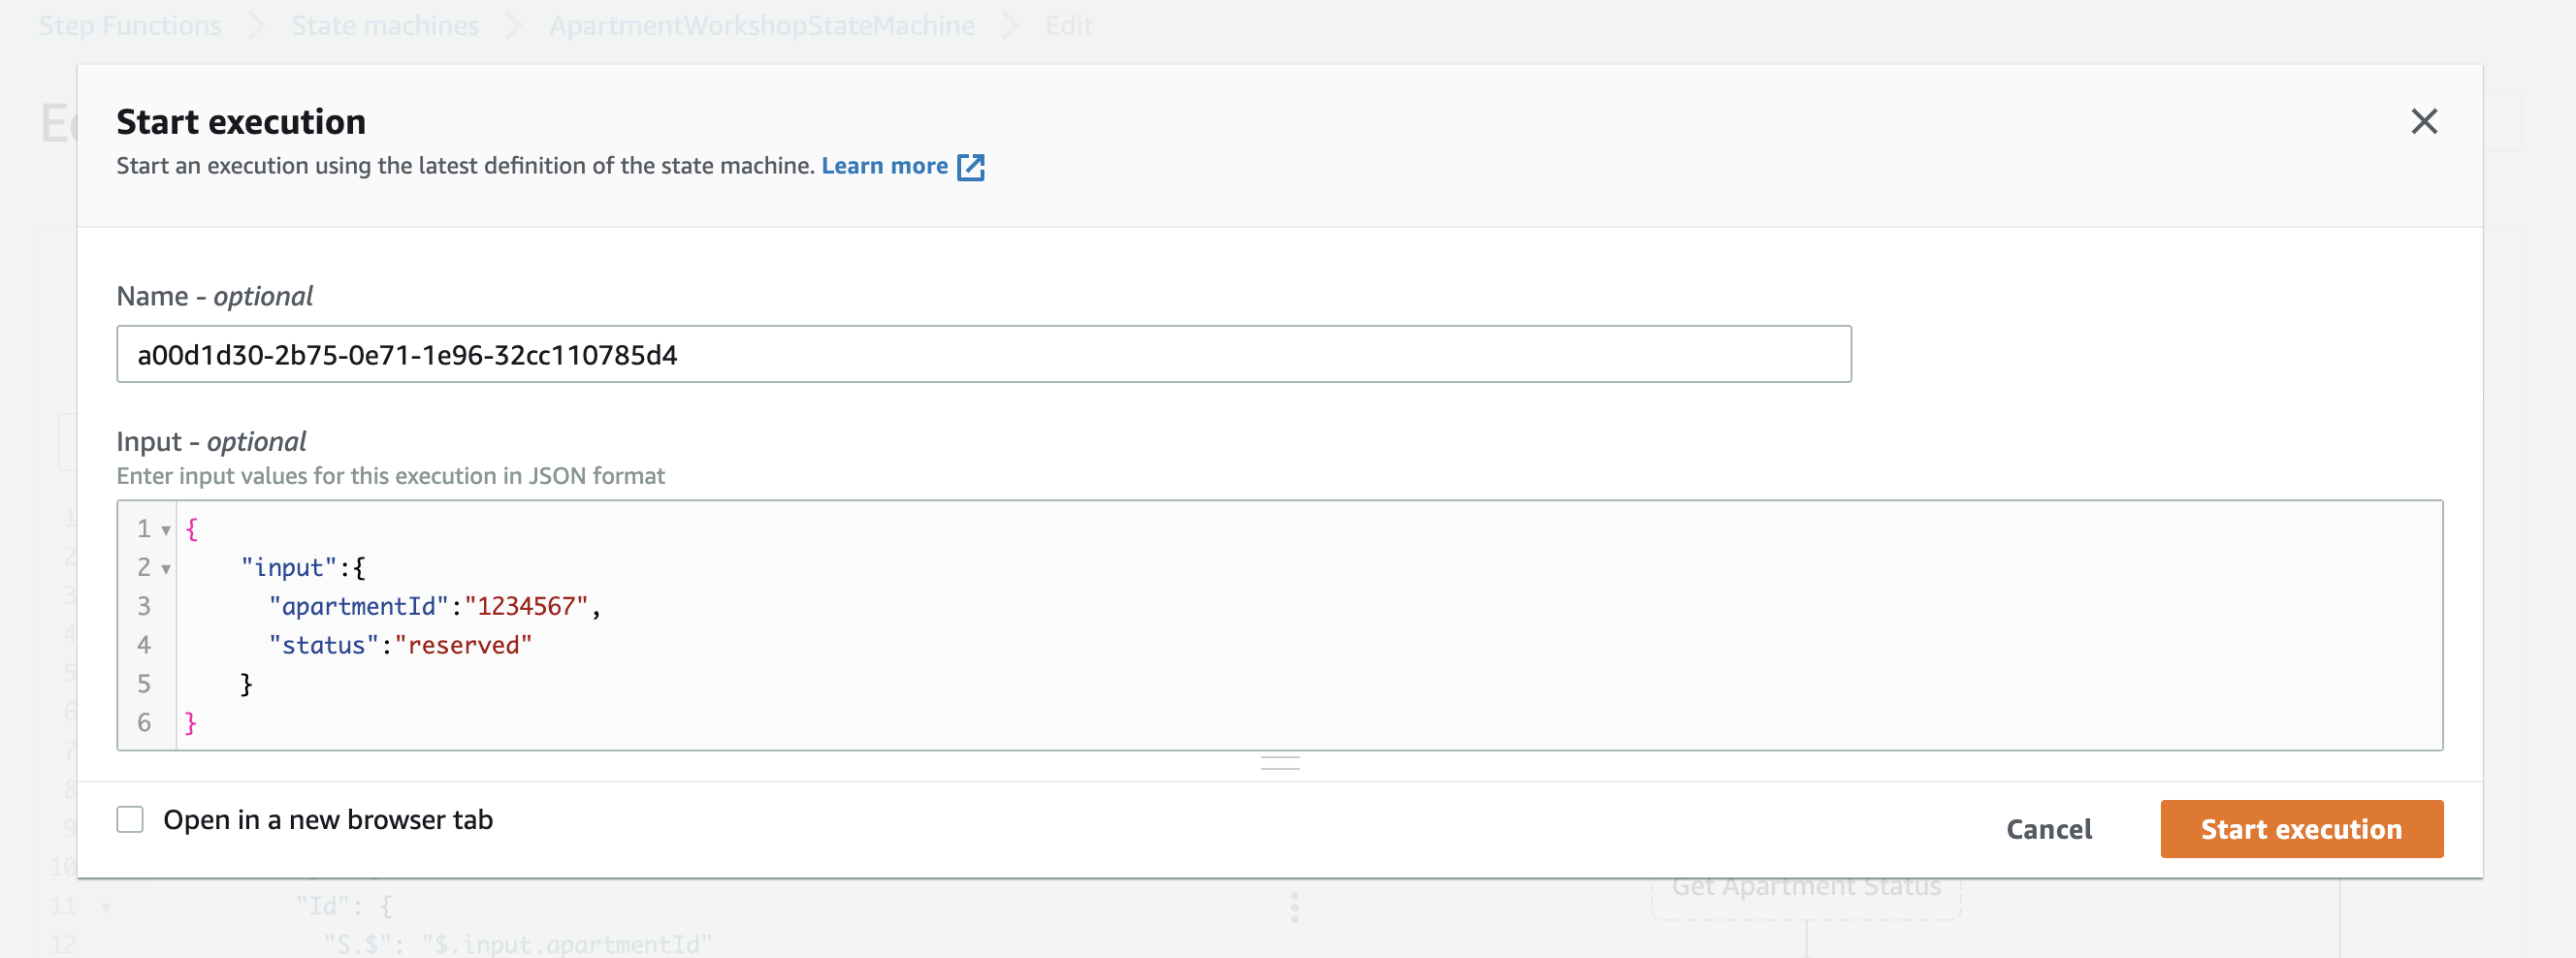
In the input box, add the Json input and click “Start Execution”
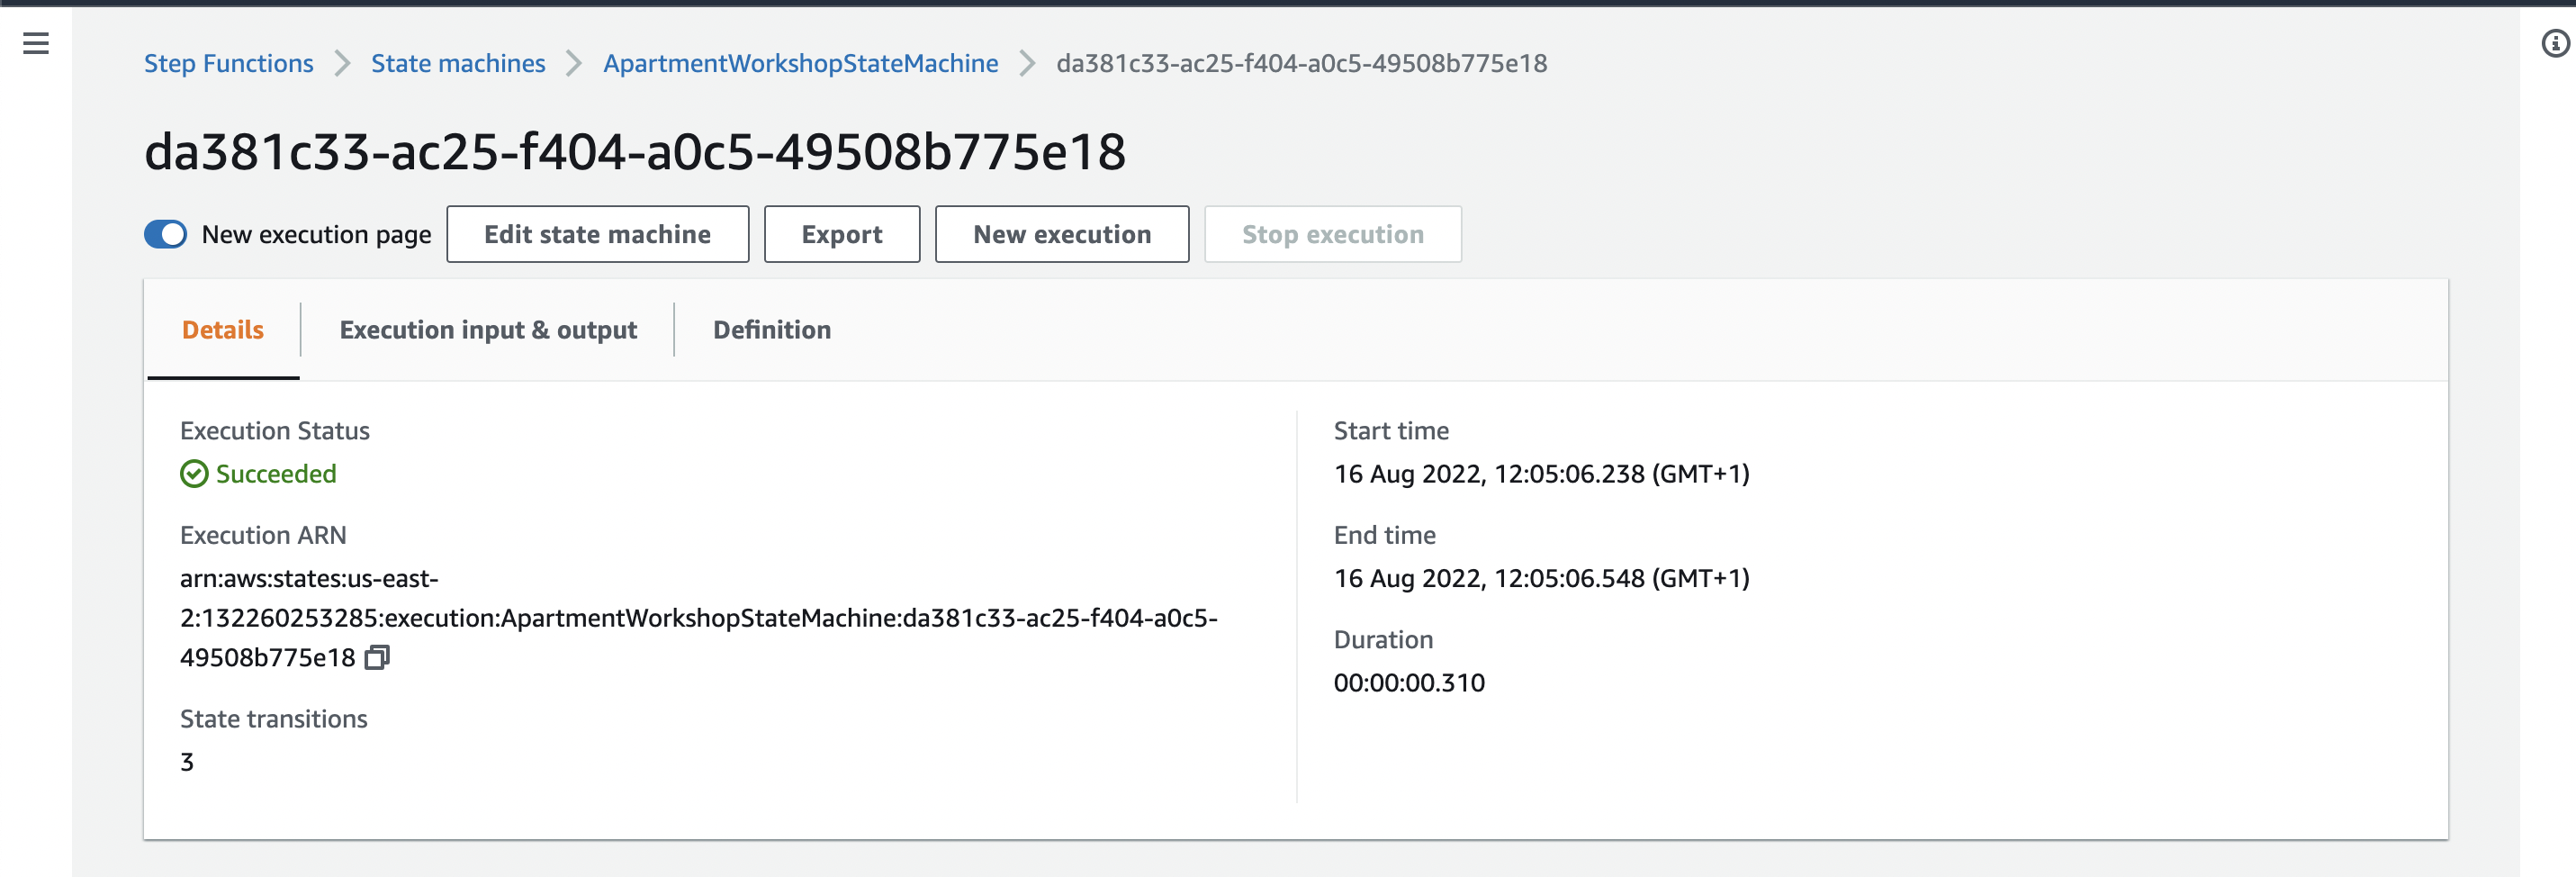
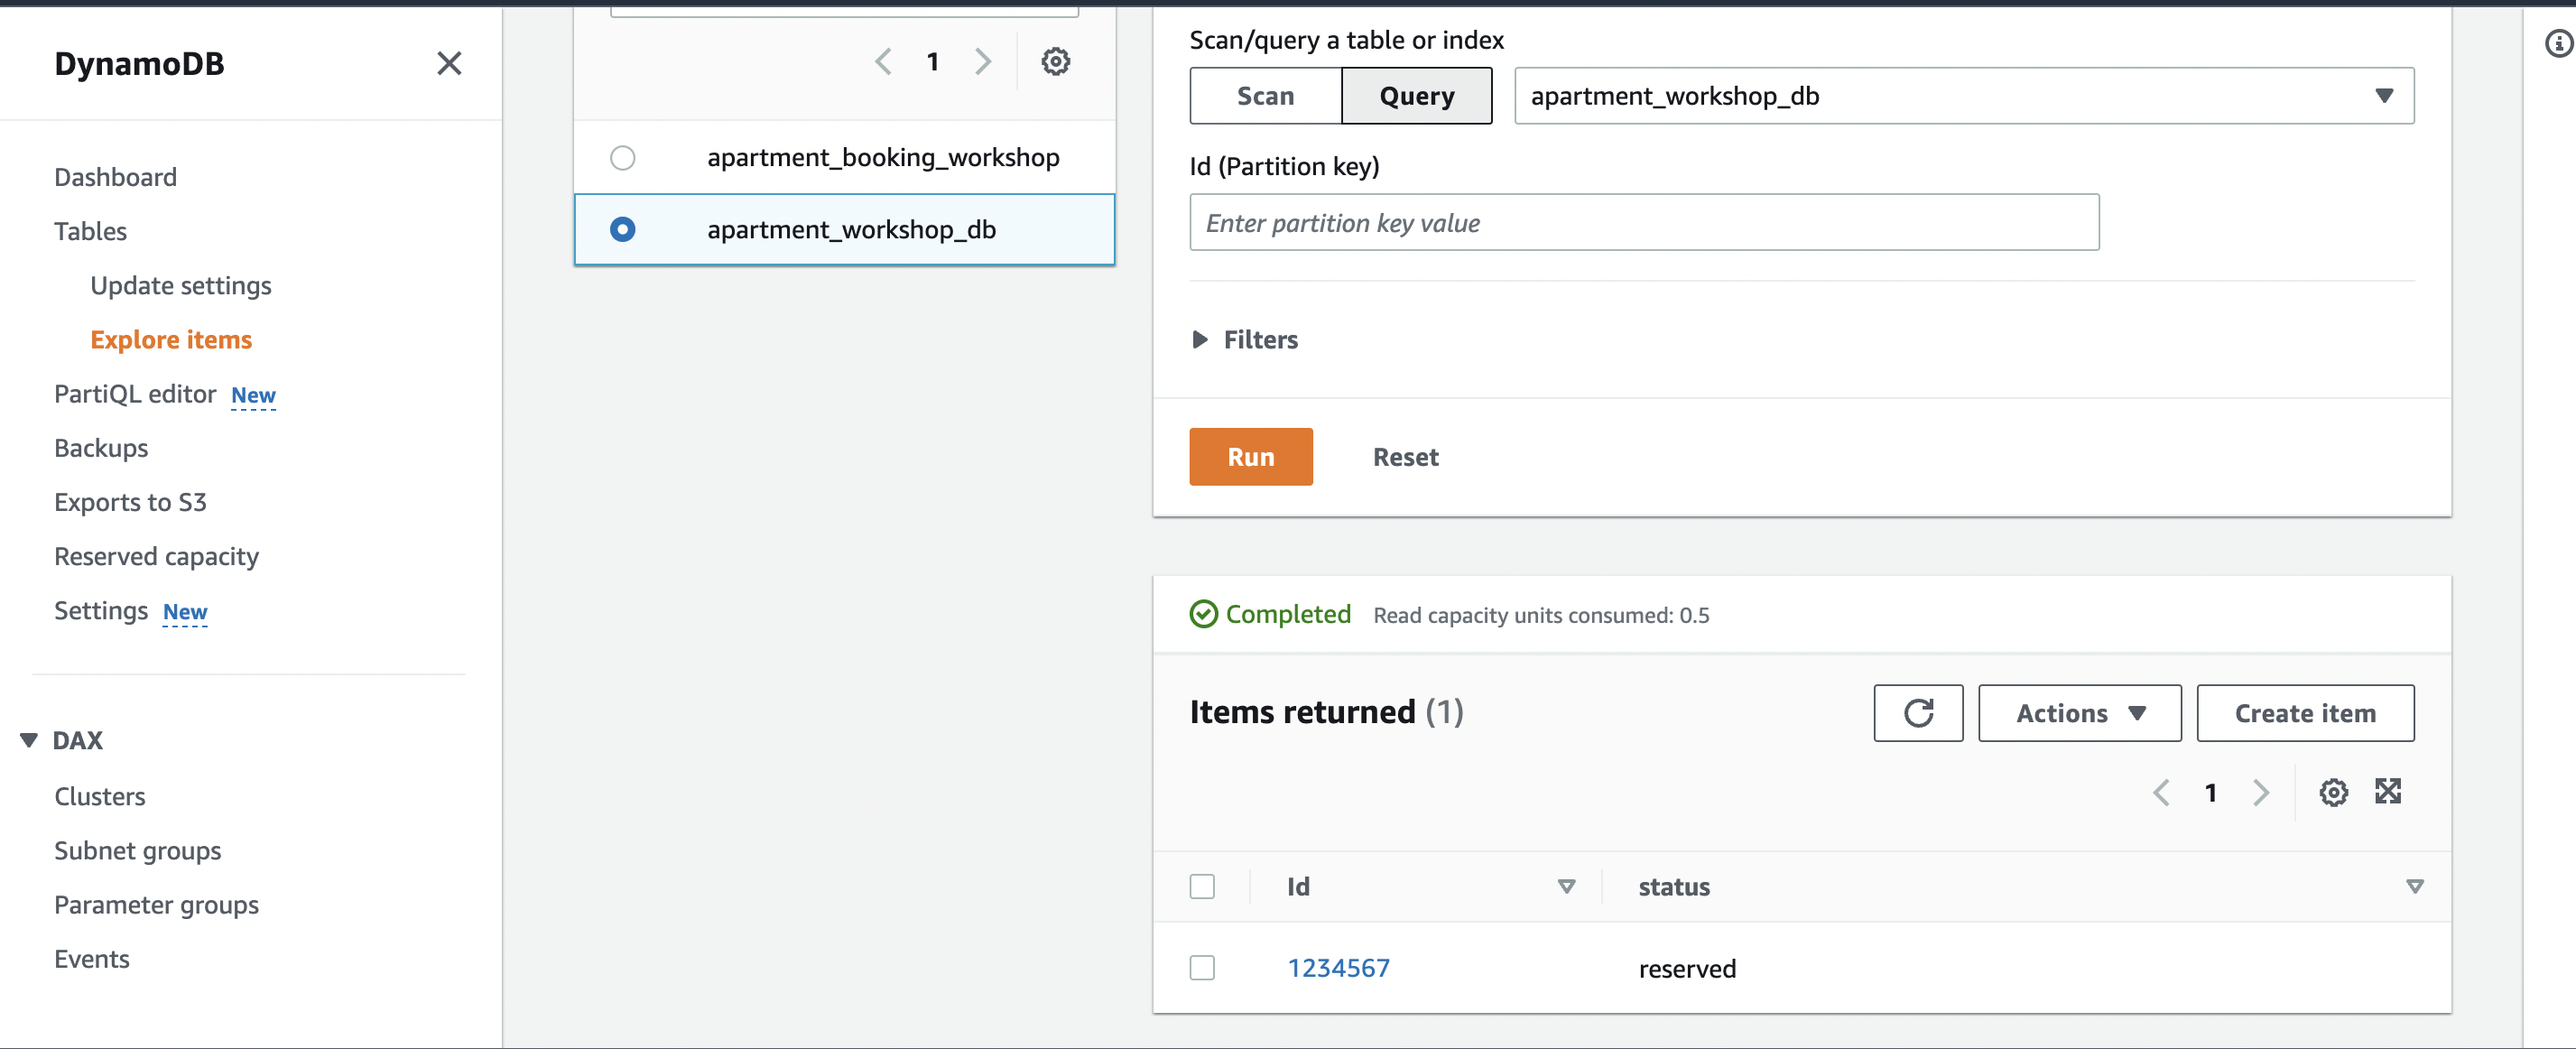
The execution succeeds, meaning that the status of the apartment in the database was changed from vacant to reserved.
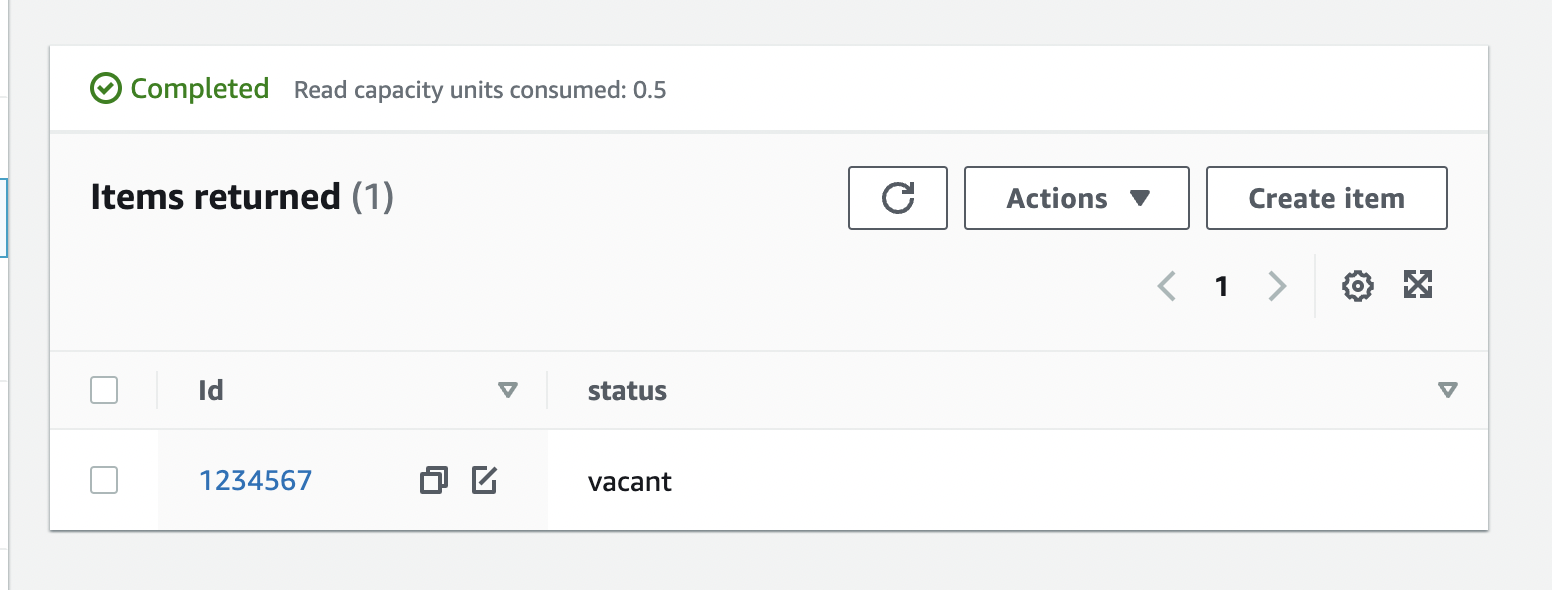
Let’s confirm that by going back to the table in dynamoDB:
What if, for some reason, there wasn’t any apartment with Id (1234567) in the database?
Remember, when defining the API parameters for DynamoDB UpdateItem Task above, we had a conditions expression "ConditionExpression": "attribute_exists(Id)"
This condition asserts that it will only update an apartment if the apartment exists.
Therefore, if the apartment doesn’t exist, throw a ConditionalCheckFailedException error.
We need to add a fail state to catch this error, which is one of the many strengths of Step Functions. Let’s do it:
Click on “Edit”, then Workflow Studio
 Click on the
 UpdateItem task and select the Error Handling Tab
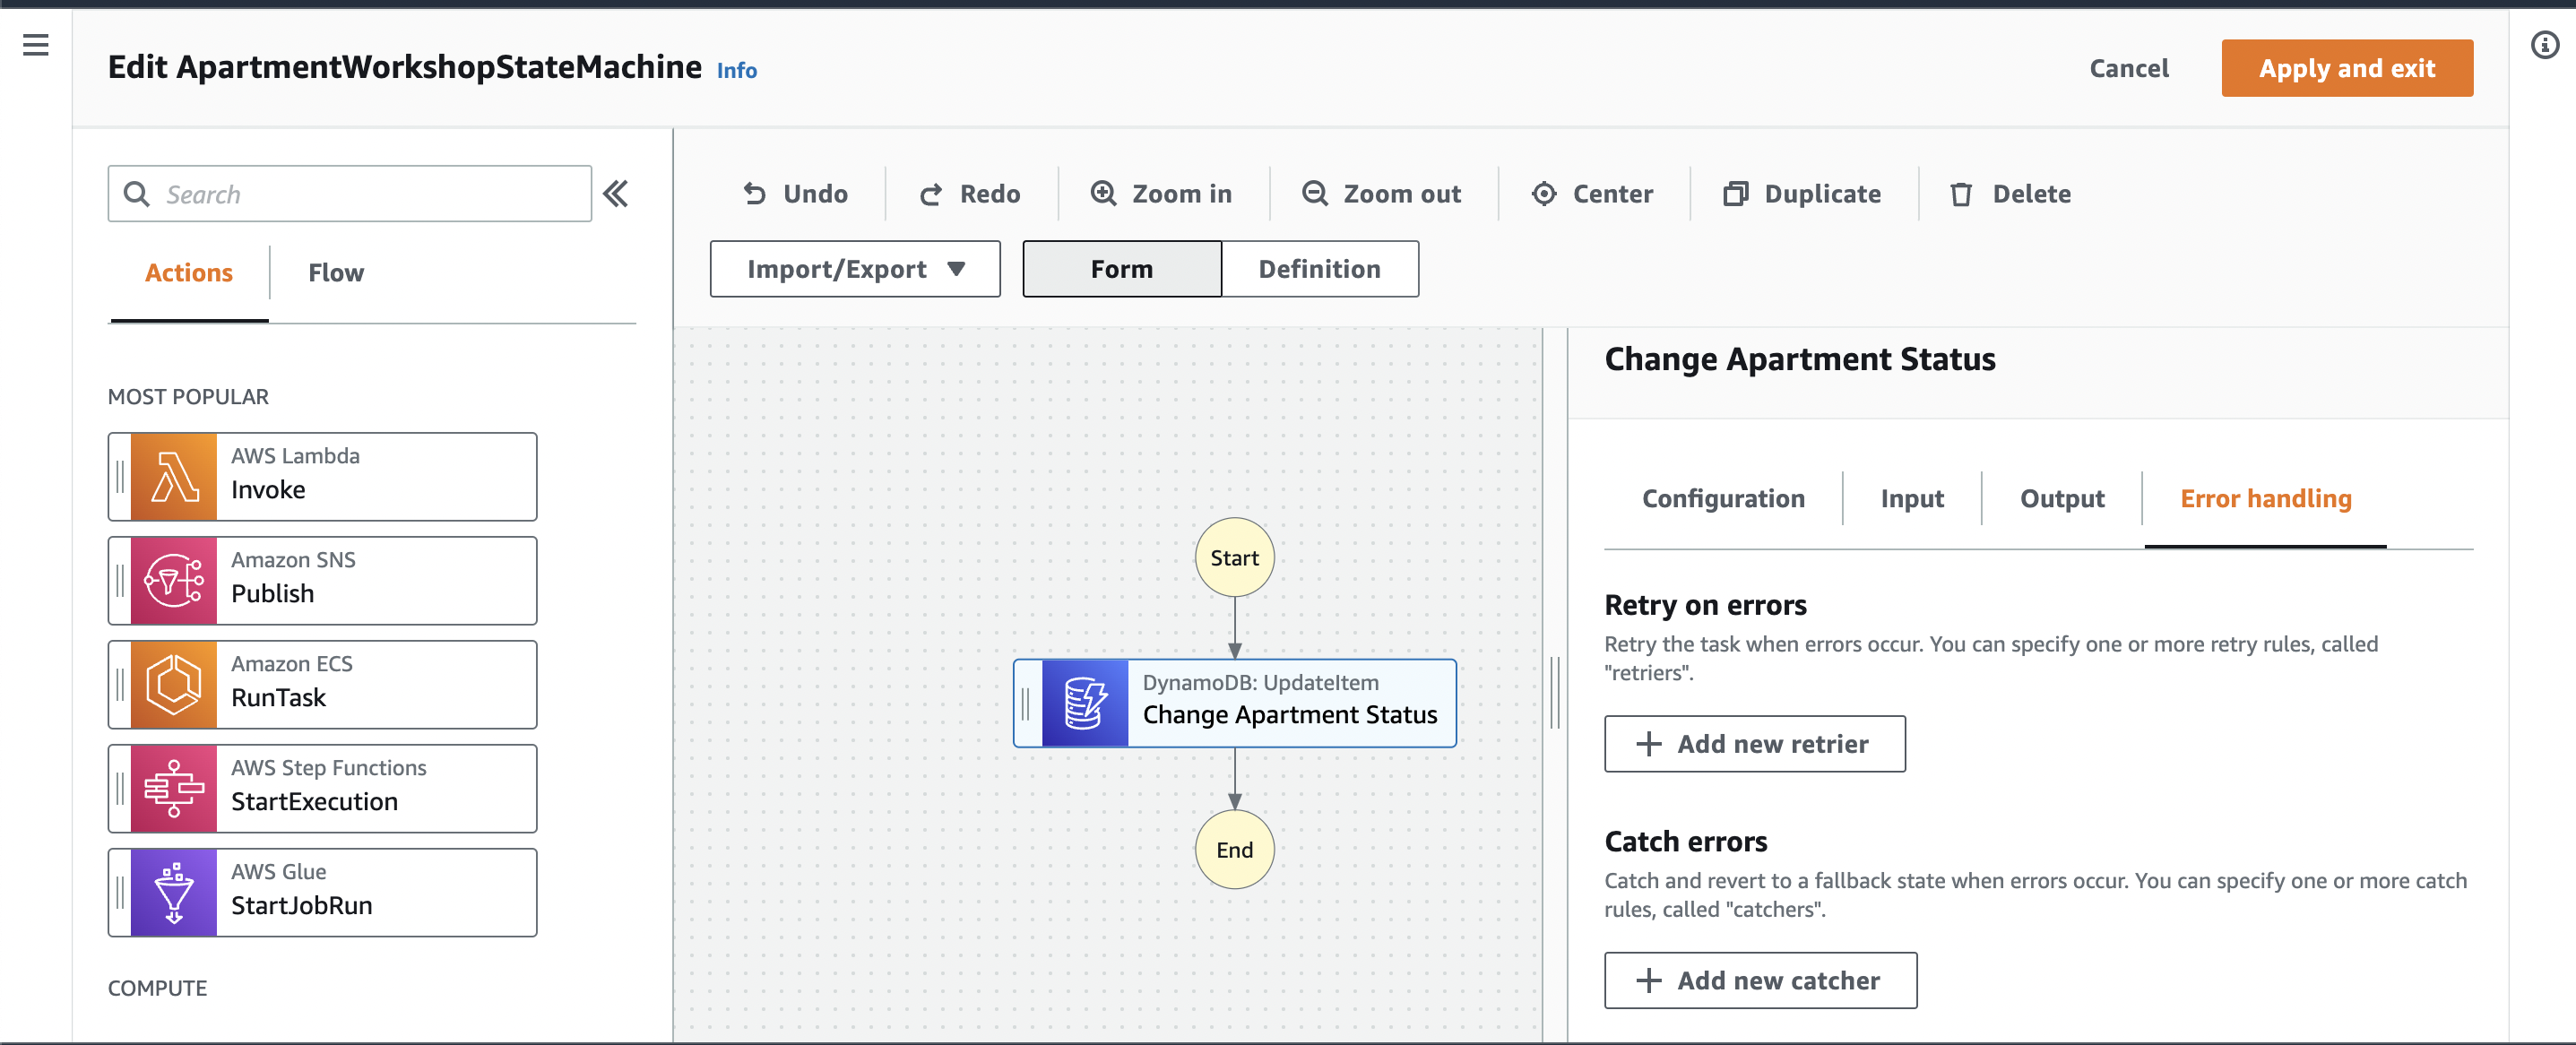 Click on
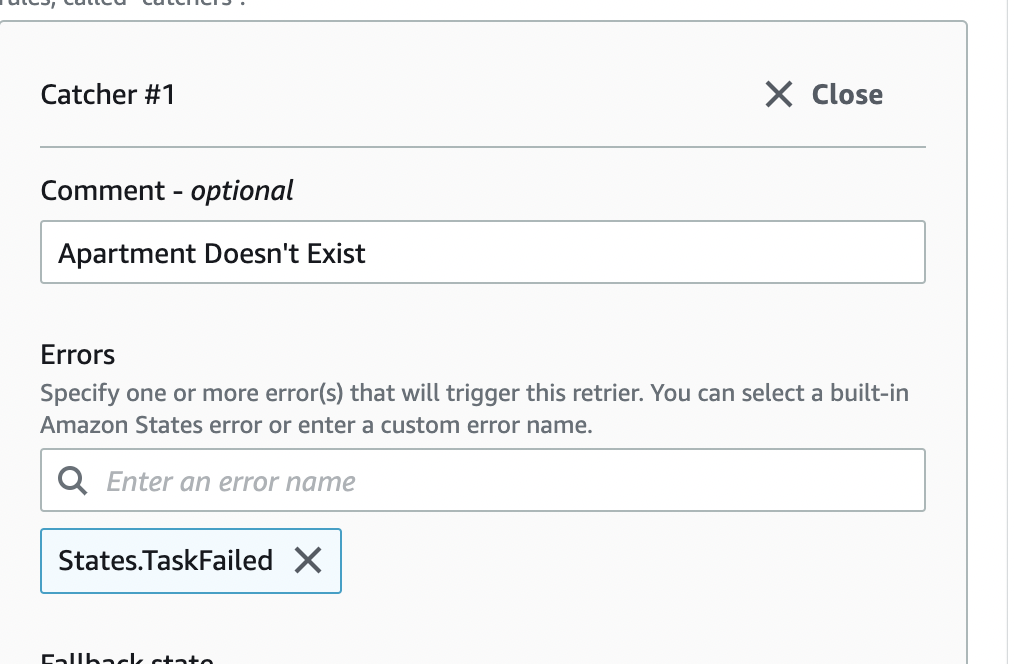
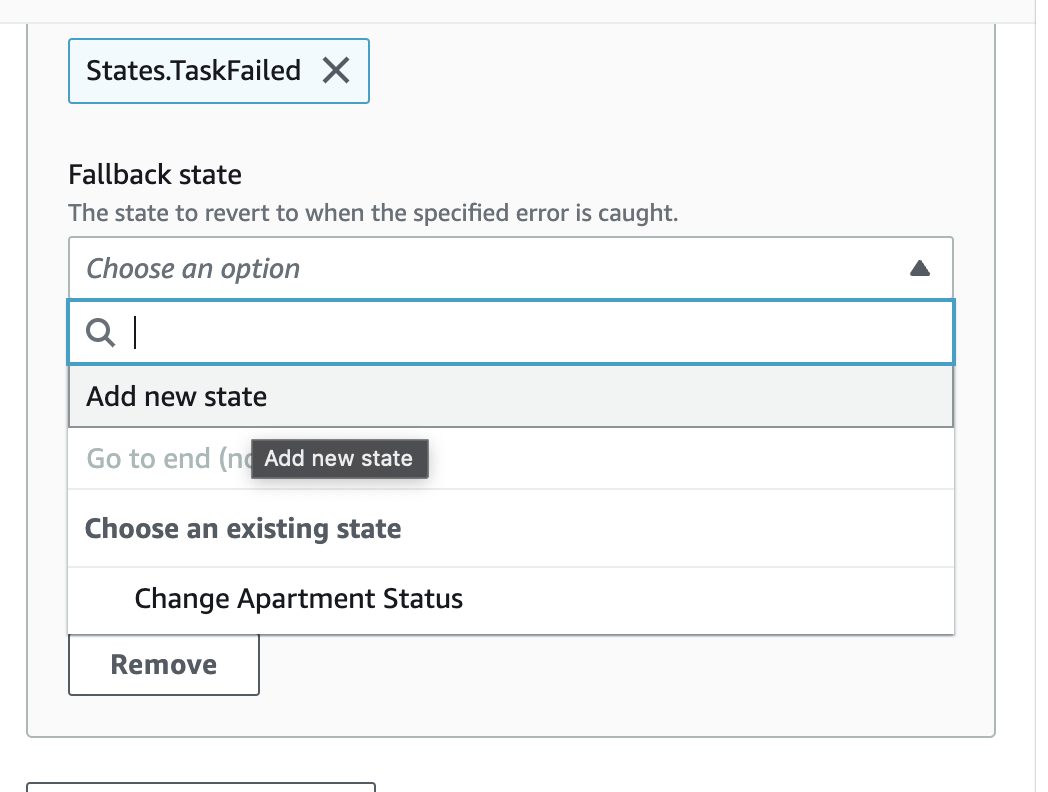
 Add new catcher . Add an optional Comment for errors, next, select States.TaskFailed.
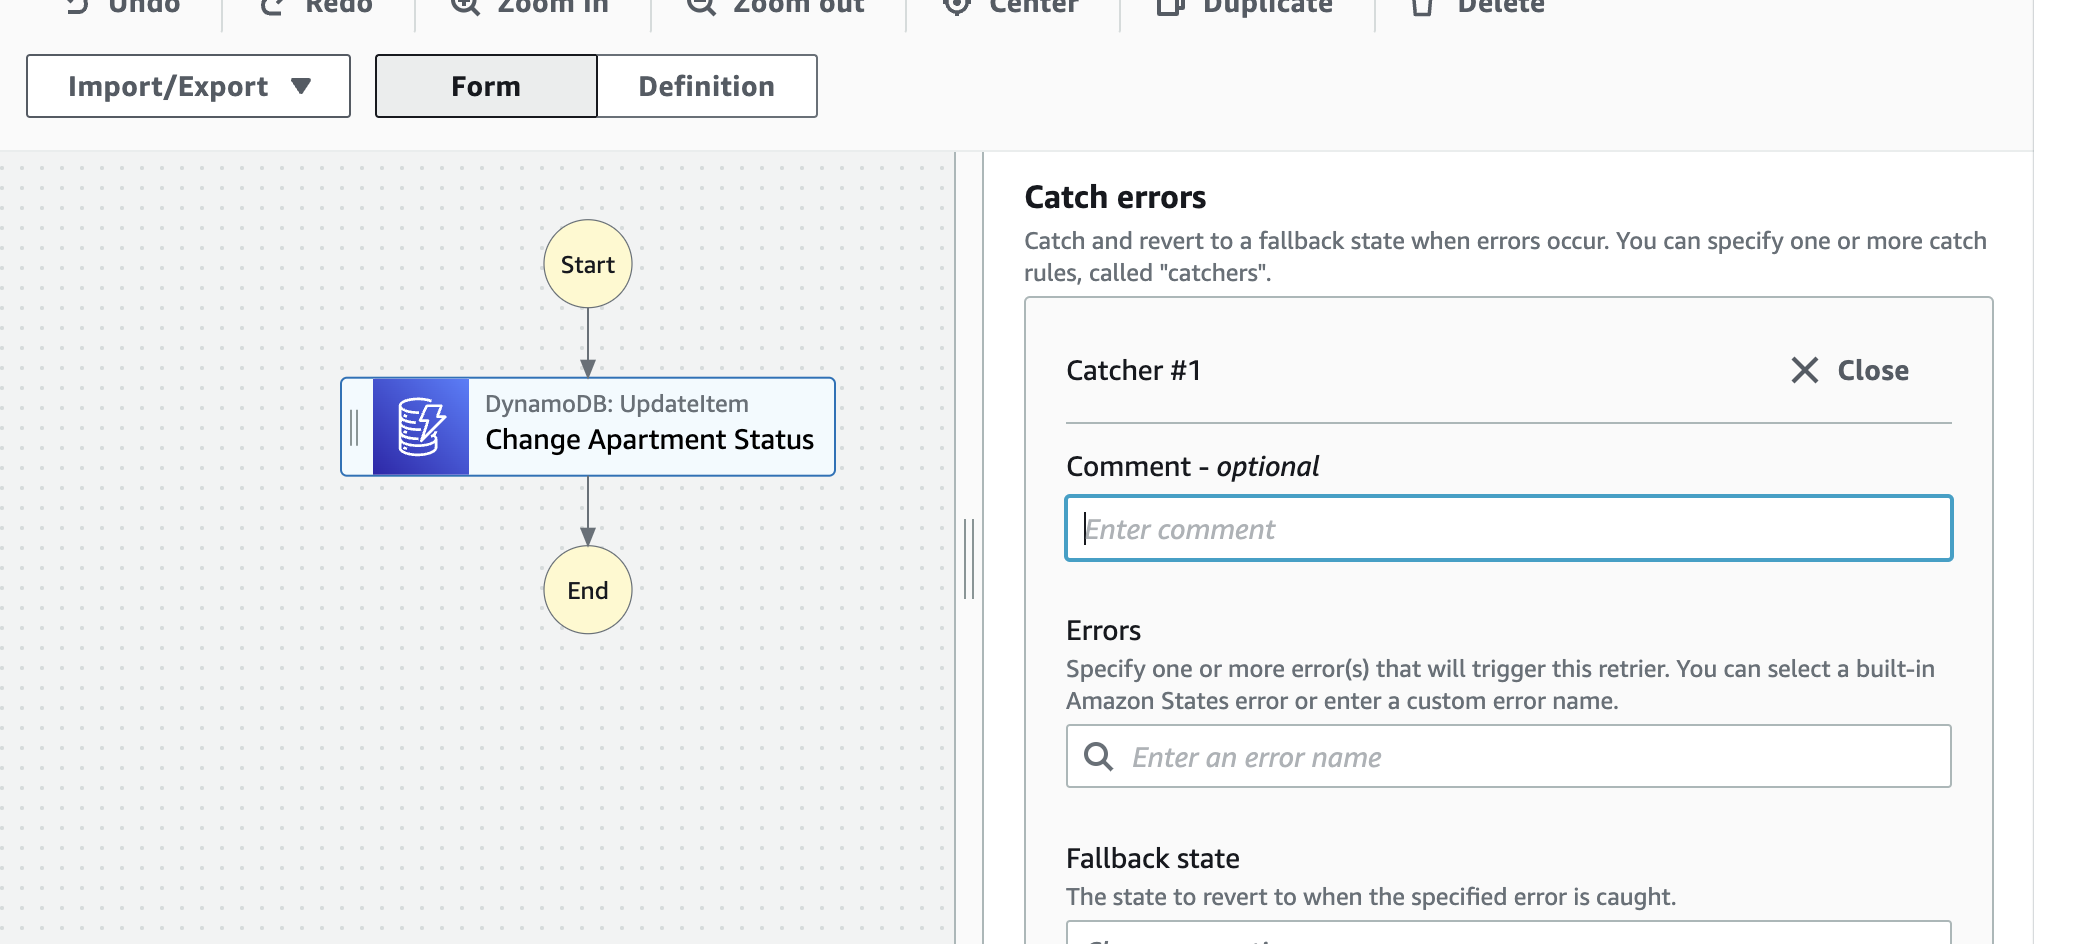
For Fallback state, select add new state.
From the Flow Tab, drag and drop a fail state into the workflow
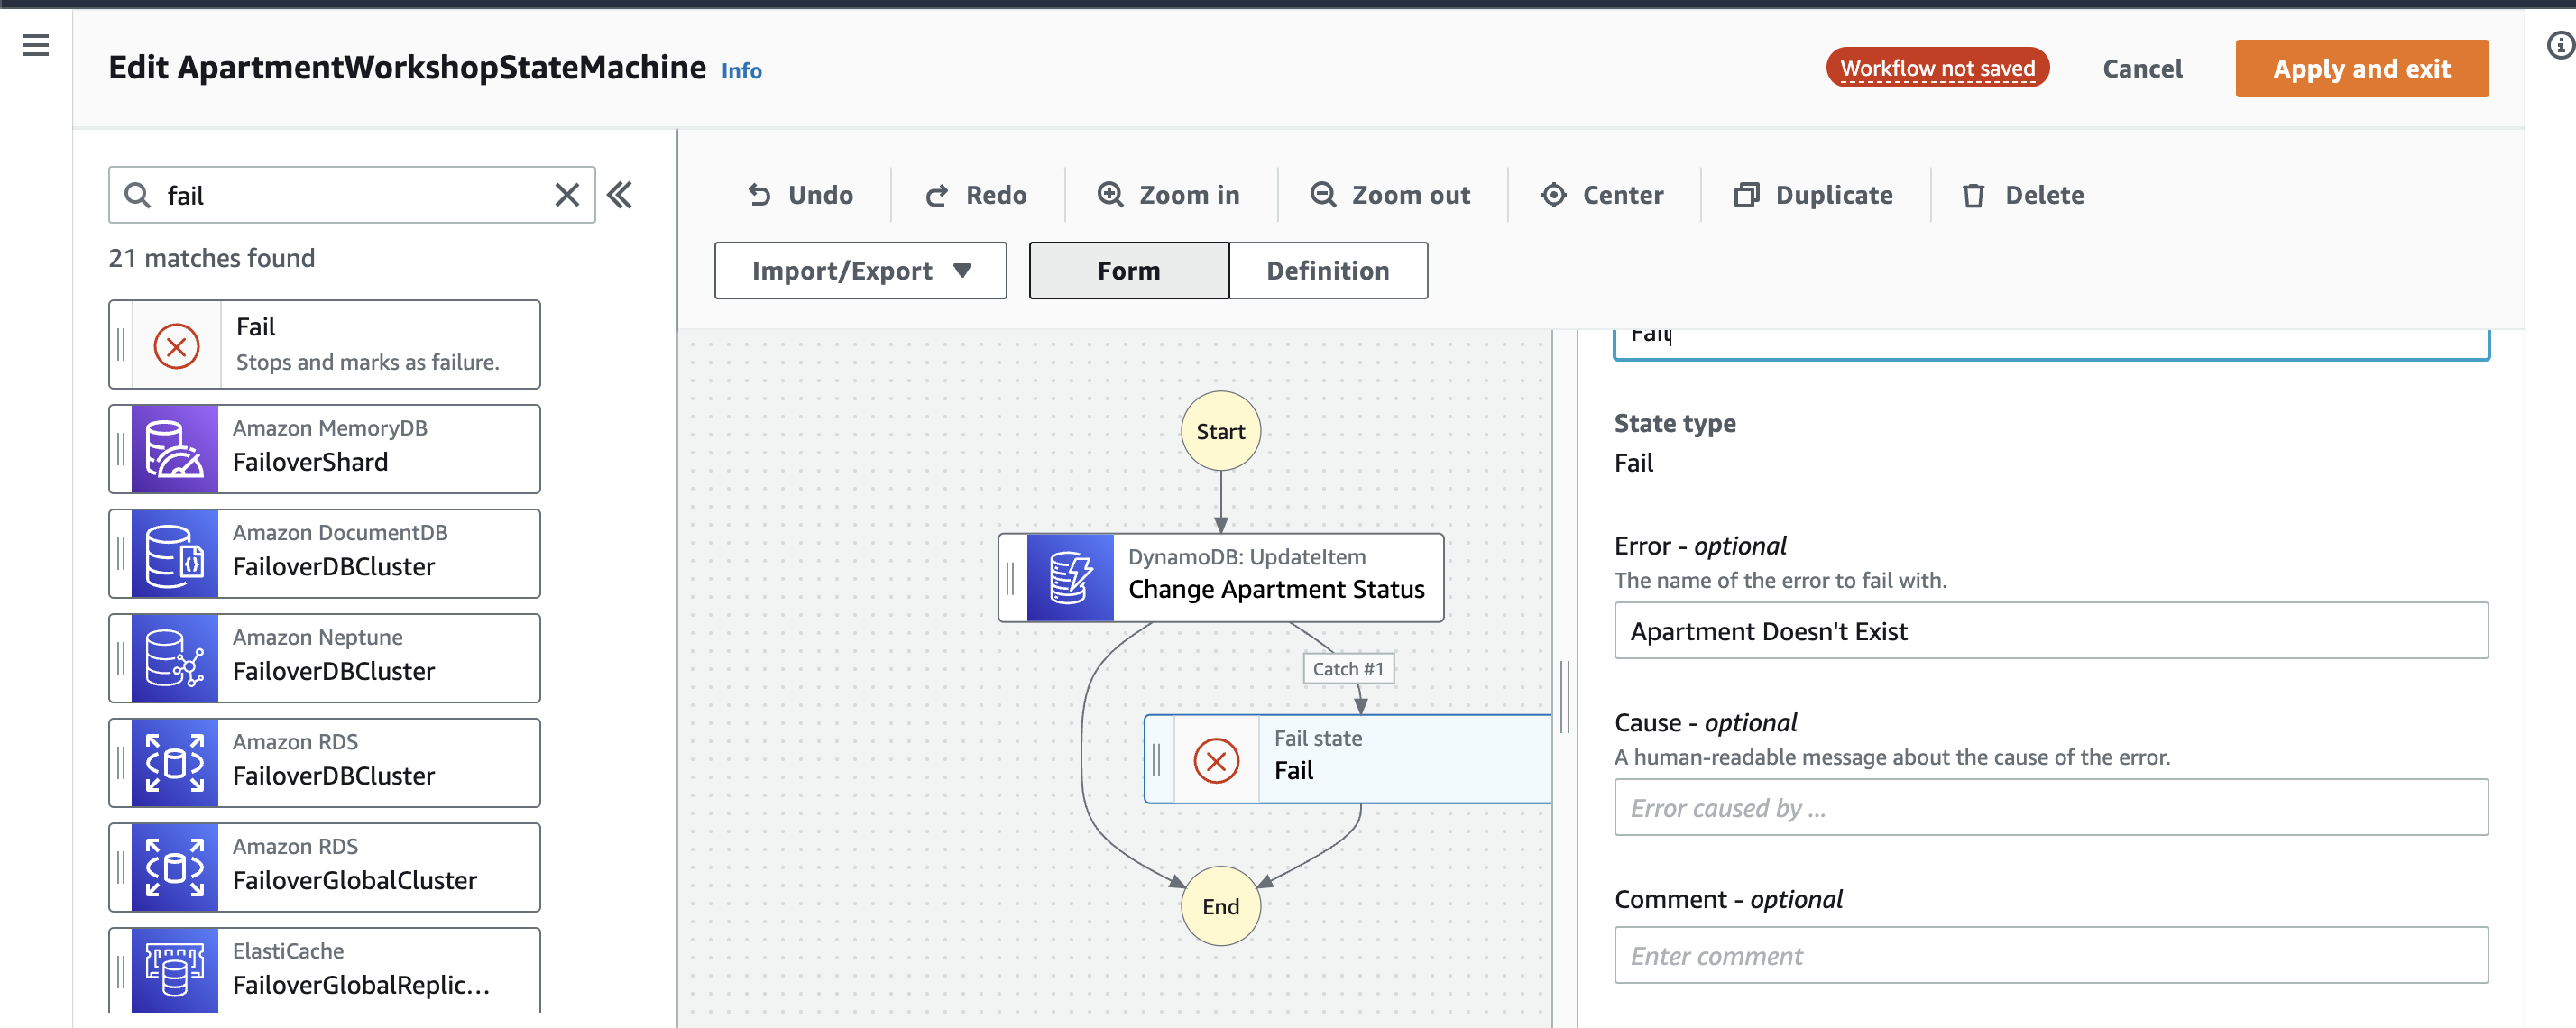
Click on Apply and exist
Click on “Save”.
In order to test this workflow, first, go to the DynamoDB table we created earlier and delete the item we added.
Now let’s go back to the step functions workflow and start a new execution.
{
    "input":{
      "apartmentId":"1234567",
      "status":"reserved"
    }
}
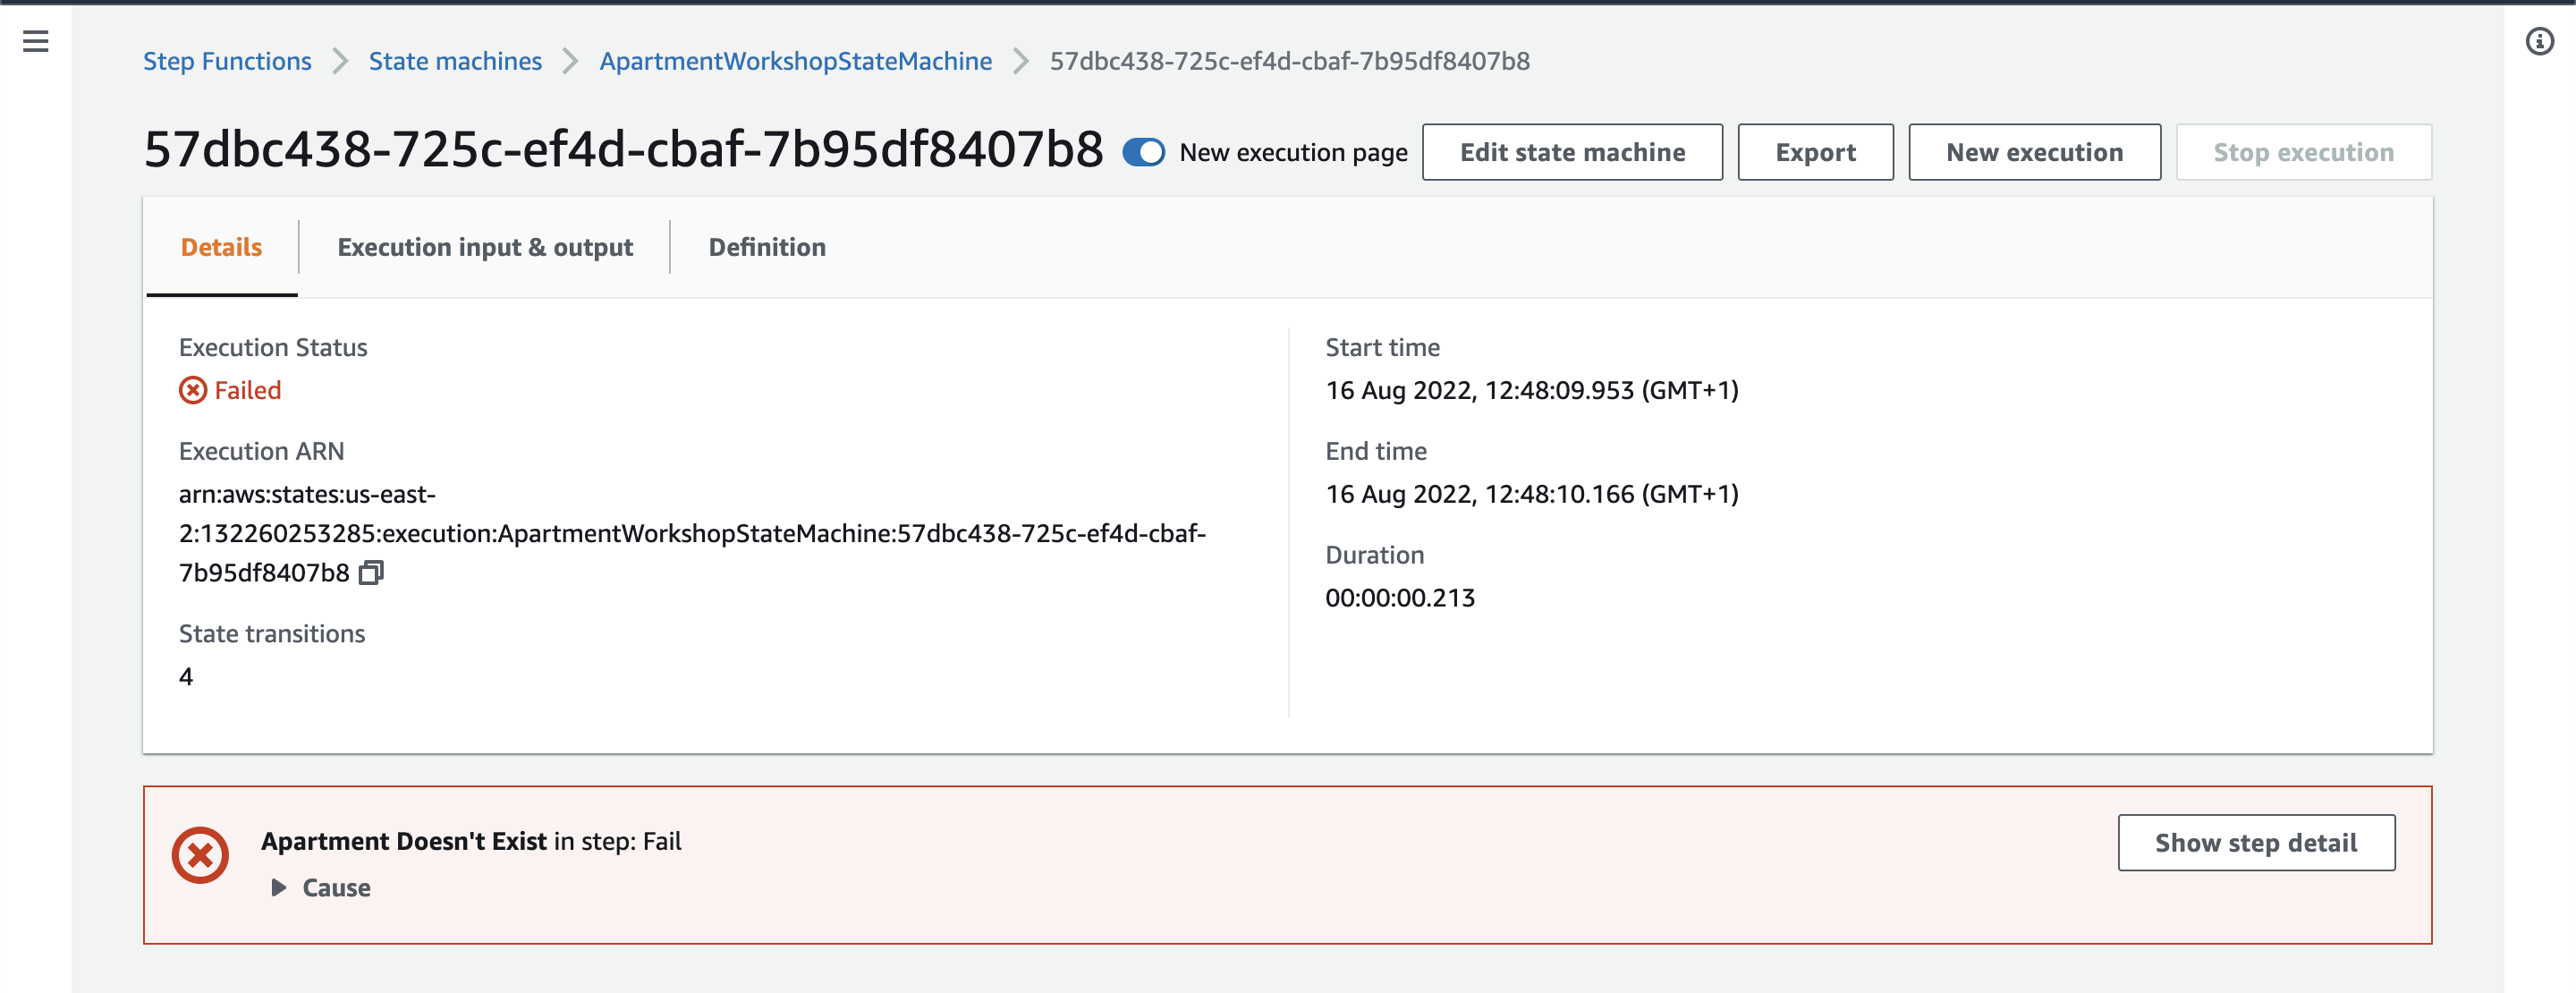
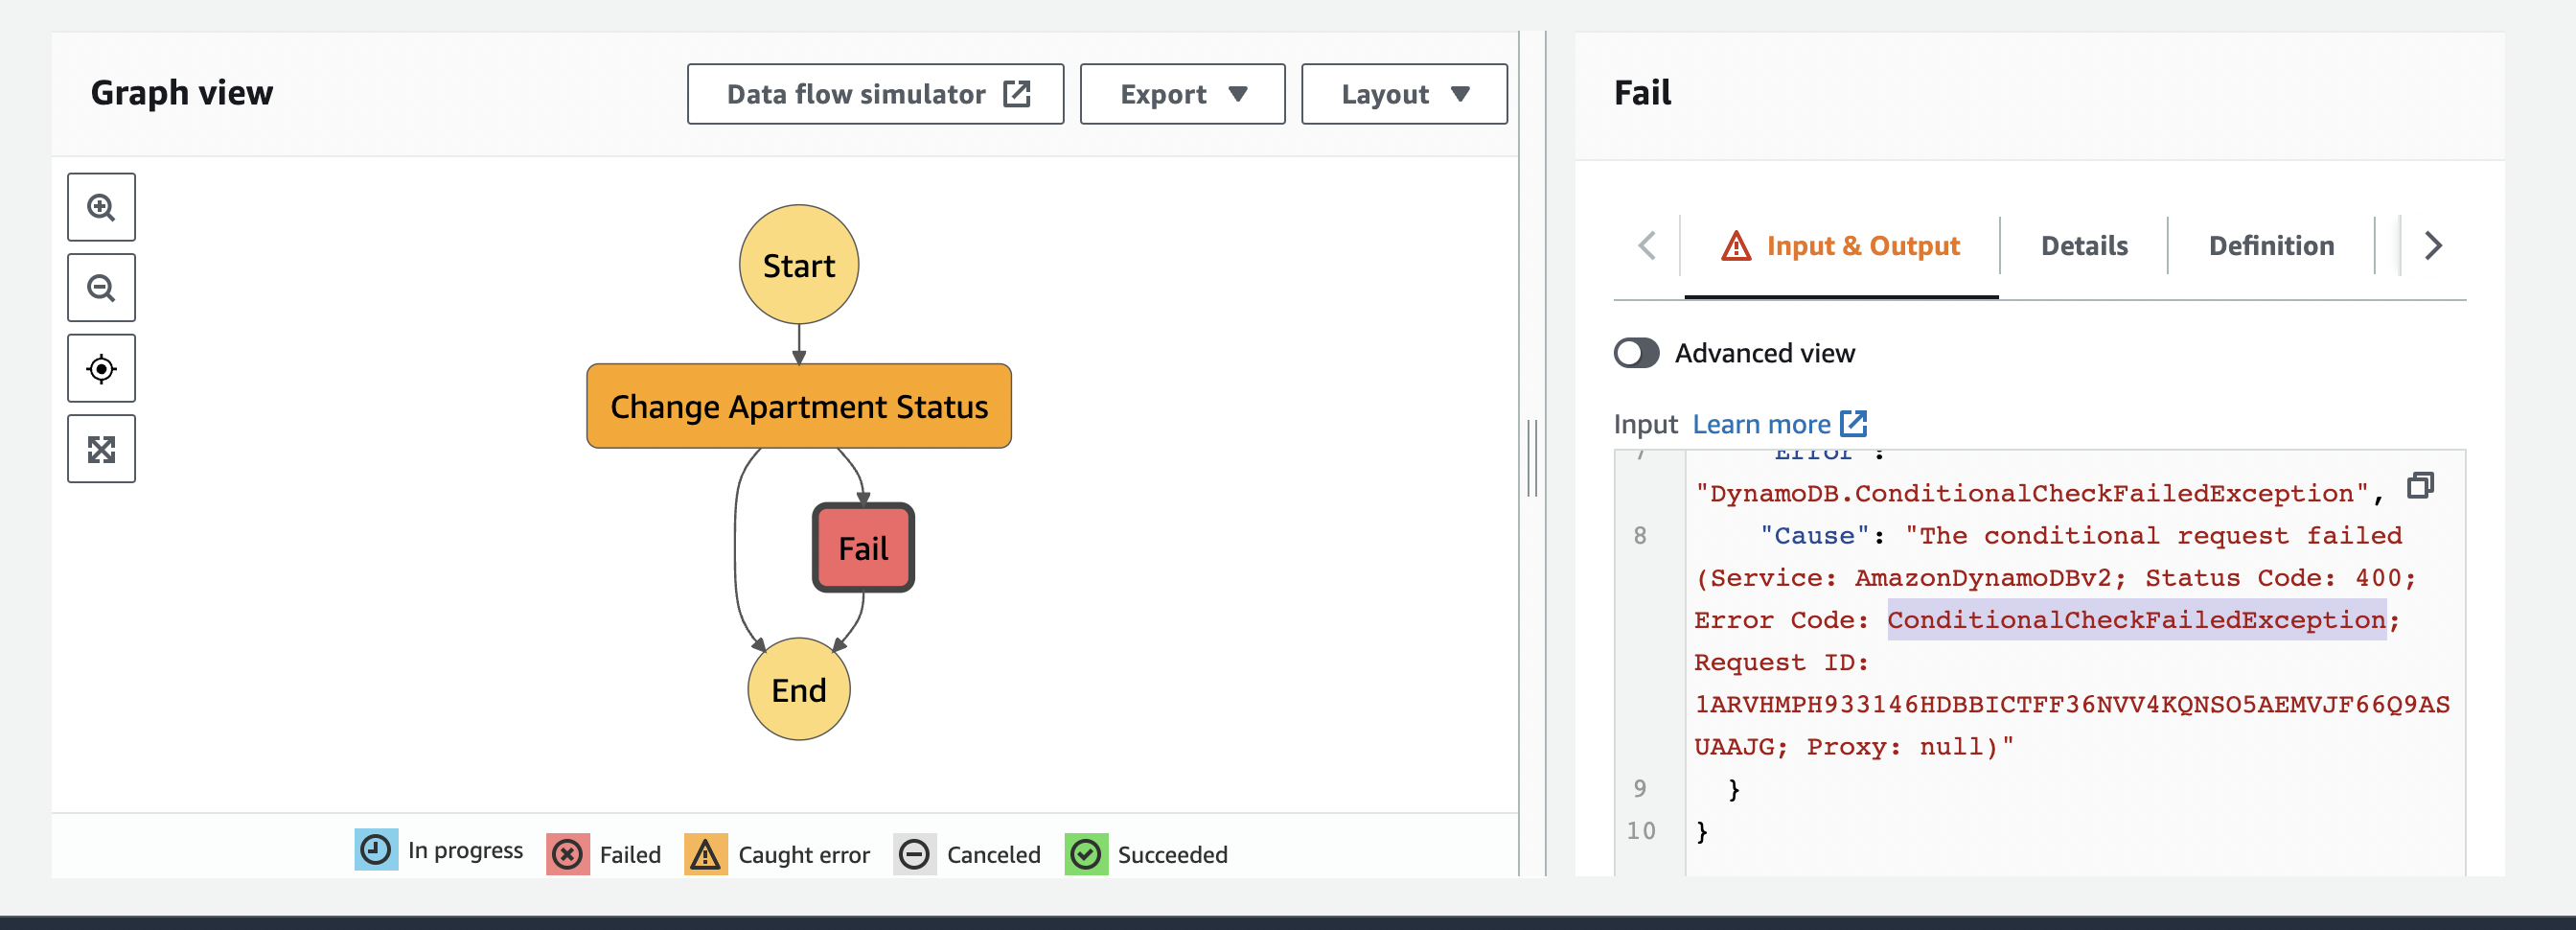
The execution fails with a ConditionalCheckFailedException error
Wait For Payment
Once an apartment has been reserved, the apartment is temporarily put on hold for a particular period of time until payment is made or the time expires.
Now is a good opportunity to use the wait state.
Click on Edit State Machine
From the Flow Tab, drag and drop the Wait state onto the workflow.
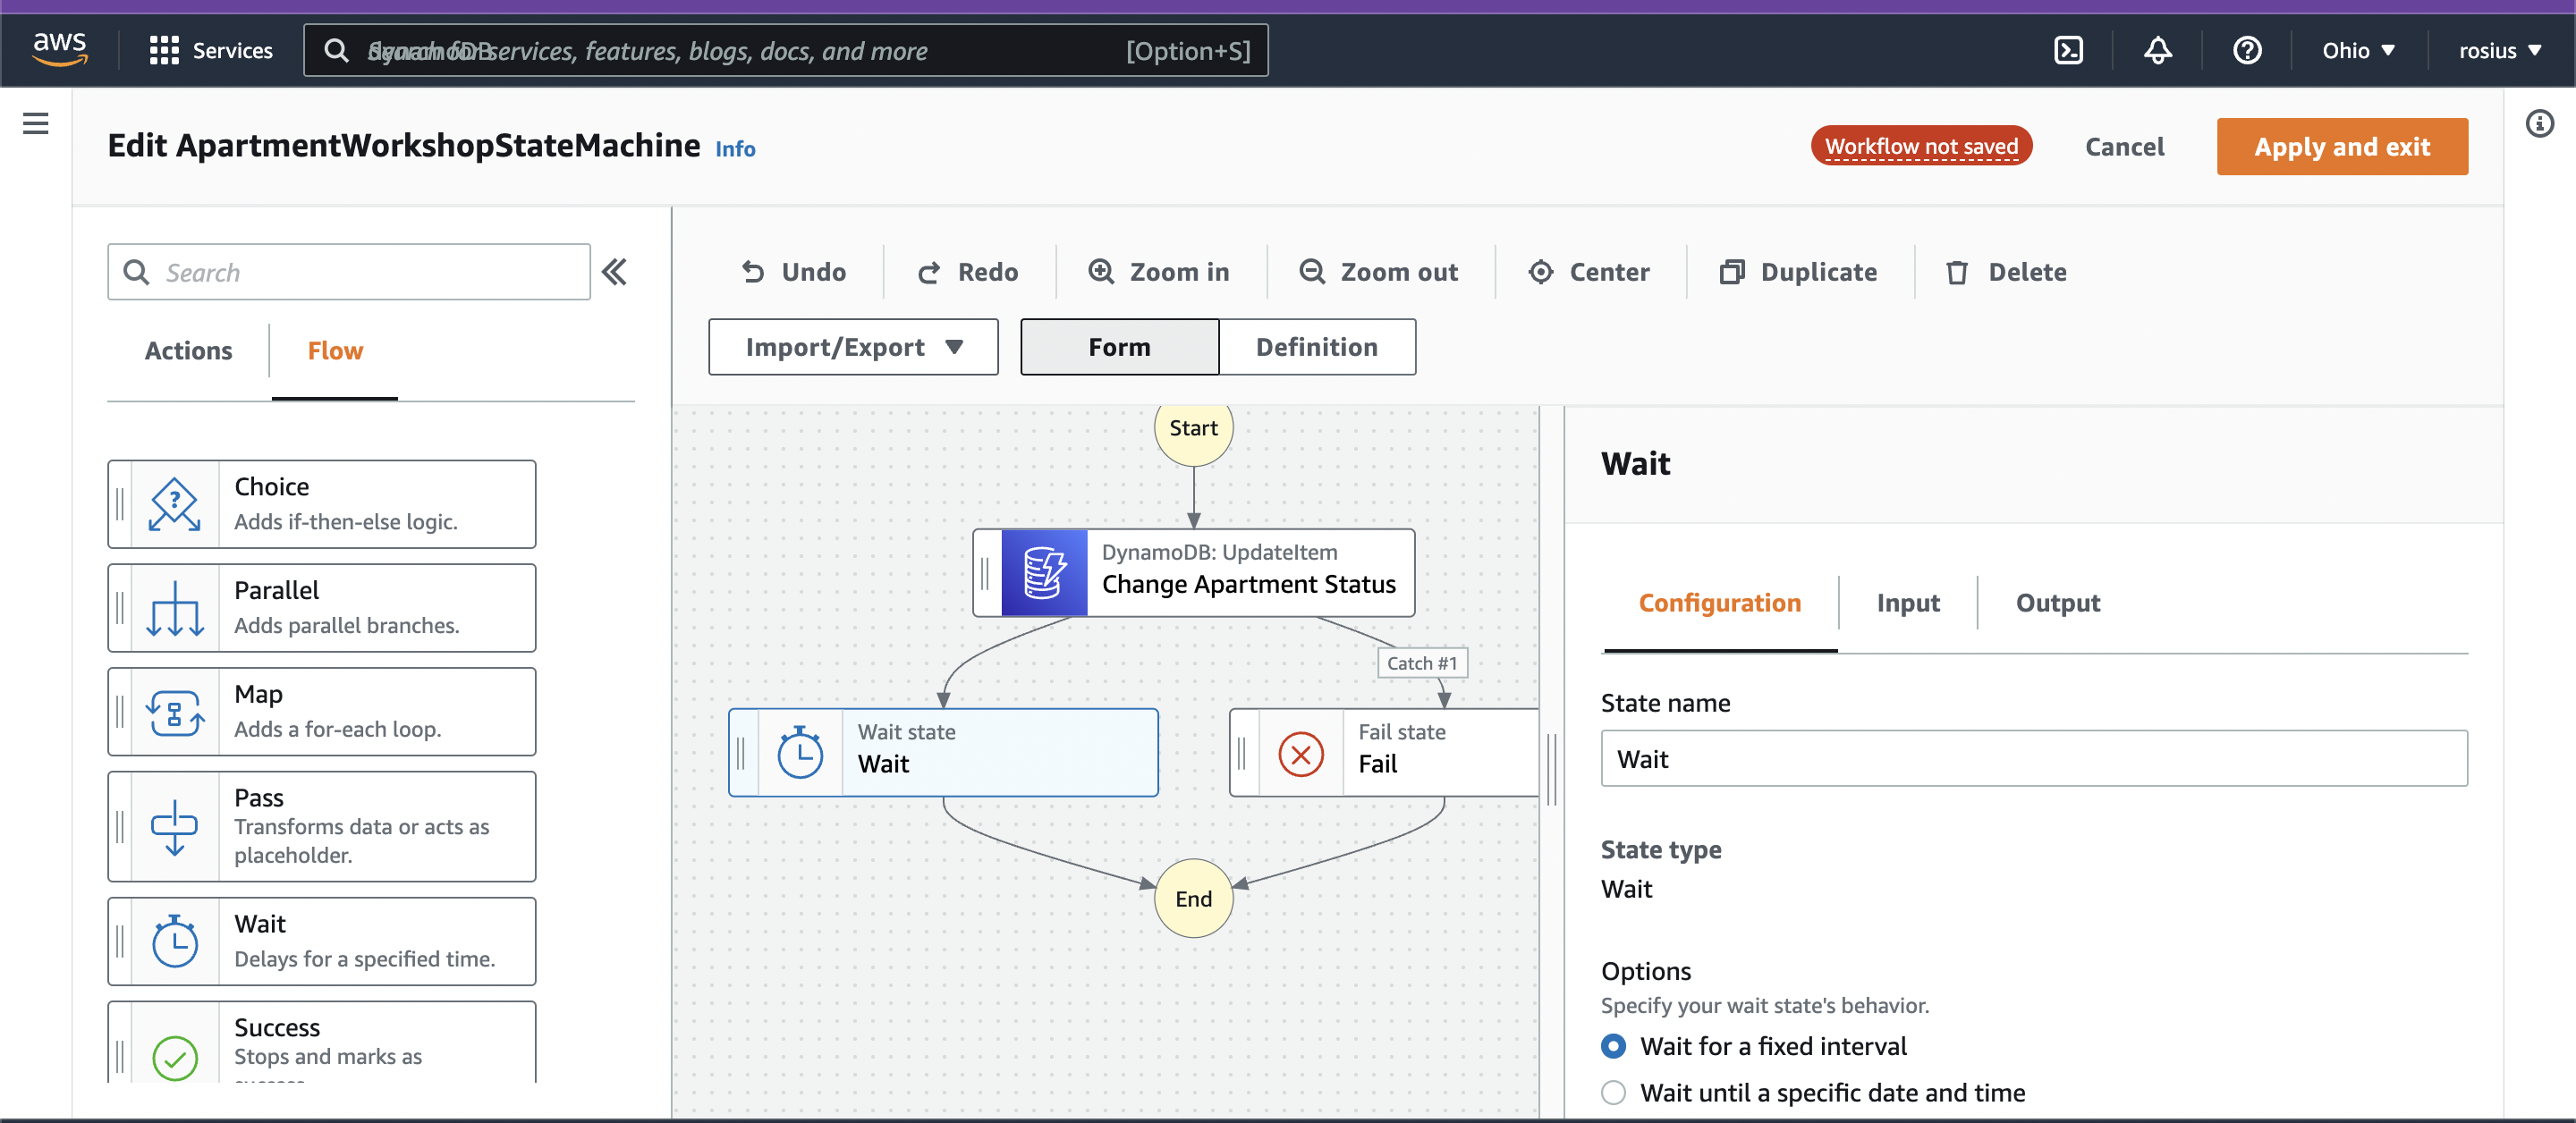
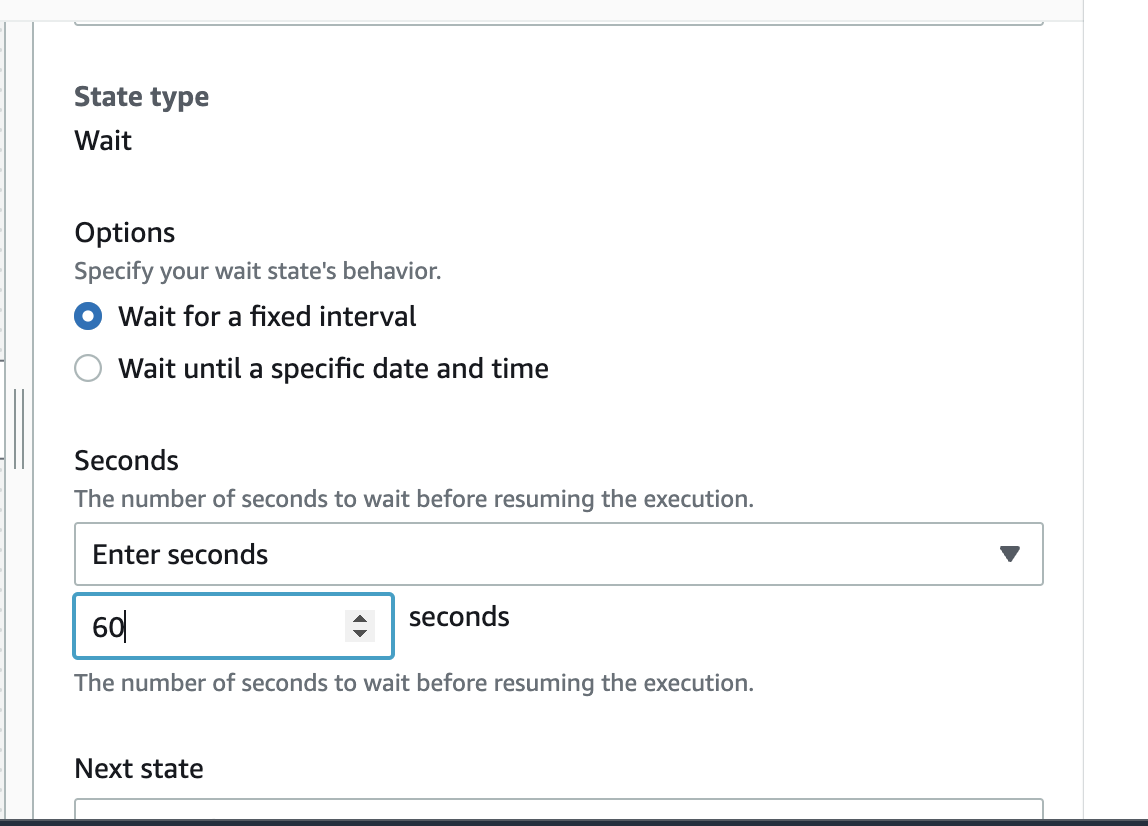
Because this is a tutorial, we want to give the client just 60 seconds to pay for the apartment or risk their reservation being canceled.
Therefore, in the configuration window, enter 60 seconds as the wait time
Get Apartment Status
When the wait time expires, we want to get the status of the apartment. Therefore, we’ll use a DynamoDB GetItem Task to get the status of the apartment.
From the Actions Tab, drag and drop the DynamoDb GetItem task into the visual workflow after the wait state
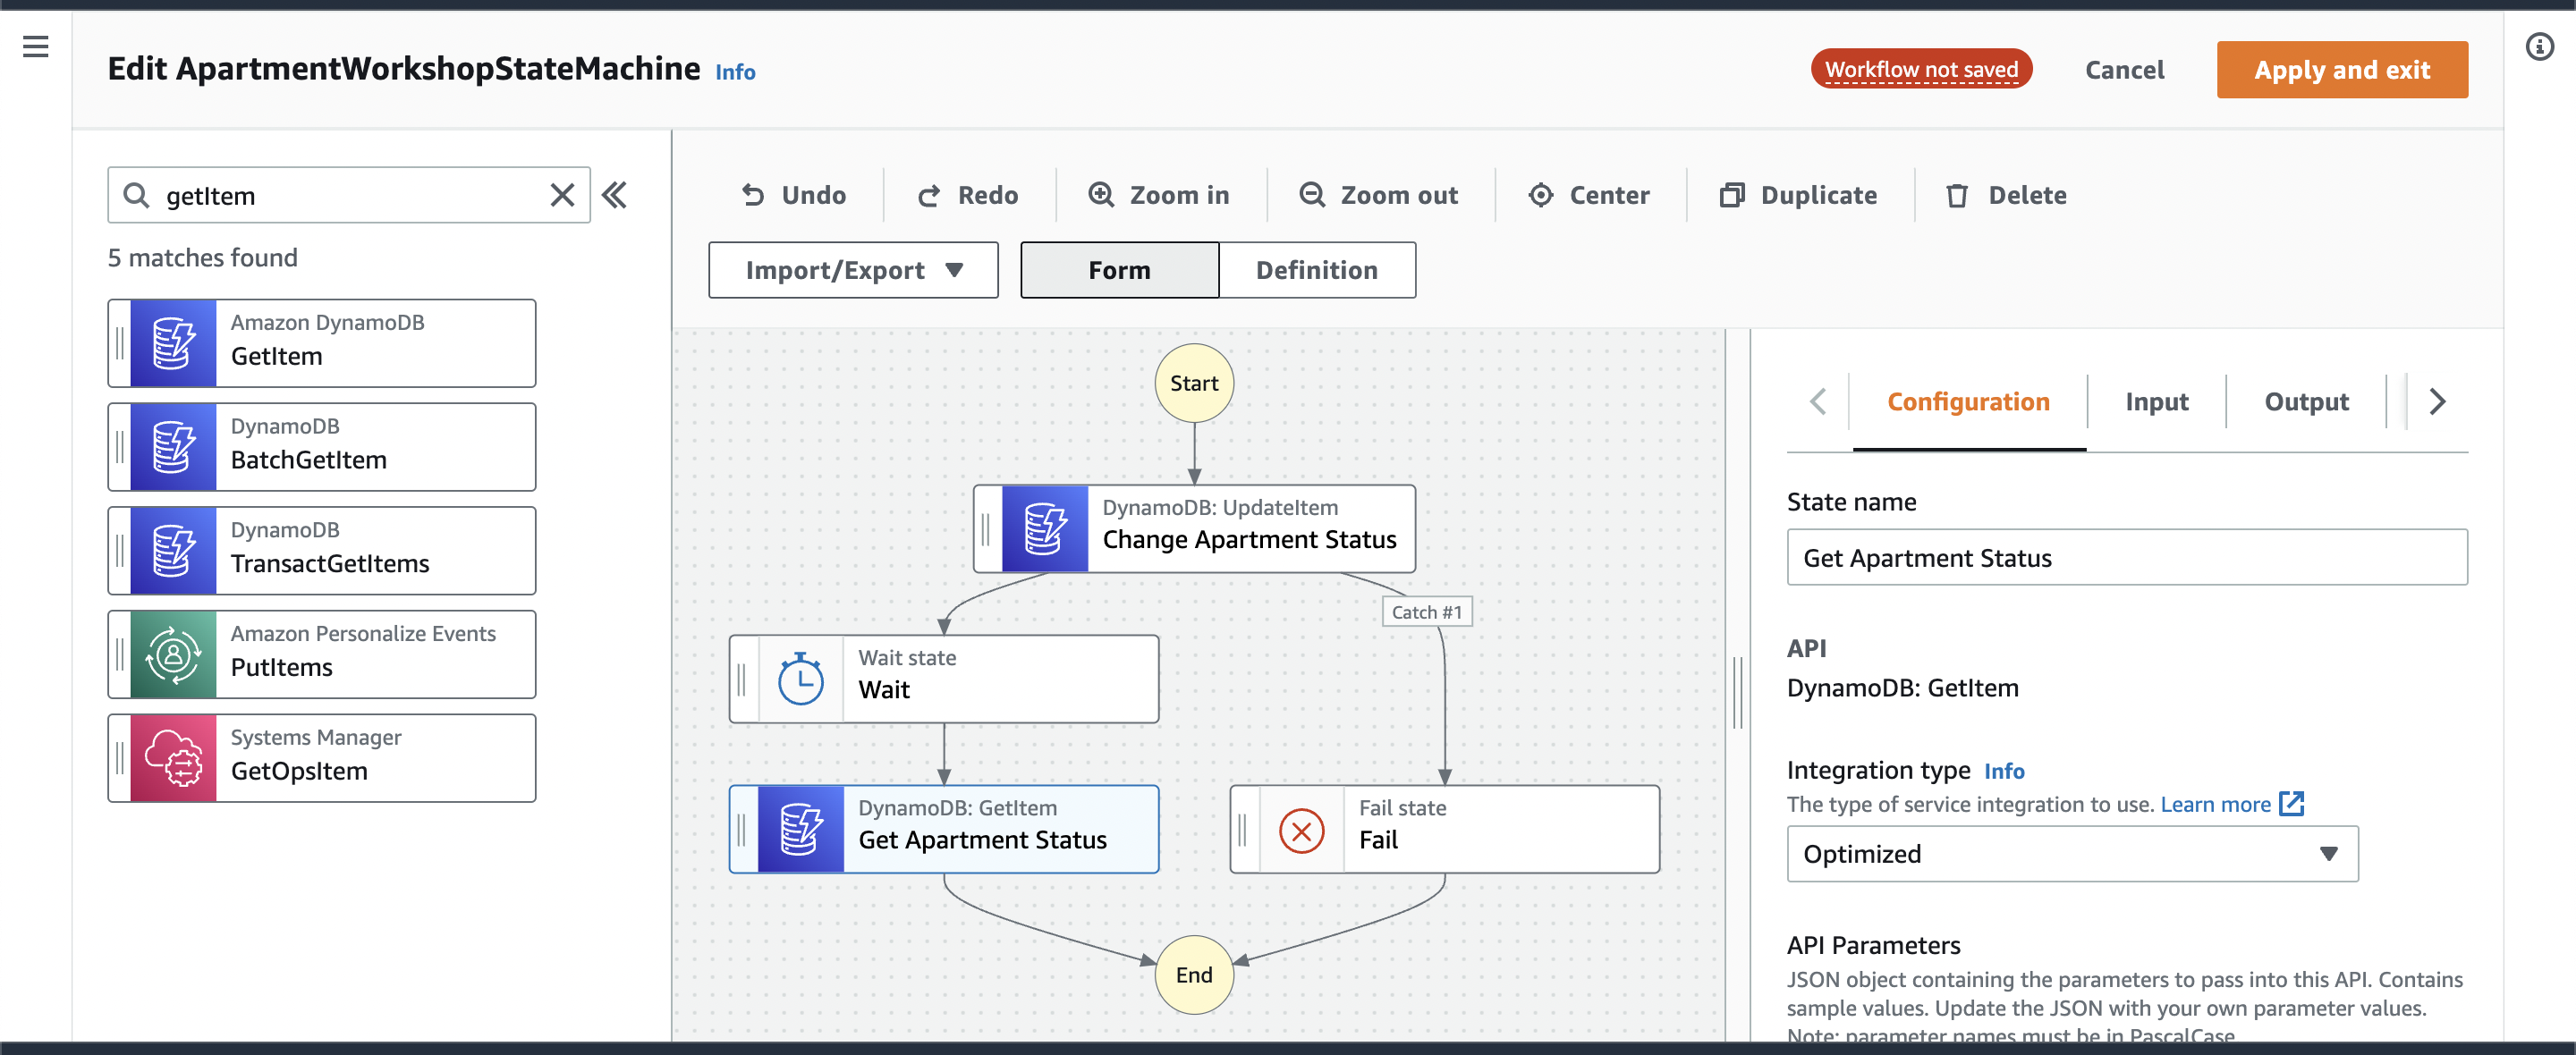 Give the state a name like “Get Apartment Status” and the API Parameters object is:
{
  "TableName": "apartment_workshop_db",
  "Key": {
    "Id": {
      "S.$": "$.input.apartmentId"
    }
  }
}
We’ll query the dynamoDB table for this apartment, and if we get a result, we need to pass that result as output, preferably combined with input.
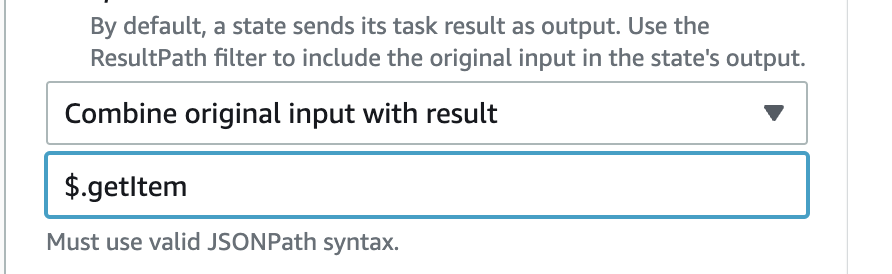
Click on the Output tab on the right side visual editor, and check the checkbox “Add original input to output using ResultPath - optional”
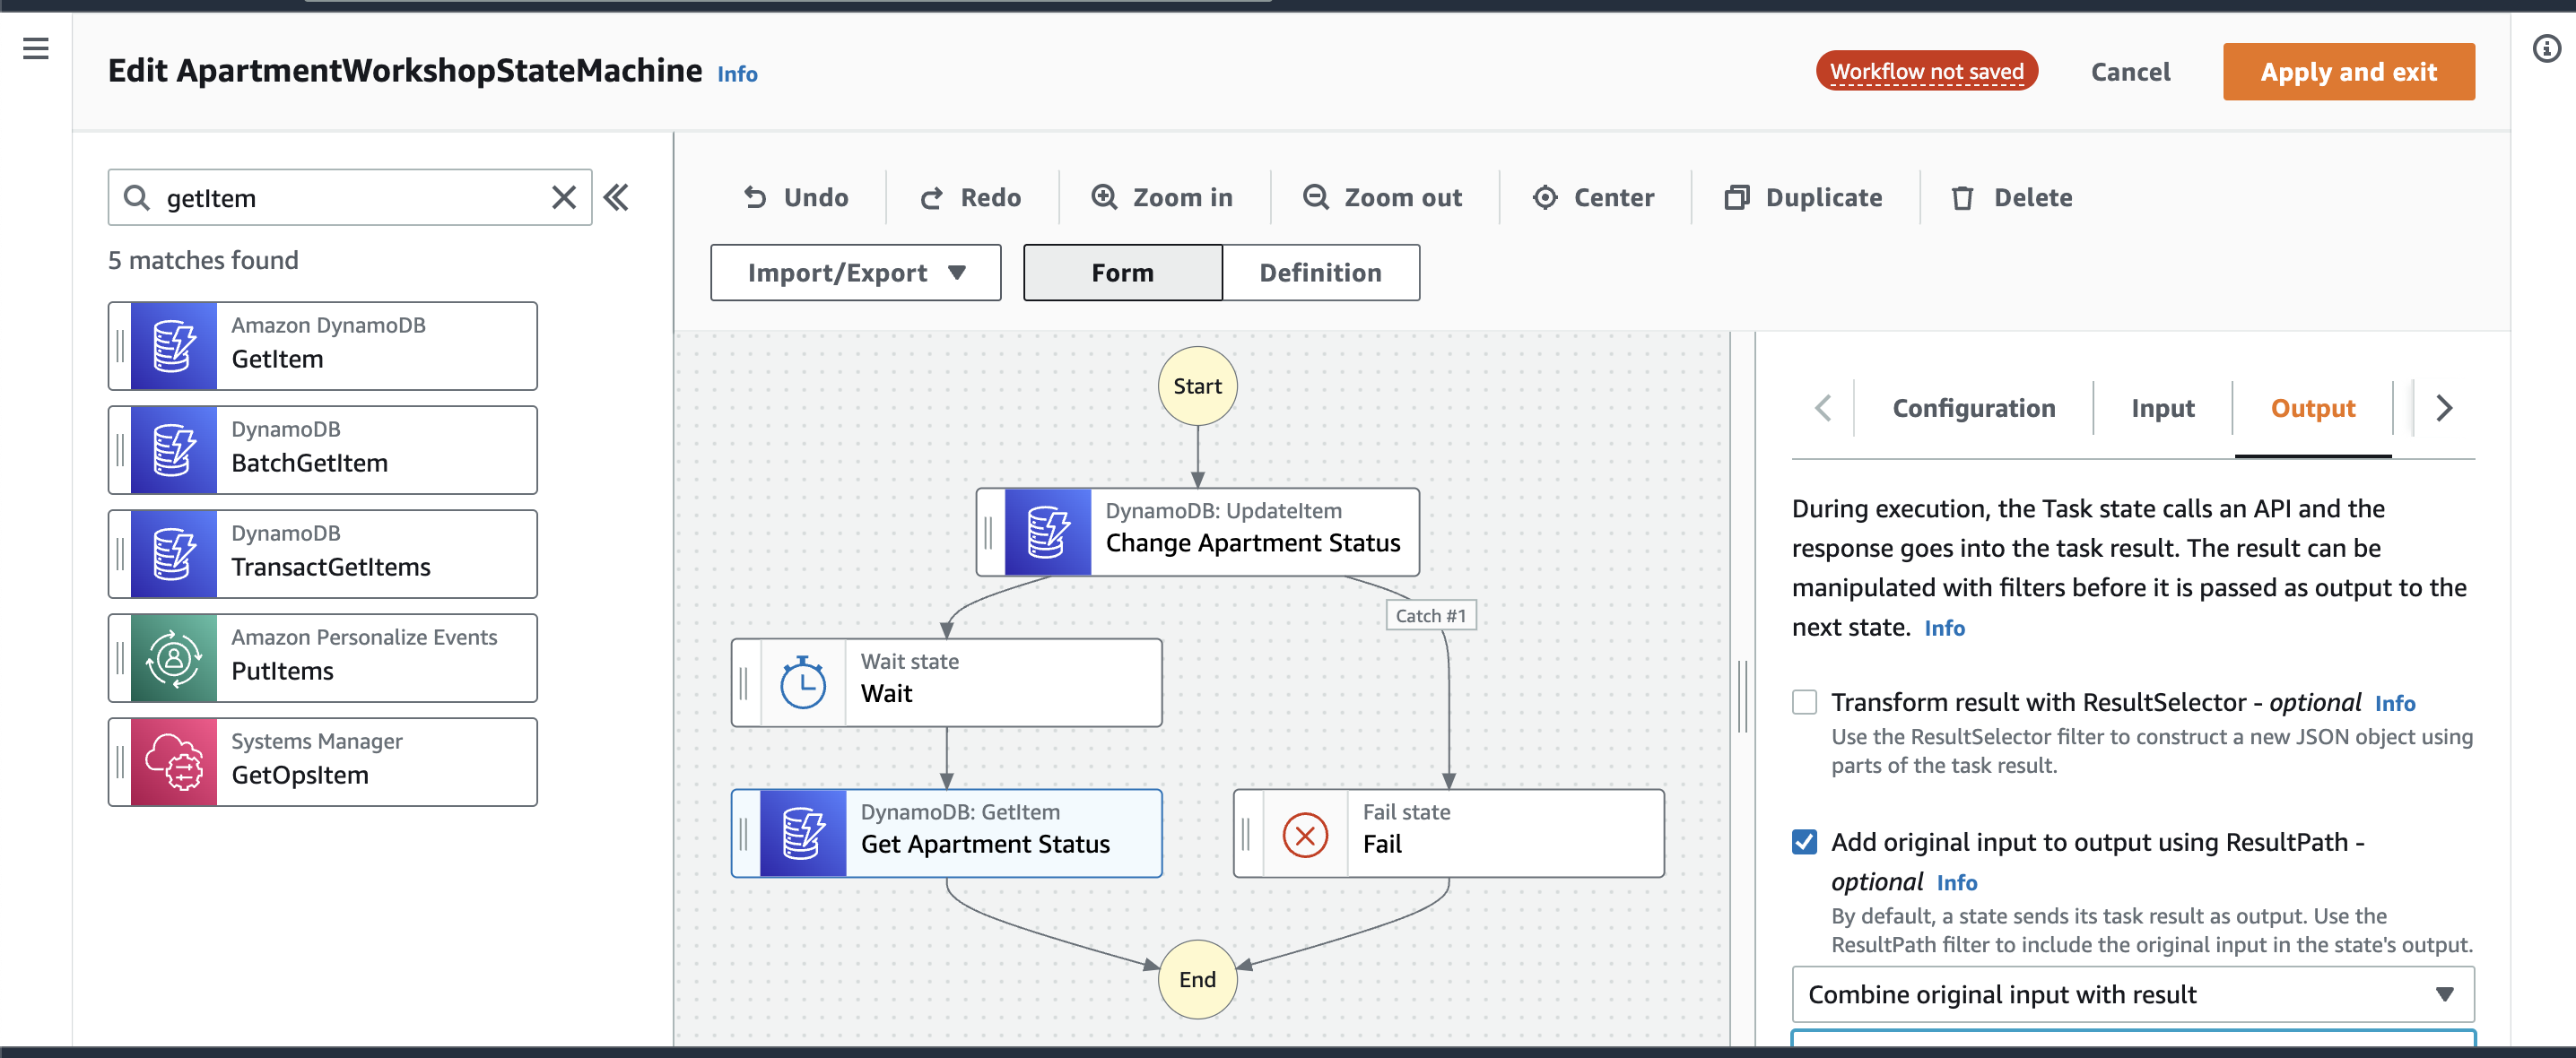
Select “Combine original input with result” and name the result path as $.getItem
Has the Client made payment?
After getting the status of the apartment, we want to check if the client had made the payment or not. In this case, we will use the choice state to check if the apartment status is equal to Paid or Not.
Again, from the Flow Tab, drag the Choice state and drop it into the visual editor immediately after the GetItem Task.
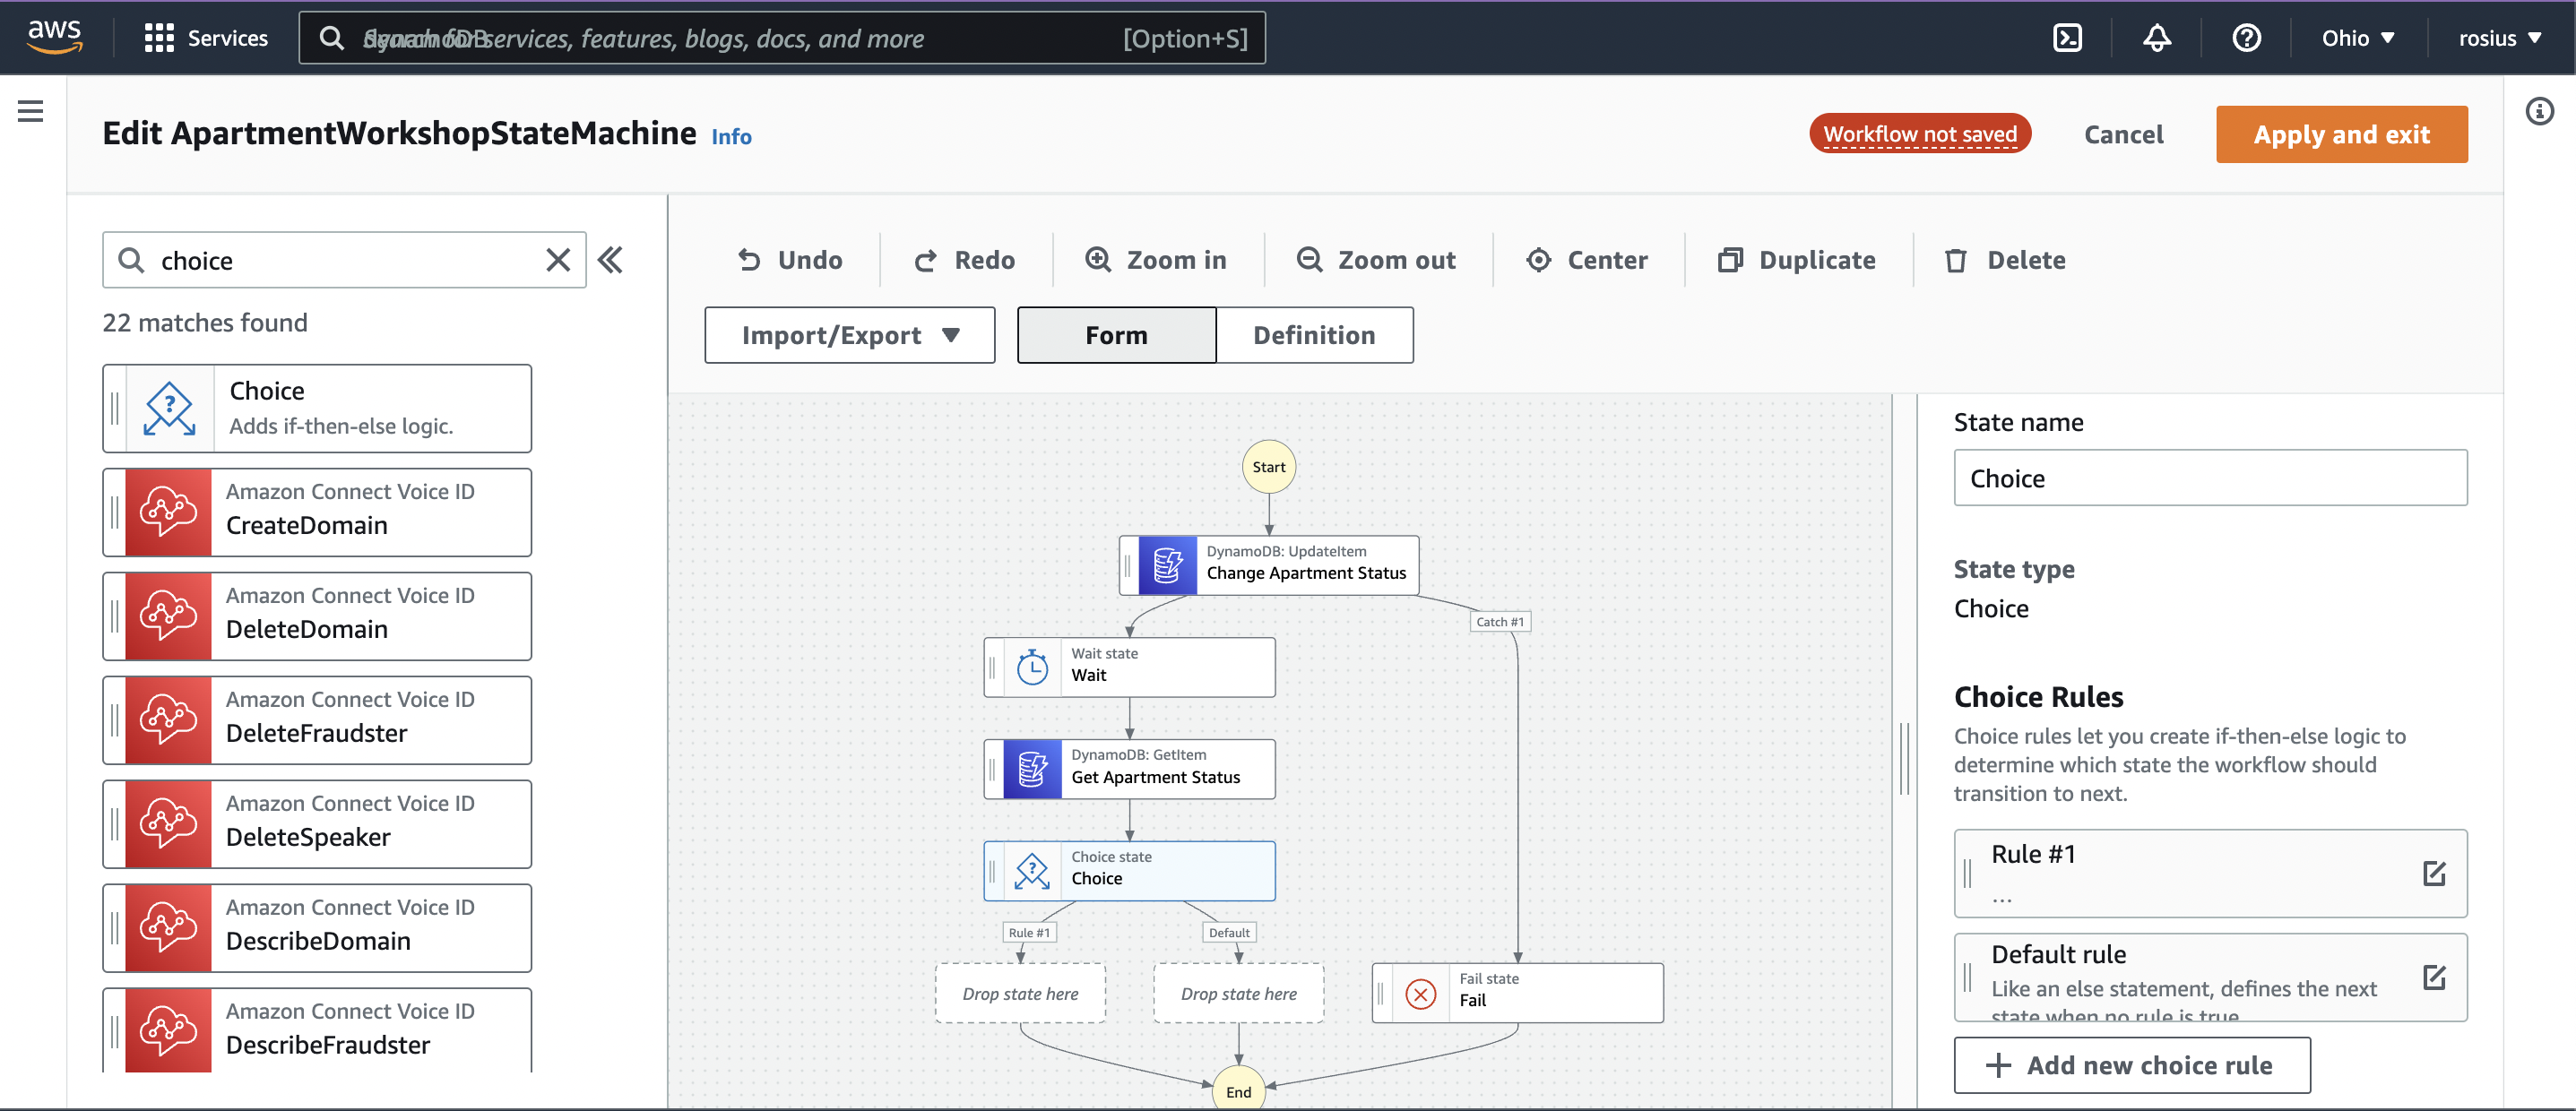
Give the state a name like, “Has Client Made Payment ?"
Under Choice Rules, click on Rule #1 and “Add Conditions"
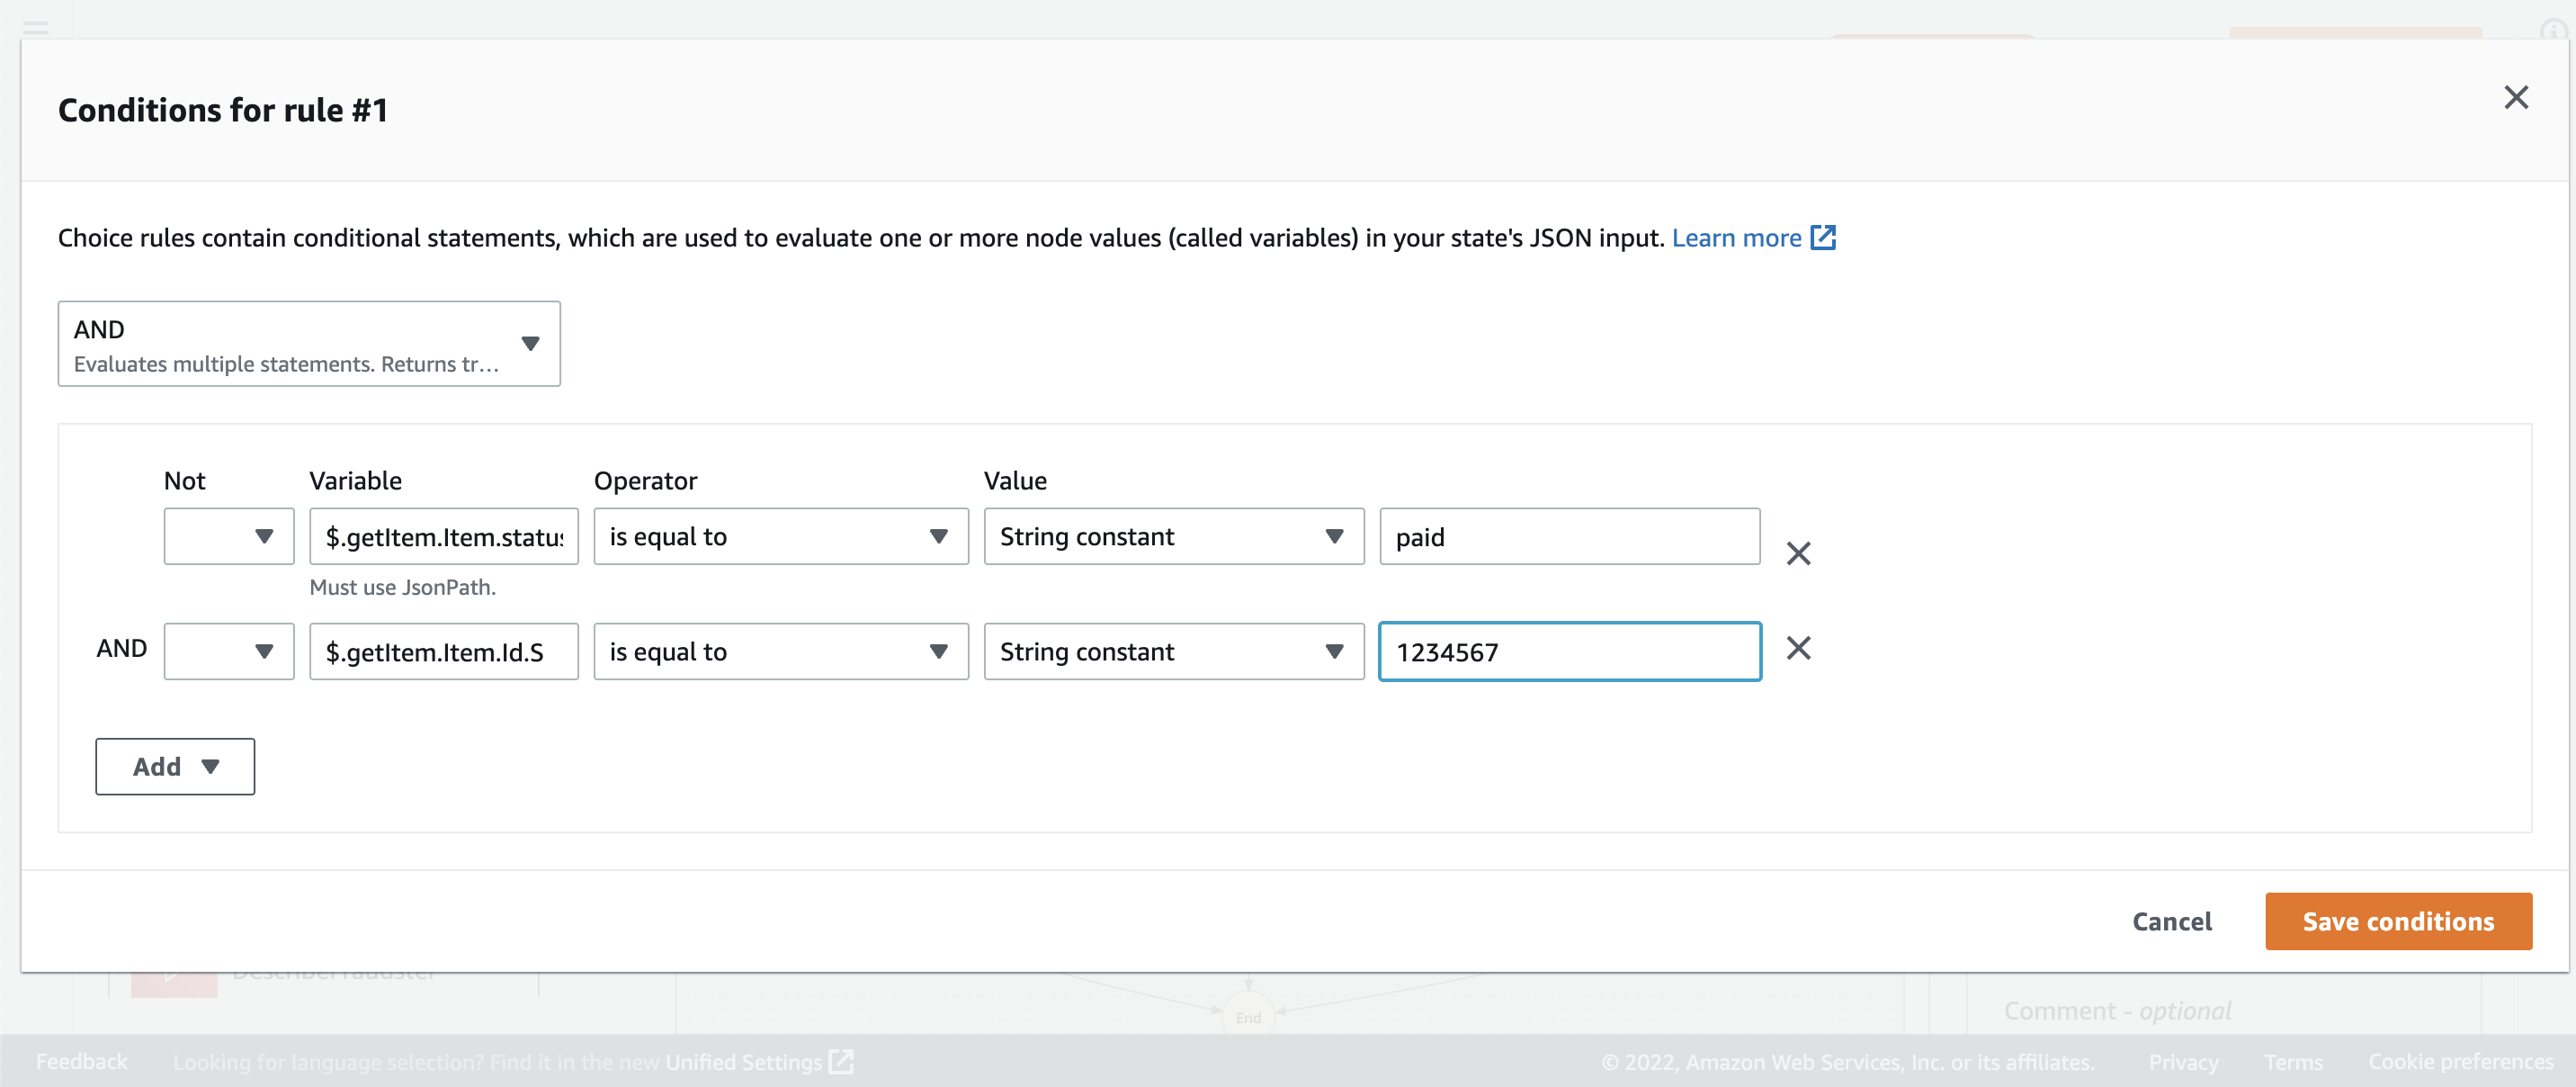
Remember we combined the input with the result of the previous step into $.getItem.
So the output was similar to something like this:
"getItem": {
      "Item": {
        "Id": {
          "S": "1234567"
        },
        "status": {
          "S": "reserved"
        }
      },
So we grab the value of status using the reference path $getItem.Item.status.S and compare that value to a constant string such as “paid.”
We want to ensure we are getting the status for the particular apartment we queried earlier, so we used an AND clause to ensure certainty.
If the client has already made the payment, move to a pass state and end. Else, update the status of the apartment back to vacant and exit.
From the Flow Tab, drag a pass state and put it after rule 1 in the visual workflow
From the Action Tab, drag DynamoDB UpdateItem Task and add it to the workflow under default.
Under API parameters, add the object:
{
  "TableName": "apartment_workshop_db",
  "Key": {
    "Id": {
      "S": "1234567"
    }
  },
 "UpdateExpression": "SET #apartmentStatus = :status",
 "ExpressionAttributeNames": {
     "#apartmentStatus": "status"
   },
  "ExpressionAttributeValues": {
    ":bookingStatus": {
      "S": "vacant"
    }
  }
}
Click on “Apply and Exit”
One step we intentionally omitted was, connecting the DynamoDB GetItem Task to a fail state. In the initial workflow, I had it in there, but looking at it again, I don’t think it was important to add it.
Because if an apartment with Id= 1234567 doesn't exist, then an empty object is returned.
So instead, we have to do a check before the Choice State.
But in order to keep this workflow simple and beginner friendly, we’ll stick to what we already got.
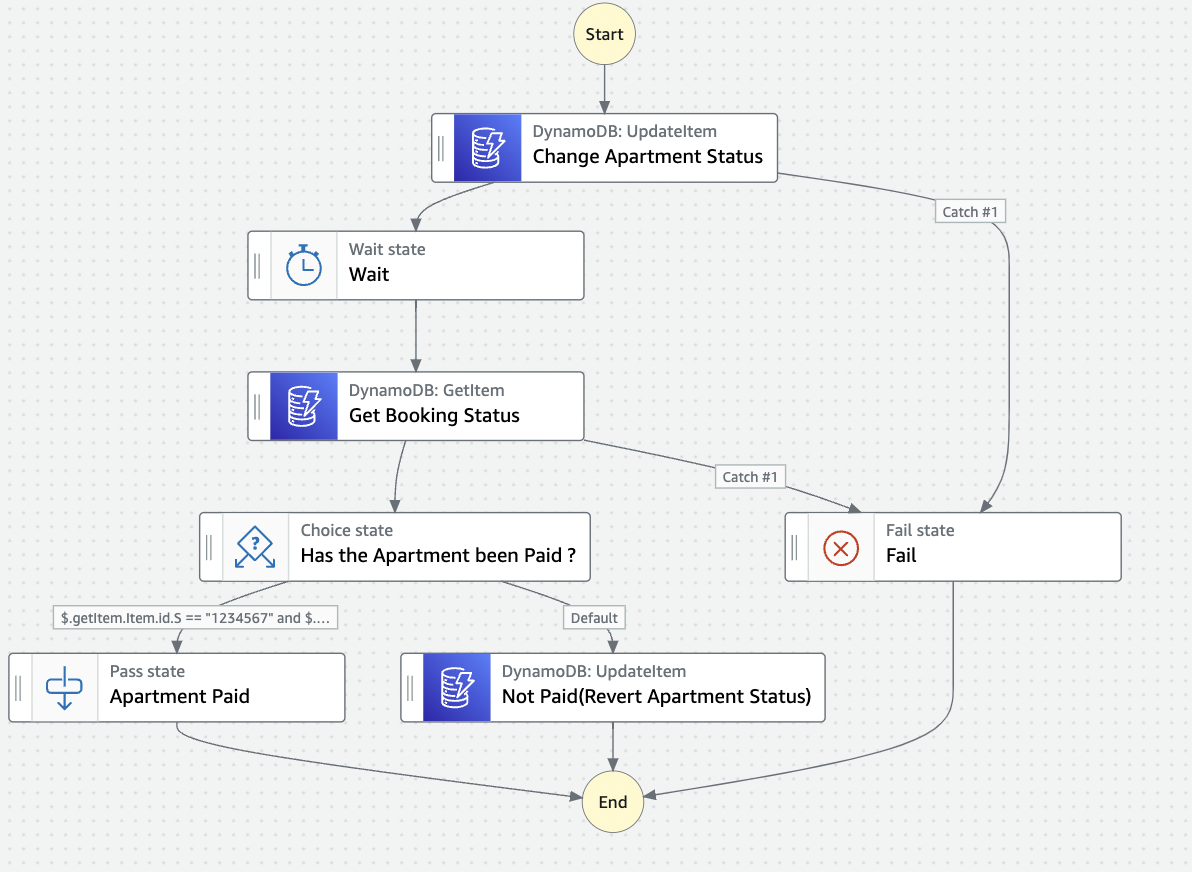
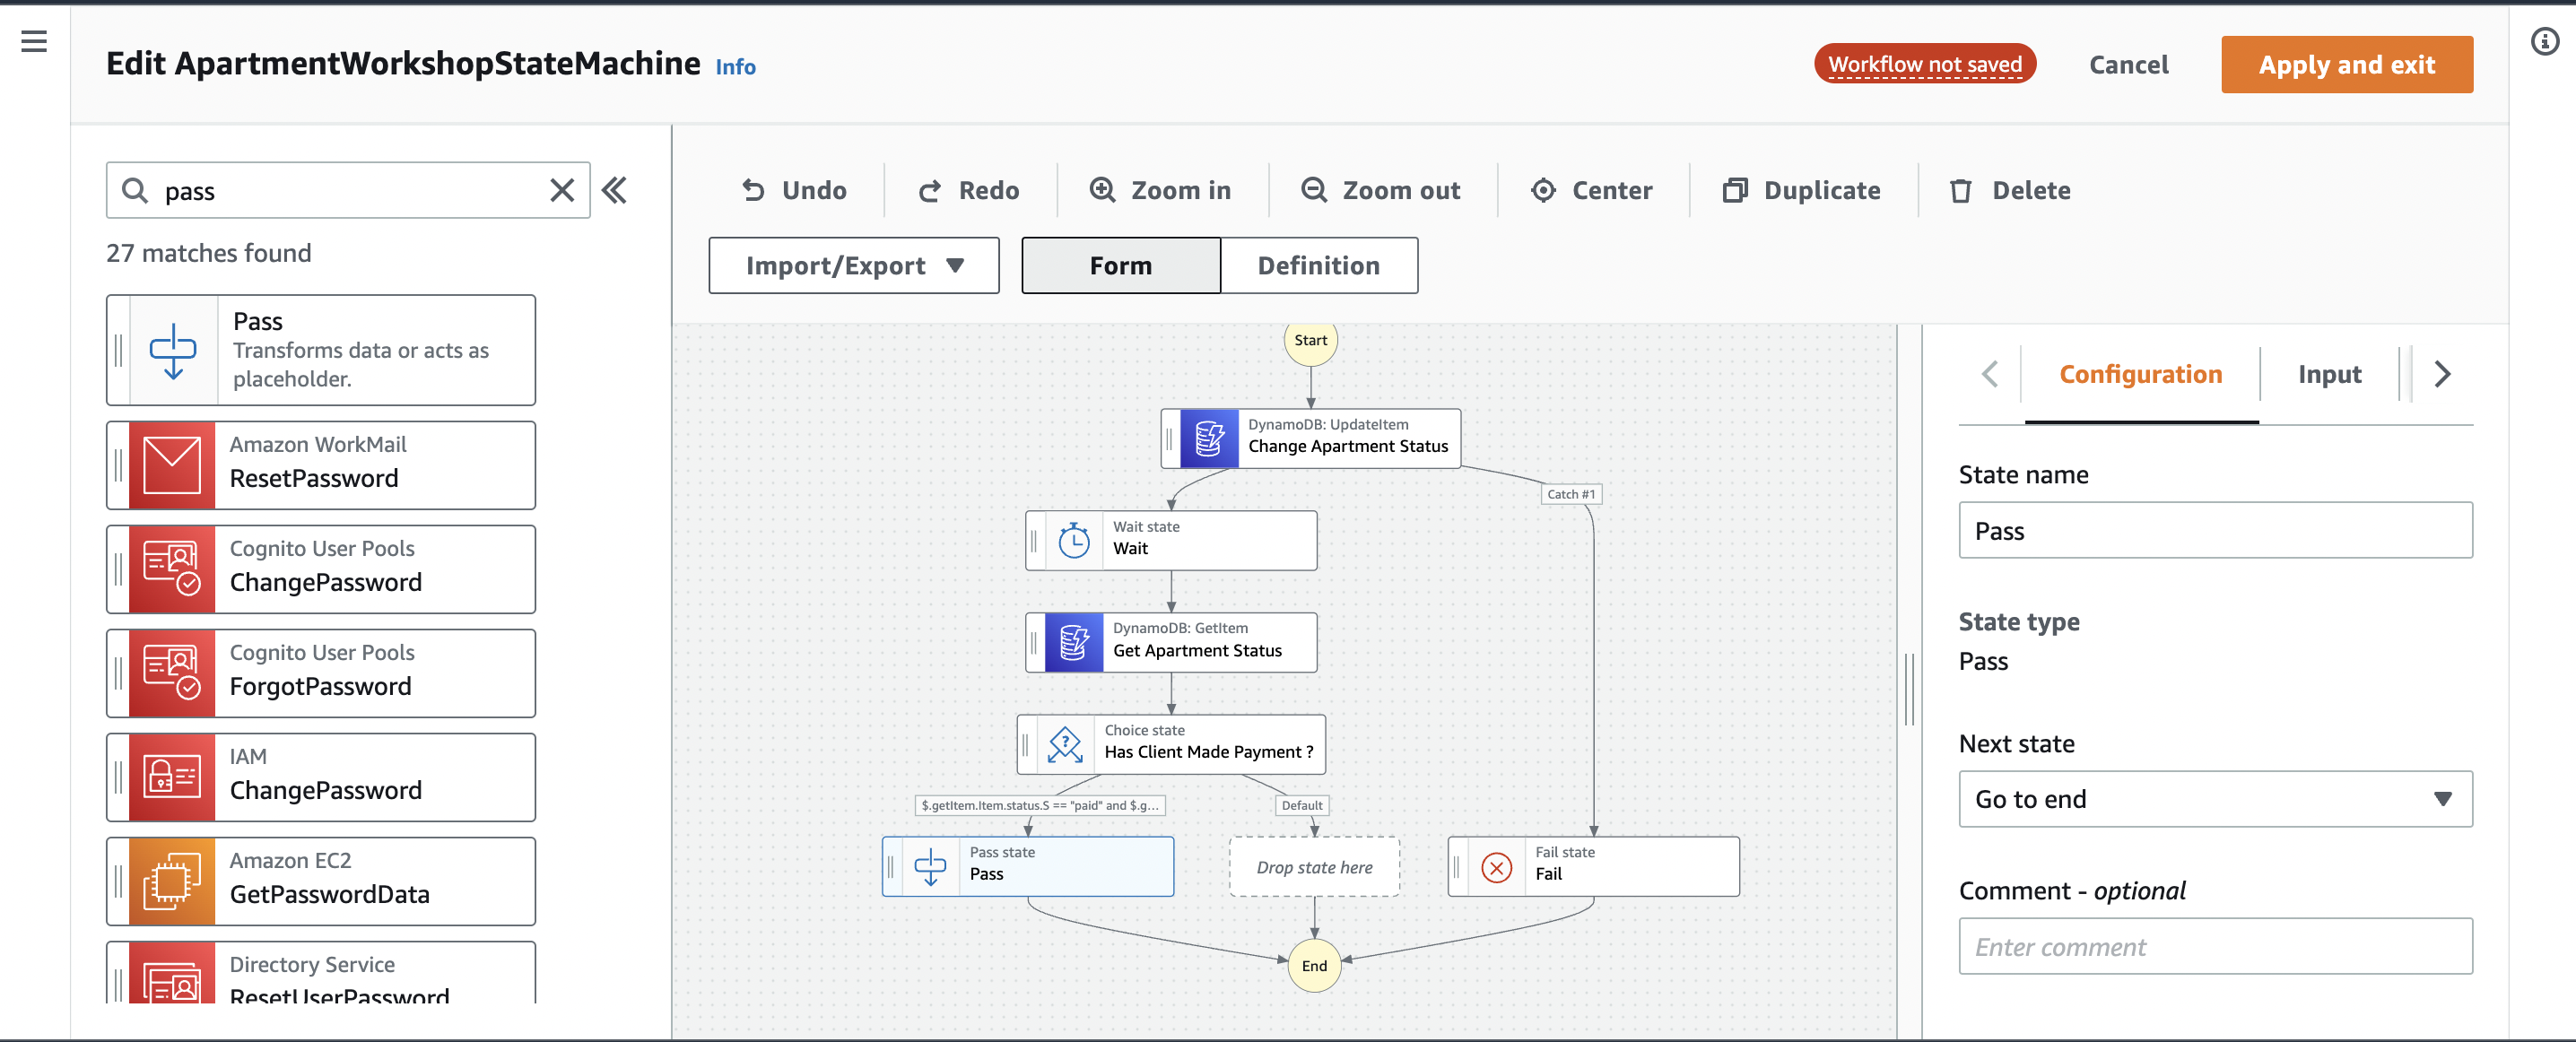
Here’s the complete workflow ASL(Amazon states language):
{
  "Comment": "A description of my state machine",
  "StartAt": "Change Apartment Status",
  "States": {
    "Change Apartment Status": {
      "Type": "Task",
      "Resource": "arn:aws:states:::dynamodb:updateItem",
      "Parameters": {
        "TableName": "apartment_workshop_db",
        "Key": {
          "Id": {
            "S.$": "$.input.apartmentId"
          }
        },
        "UpdateExpression": "SET #apartmentStatus = :status",
        "ExpressionAttributeNames": {
          "#apartmentStatus": "status"
        },
        "ExpressionAttributeValues": {
          ":status": {
            "S.$": "$.input.status"
          }
        },
        "ConditionExpression": "attribute_exists(Id)"
      },
      "Catch": [
        {
          "ErrorEquals": [
            "States.TaskFailed"
          ],
          "Comment": "Apartment Doesn't Exist",
          "Next": "Fail",
          "ResultPath": "$.error"
        }
      ],
      "Next": "Wait",
      "ResultPath": "$.updateItem"
    },
    "Wait": {
      "Type": "Wait",
      "Seconds": 5,
      "Next": "Get Apartment Status"
    },
    "Get Apartment Status": {
      "Type": "Task",
      "Resource": "arn:aws:states:::dynamodb:getItem",
      "Parameters": {
        "TableName": "apartment_workshop_db",
        "Key": {
          "Id": {
            "S.$": "$.input.apartmentId"
          }
        }
      },
      "ResultPath": "$.getItem",
      "Next": "Has Client Made Payment ?"
    },
    "Has Client Made Payment ?": {
      "Type": "Choice",
      "Choices": [
        {
          "And": [
            {
              "Variable": "$.getItem.Item.status.S",
              "StringEquals": "paid"
            },
            {
              "Variable": "$.getItem.Item.Id.S",
              "StringEquals": "1234567"
            }
          ],
          "Next": "Payment Was made."
        }
      ],
      "Default": "Payment Wasn't Made, revert."
    },
    "Payment Was made.": {
      "Type": "Pass",
      "End": true
    },
    "Payment Wasn't Made, revert.": {
      "Type": "Task",
      "Resource": "arn:aws:states:::dynamodb:updateItem",
      "Parameters": {
        "TableName": "apartment_workshop_db",
        "Key": {
          "Id": {
            "S": "1234567"
          }
        },
        "UpdateExpression": "SET #apartmentStatus = :status",
        "ExpressionAttributeNames": {
          "#apartmentStatus": "status"
        },
        "ExpressionAttributeValues": {
          ":status": {
            "S": "vacant"
          }
        }
      },
      "End": true
    },
    "Fail": {
      "Type": "Fail",
      "Error": "Apartment Doesn't Exist",
      "Cause": "Update Condition Failed"
    }
  }
}
Testing
Now, let’s test the complete workflow.
We have two scenarios to test:
- When a client makes a reservation but doesn’t make payment before time elapses.
- When a client makes a reservation and then makes payment before the time elapses
Scenario 1(Client Reserves, but doesn’t Pay)
Firstly, ensure an item with Id 1234567 is available in the database.
Secondly, start a step functions execution
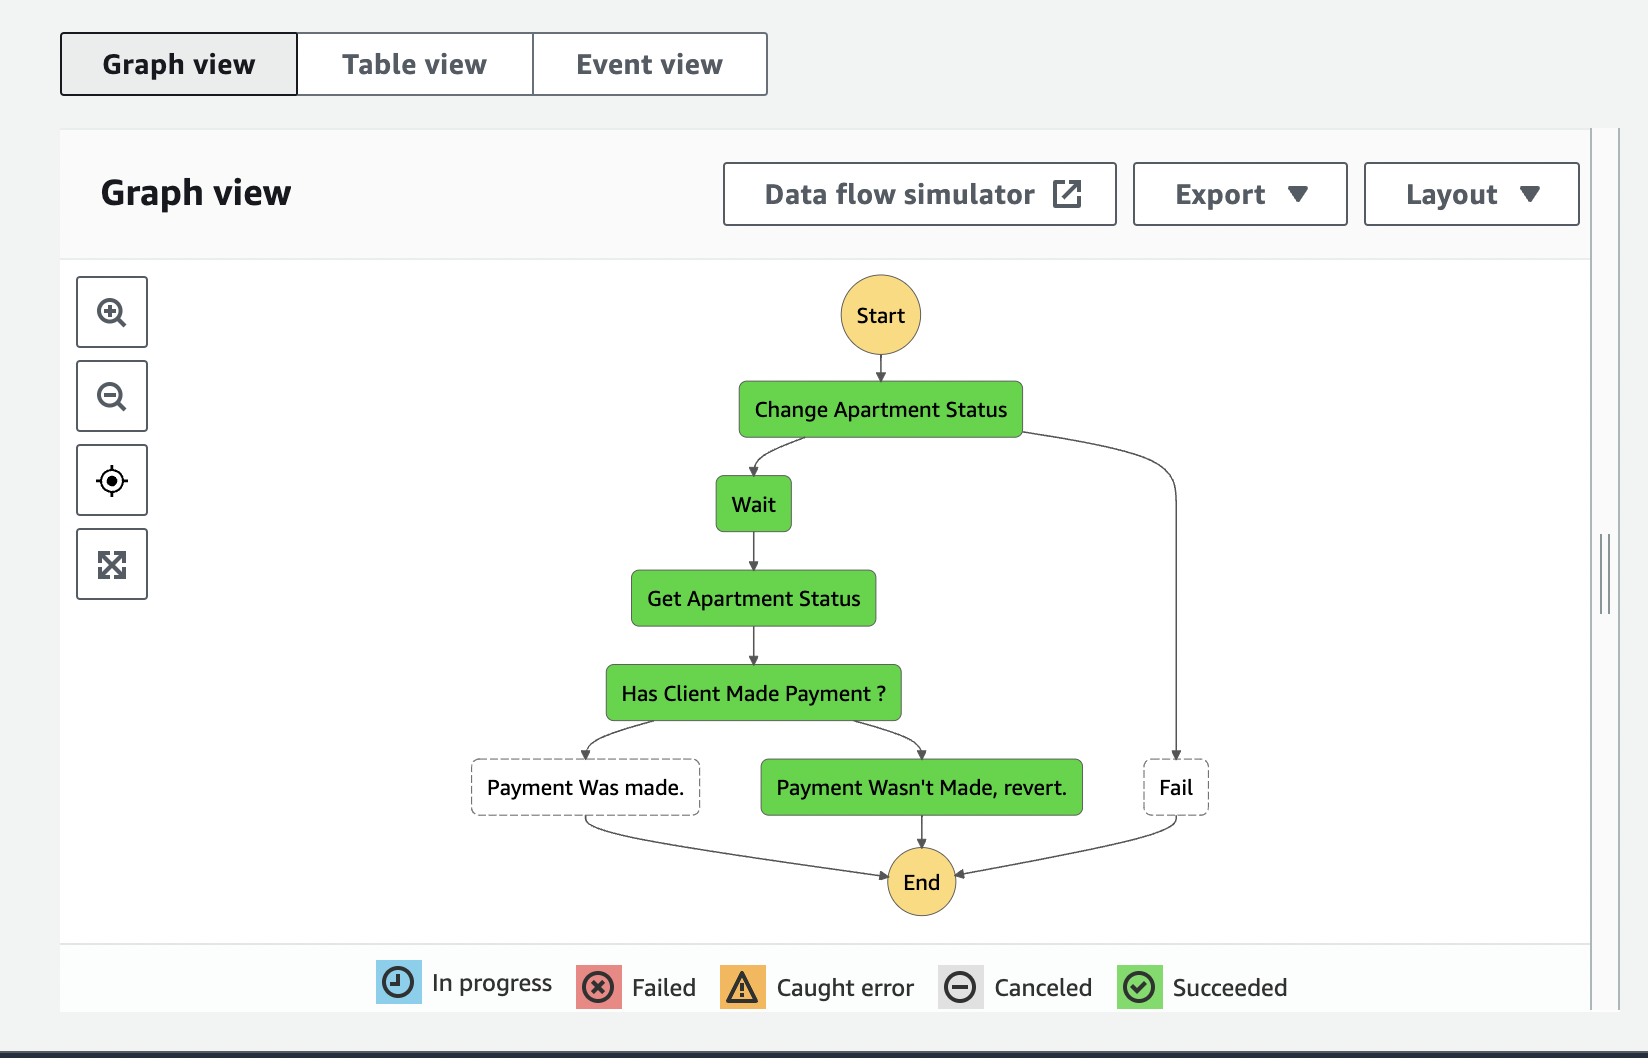
The status of the apartment first changes from vacant to reserved and back to vacant when payment wasn’t made
Scenario 2(Client Reserves and proceeds to Pay)
Here’s what we are going to do. We’ll start the step functions execution once we get to the wait step, and we’ll assume a payment, so we will manually change the apartment status in the database to paid.
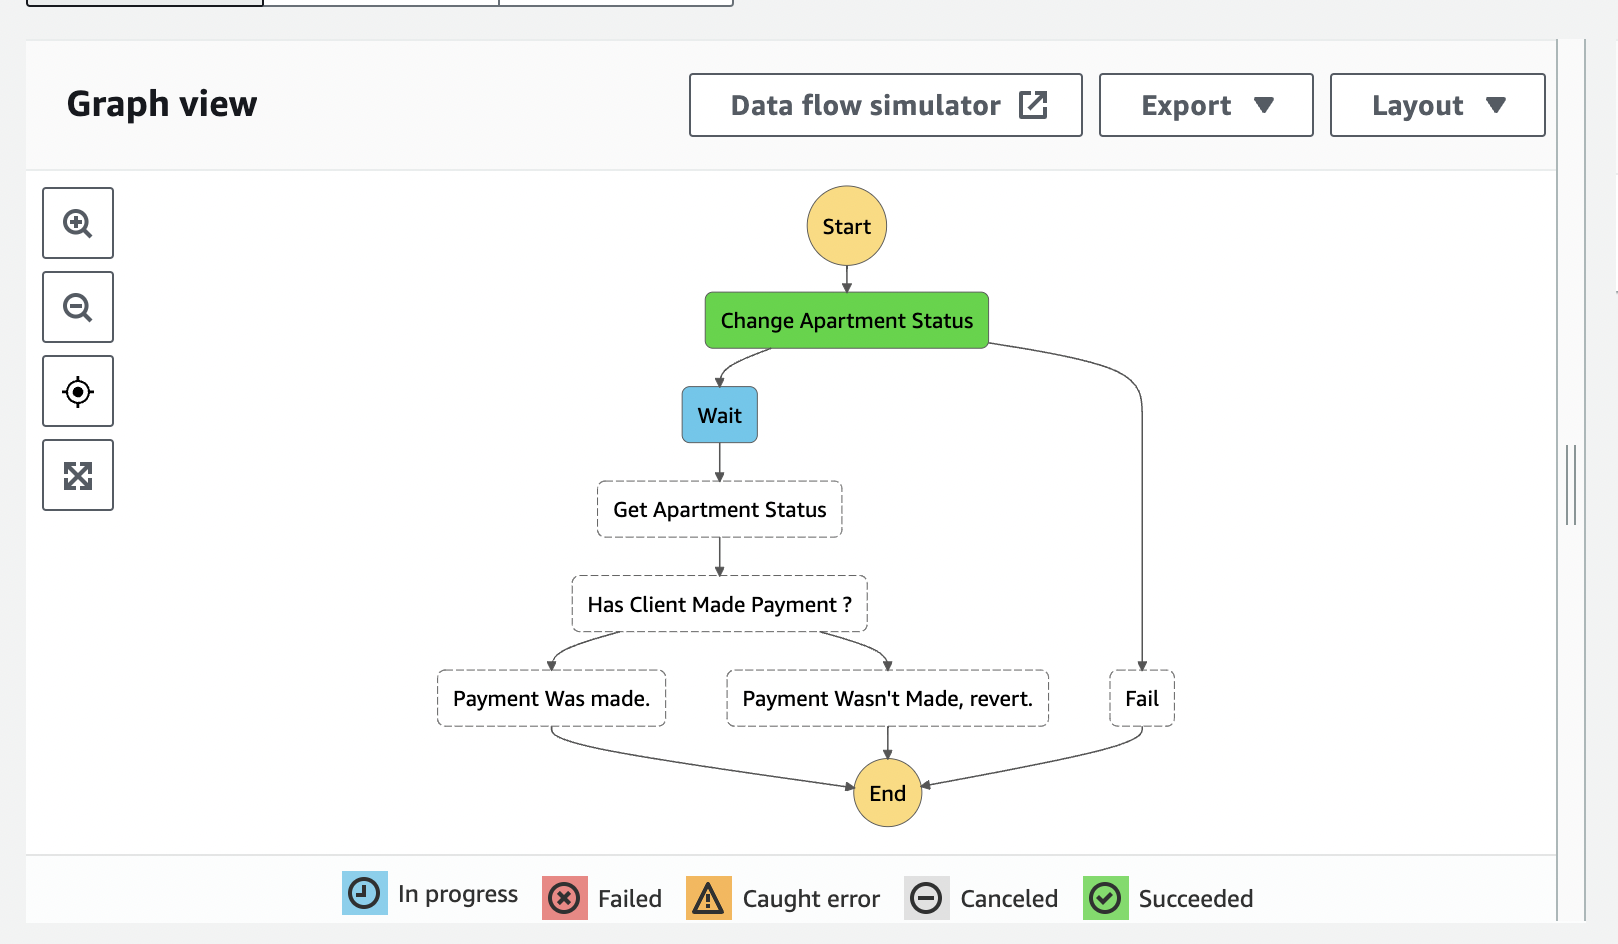
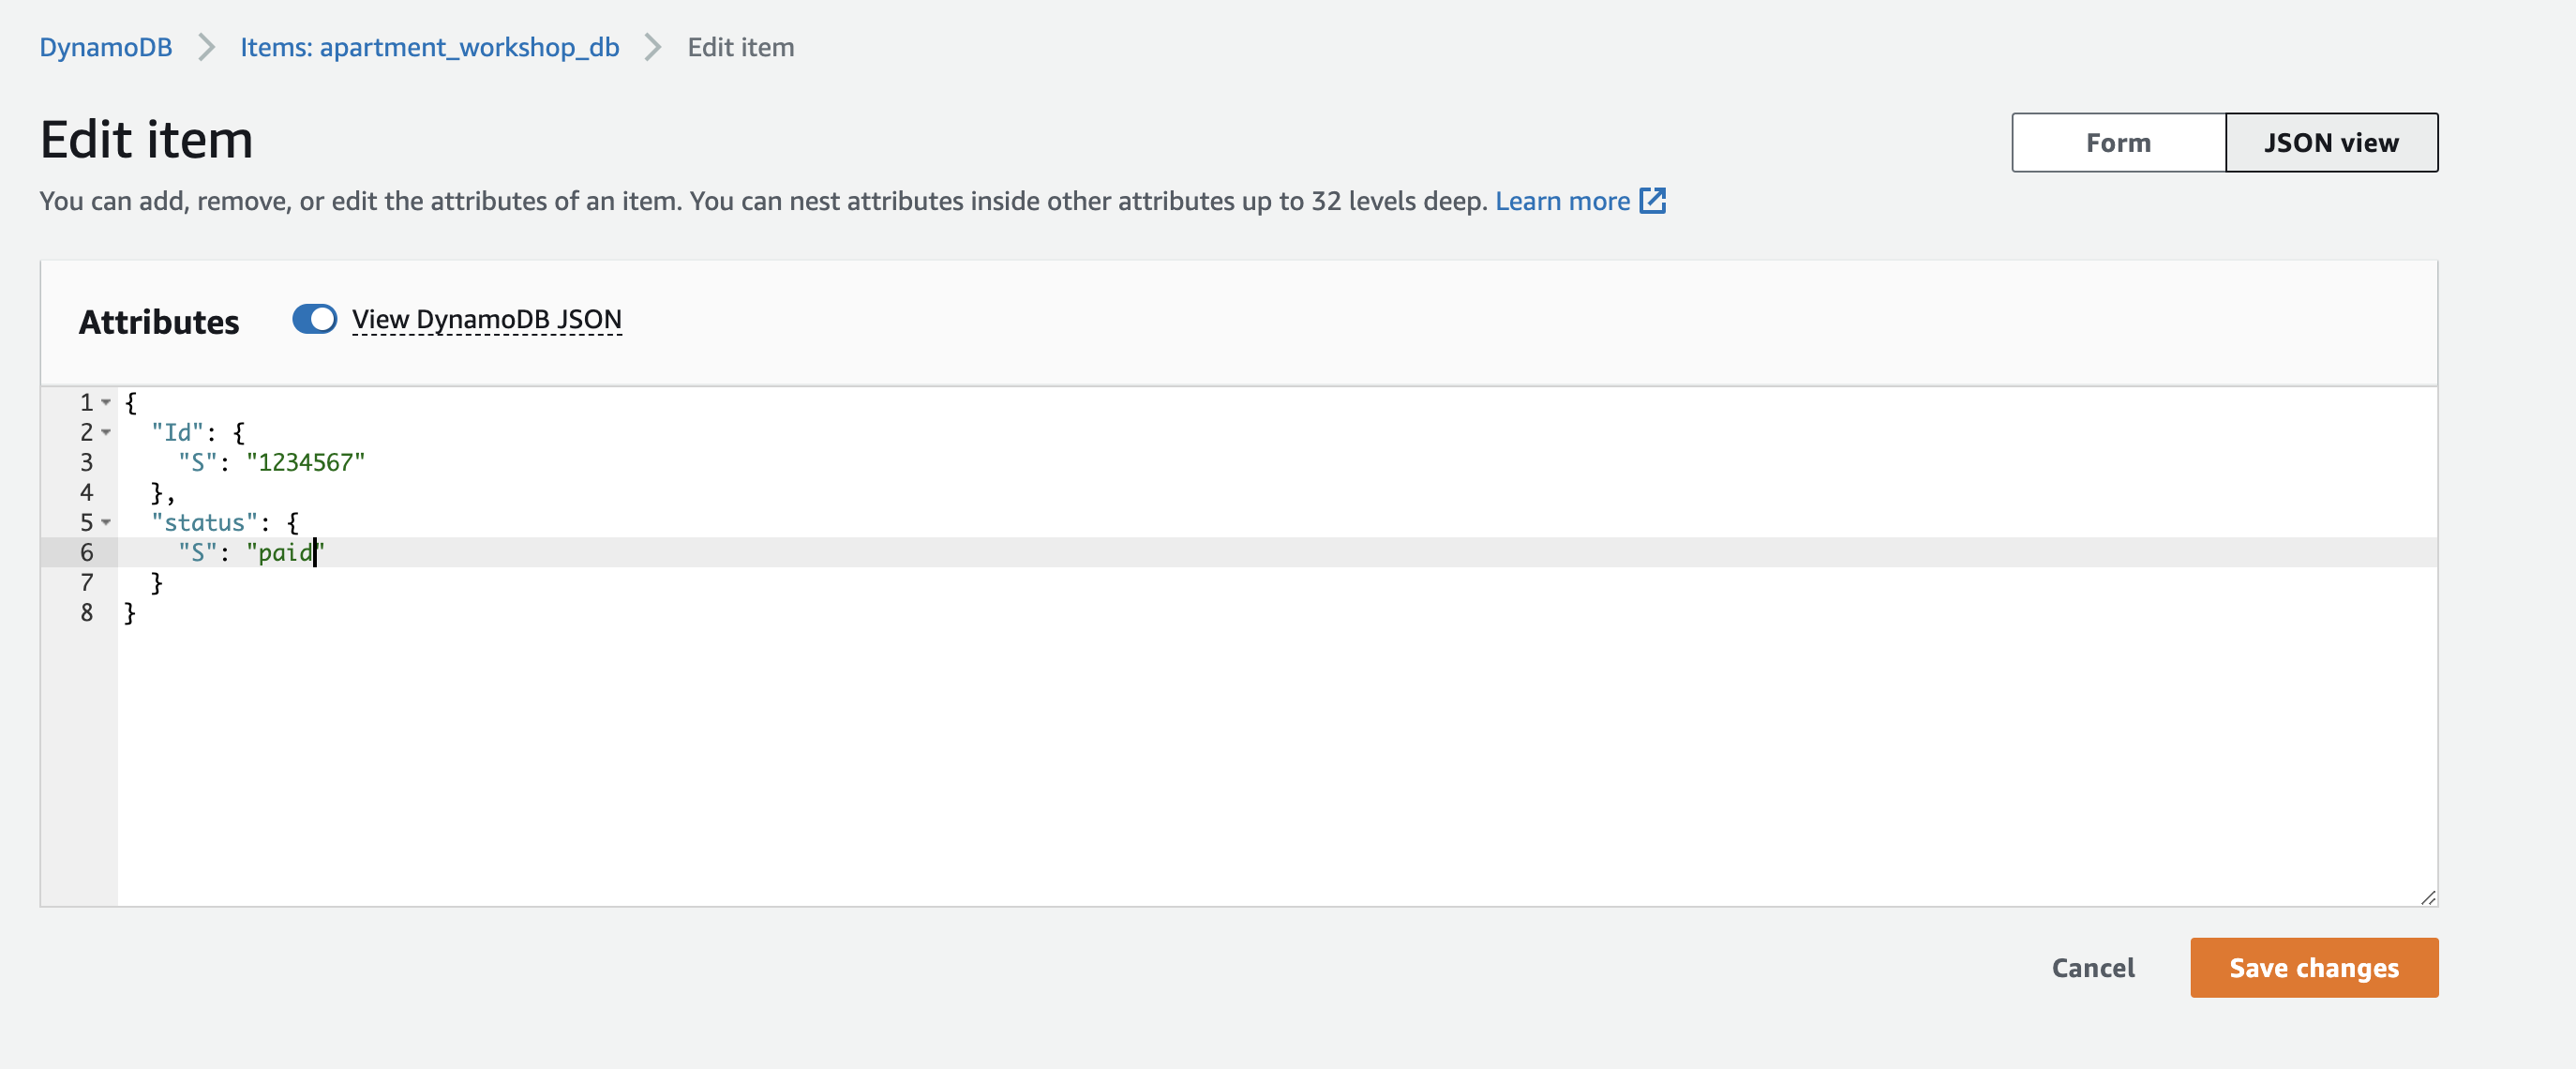
Start an execution, and then, during the wait state, move to DynamoDB and change the status to paid:

Wait State:
Change status in dynamodb (Make payment):
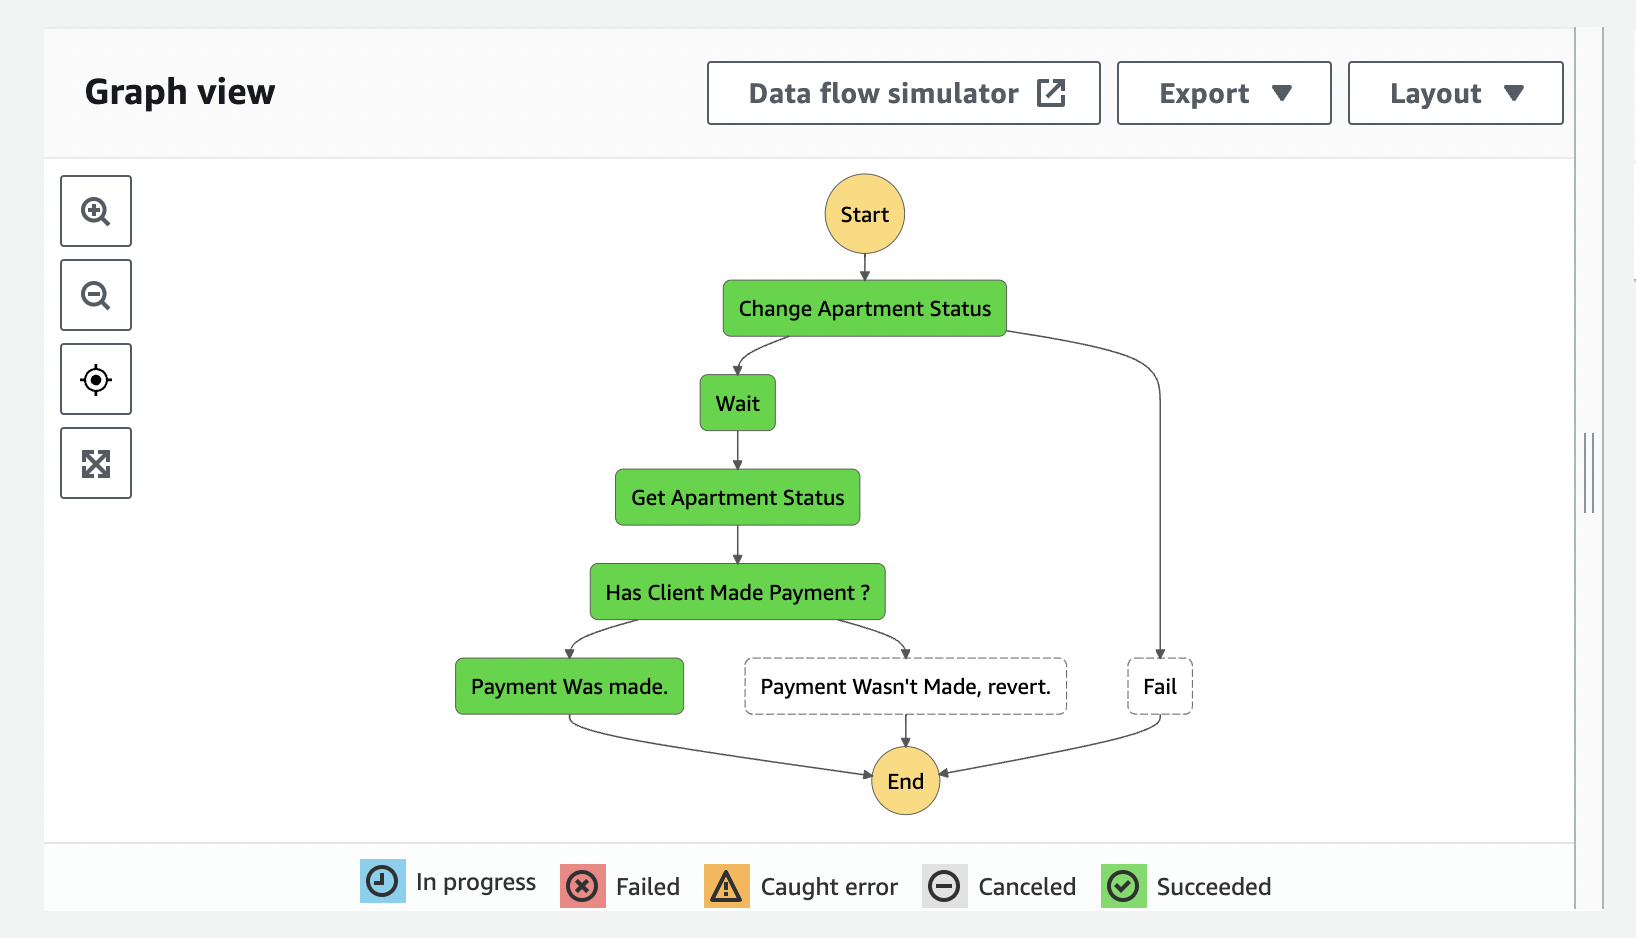
Once Payment has been made within the time frame:
Conclusion
In this post, we built a step functions workflow, which mimics a real-life scenario of booking an apartment.
- We saw how to directly integrate AWS Step functions with other AWS Services.
- We didn’t use any Lambda functions
- We quickly built the workflow using the drag and drop step functions visual builder.
Some Major Advantages of building apps with step functions are :
- The Drag and Drop capability enables us to rapidly build and deploy our cloud apps.
- We Get to write less Integration Code because step functions directly integrates with over 200 aws services.
- Step Functions manages state, checkpoints, and restarts for you to make sure that your workflows run in order and as expected.
In the next post, we’ll see how to build this workflow using an IaC(Infrastructure as Code) framework such as CDK(Cloud Development Kit).
We’ll also talk about the advantages of using IaC and other interesting tidbits
Stay tuned