How to build Serverless Jamstack apps with Aws, Vue,Nuxt and Netlify. Part 1
Building the api
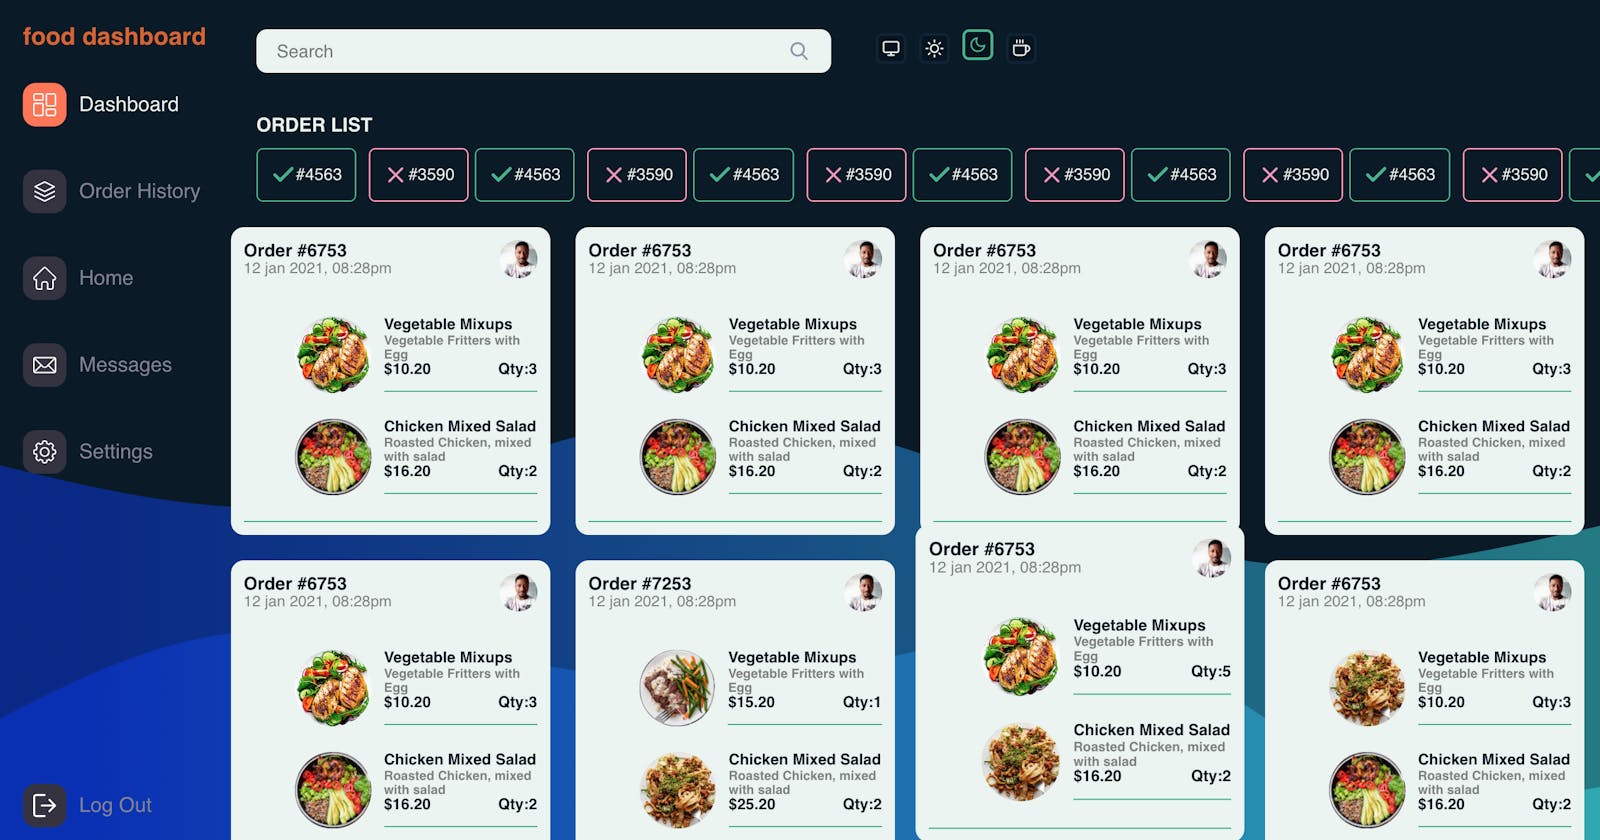
Foodie is a fictional restaurant that serves a variety of dishes and is pretty hot in their city. They wish to push their business further, by taking it online. So they need an online service, in other to give their clients the ability to place an order from anywhere within the city they operate. They've contracted 2 engineers to make this happen. You and Miss Melissa. Miss Melissa is in charge of the frontend. So she'll give users the ability to place orders, and these orders would be saved in a table in a database(A NoSql DB like Dynamo preferably). Your mission is to build an admin dashboard to display the list of saved orders, so that the chef( also happens to be the Admin) knows what dishes to serve, what dishes are ordered frequently, and in what seasons. How much is made a day? and so on .
So this app involves 2 parts.
- Creating a serverless API with aws using lambda, DynamoDb, and API Gateway. We'll use this API to serve data to our JamStack app.
- Creating a Web application with Vue, which would interact with our serverless API.
Prerequisite
I've already written a beginner's guide to building serverless APIs, which I recommend you go through in other to be comfortable with what we are about to build now. You'll have to install node, AWS CLI and serverless framework.
Serverless Api design with AWS lambda, dynamo DB and API Gateway
Serverless Api design with AWS lambda, dynamo DB and API Gateway
Creating our serverless api.
I want to create an api, with 2 endpoints.- Loading dummy order items into our table(Orders)
- Getting all order items from our table
I'll be using the serverless framework to facilitate building this API.
From the command line, type this in.
serverless
Take a look at my command line print and fill yours in accordingly. I'll be using python as the runtime language. You'll be asked to create an AWS IAM profile, and set up an access key Id and Access Secret.
RosiusNsMacBook:Documents mac$ serverless

Serverless: No project detected. Do you want to create a new one? Yes
Serverless: What do you want to make? AWS Python
Serverless: What do you want to call this project? serverless-order-api

The project successfully created in the  'serverless-order-api' folder.

You can monitor, troubleshoot, and test your new service with a free Serverless account.

Serverless: Would you like to enable this? No
You can run the “serverless” command again if you change your mind later.


No AWS credentials were found on your computer, you need these to host your application.

Serverless: Do you want to set them up now? Yes
Serverless: Do you have an AWS account? Yes

If your browser does not open automatically, please open the URL: https://console.aws.amazon.com/iam/home?region=us-east-1#/users$new?step=final&accessKey&userNames=serverless&permissionType=policies&policies=arn:aws:iam::aws:policy%2FAdministratorAccess

Serverless: Press Enter to continue after creating an AWS user with access keys
Serverless: AWS Access Key Id: AKXXXXXXXXXXXXXXXXXX
Serverless: AWS Secret Access Key: P7XXXXXXXXXXXXXXXXXXXXXXXXXXXXXXXXXX

AWS credentials saved on your machine at ~/.aws/credentials. Go there to change them at any time.

Serverless: Would you like to set up a command line <tab> completion? No
Once you've successfully created the serverless app, please open it up with your favorite IDE. I'll be using vscode.
Type this out in your serverless.yml file.
# Welcome to Serverless!
#
# This file is the main config file for your service.
# It's very minimal at this point and uses default values.
# You can always add more config options for more control.
# We've included some commented-out config examples here.
# Just uncomment any of them to get that config option.
#
# For full config options, check the docs:
#    docs.serverless.com
#
# Happy Coding!

service: serverless-order-api
# app and org for use with dashboard.serverless.com
app: order-api
#org: your-org-name

# You can pin your service to only deploy with a specific Serverless version
# Check out our docs for more details
frameworkVersion: '2'

provider:
  name: aws
  runtime: python3.8
  region: us-east-2


  lambdaHashingVersion: 20201221

# you can overwrite defaults here
  stage: dev
#  region: us-east-1

# you can add statements to the Lambda function's IAM Role here
  environment:
    DYNAMODB_TABLE: orders
  iamRoleStatements:
    - Effect: Allow
      Action:
        - dynamodb:Query
        - dynamodb:Scan
        - dynamodb:GetItem
        - dynamodb:PutItem
        - dynamodb:BatchWriteItem
      Resource: "arn:aws:dynamodb:${opt:region, self:provider.region}:*:table/${self:provider.environment.DYNAMODB_TABLE}"


functions:
  load:
    handler: orders/load_orders_data.load
    events:
      - http:
          path: orders
          method: post
          cors: true
  list:
    handler: orders/list.list
    events:
      - http:
          path: orders
          method: get
          cors: true


resources:
  Resources:
    OrdersDynamoDbTable:
      Type: 'AWS::DynamoDB::Table'
      DeletionPolicy: Retain
      Properties:
        AttributeDefinitions:
          -
            AttributeName: order_no
            AttributeType: S
        KeySchema:
          -
            AttributeName: order_no
            KeyType: HASH
        ProvisionedThroughput:
          ReadCapacityUnits: 1
          WriteCapacityUnits: 1
        TableName: ${self:provider.environment.DYNAMODB_TABLE}
Our DynamoDB table is called orders, since I'll be saving order items in it. I've given the right permissions to the user under iamRoleStatements.
We have 2 functions.
- Load function responsible for populating the orders table with dummy order data.
- List function responsible for getting all order items from the orders table and displaying them in JSON format.
Then the cloud formations template, with a primary key set to order_no.
.
Load Function
Here's how a single order item looks like.
{

                "order_no": "#6753",
                "order_date":"12 jan 2021, 08:28pm",
                "ordered_by":"https://rosius.s3.us-east-2.amazonaws.com/cropped_rosius.png",
                "total":"$26.40",
                "items":[
                {
                "pic":"https://rosius.s3.us-east-2.amazonaws.com/meal1+(1).jpg",
                "name":"Vegetable Mixups",
                "desc":"Vegetable Fritters with Egg",
                "price":"$10.20",
                "qty":3
                },
                {
                "pic":"https://rosius.s3.us-east-2.amazonaws.com/meal2+(1).jpeg",
                "name":"Chicken Mixed Salad",
                "desc":"Roasted Chicken, mixed with salad",
                "price":"$16.20",
                "qty":2
                }

                ]

            }
order_no is the primary key attribute.
The objective now is to load at least 10 order items into our orders table.
If you are loading a lot of data at a time, you can make use of DynamoDB.Table.batch_writer() in other to speed up the process and reduce the number of write requests made to the service.
This method returns a handle to a batch writer object that will automatically handle buffering and sending items in batches. In addition, the batch writer will also automatically handle any unprocessed items and resend them as needed. All you need to do is call put_item for any items you want to add, and delete_item for any items you want to delete.
Here's how my load function looks like. Please grab the complete code from the github url.
from decimal import Decimal
import json
import boto3
import os

dynamodb = boto3.resource('dynamodb')
def load(event, context):

    table = dynamodb.Table(os.environ['DYNAMODB_TABLE'])

    with table.batch_writer() as batch:


        batch.put_item(
            Item={

                "order_no": "#6757",
                "order_date":"12 jan 2021, 08:28pm",
                "ordered_by":"https://rosius.s3.us-east-2.amazonaws.com/cropped_rosius.png",
                "total":"$26.40",
                "items":[
                {
                "pic":"https://rosius.s3.us-east-2.amazonaws.com/meal1+(1).jpg",
                "name":"Vegetable Mixups",
                "desc":"Vegetable Fritters with Egg",
                "price":"$10.20",
                "qty":3
                },
                {
                "pic":"https://rosius.s3.us-east-2.amazonaws.com/meal2+(1).jpeg",
                "name":"Chicken Mixed Salad",
                "desc":"Roasted Chicken, mixed with salad",
                "price":"$16.20",
                "qty":2
                }
                ]
            }
        )

        batch.put_item(

            Item={

                "order_no": "#6758",
                "order_date":"12 jan 2021, 08:28pm",
                "ordered_by":"https://rosius.s3.us-east-2.amazonaws.com/cropped_rosius.png",
                "total":"$26.40",
                "items":[
                {
                "pic":"https://rosius.s3.us-east-2.amazonaws.com/meal1+(1).jpg",
                "name":"Vegetable Mixups",
                "desc":"Vegetable Fritters with Egg",
                "price":"$10.20",
                "qty":5
                },
                {
                "pic":"https://rosius.s3.us-east-2.amazonaws.com/meal4+(1).jpeg",
                "name":"Chicken Mixed Salad",
                "desc":"Roasted Chicken, mixed with salad",
                "price":"$16.20",
                "qty":2
                }
                ]
            }
        )
        batch.put_item(
            Item={
                "order_no": "#6759",
                "order_date":"12 jan 2021, 08:28pm",
                "ordered_by":"https://rosius.s3.us-east-2.amazonaws.com/cropped_rosius.png",
                "total":"$26.40",
                "items":[
                {
                "pic":"https://rosius.s3.us-east-2.amazonaws.com/meal1+(1).jpg",
                "name":"Vegetable Mixups",
                "desc":"Vegetable Fritters with Egg",
                "price":"$10.20",
                "qty":3
                },
                {
                "pic":"https://rosius.s3.us-east-2.amazonaws.com/meal2+(1).jpeg",
                "name":"Chicken Mixed Salad",
                "desc":"Roasted Chicken, mixed with salad",
                "price":"$16.20",
                "qty":2
                }
                ]
            }
        )
        batch.put_item(
            Item={
                "order_no": "#6760",
                "order_date":"12 jan 2021, 08:28pm",
                "ordered_by":"https://rosius.s3.us-east-2.amazonaws.com/cropped_rosius.png",
                "total":"$26.40",
                "items":[
                {
                "pic":"https://rosius.s3.us-east-2.amazonaws.com/meal1+(1).jpg",
                "name":"Vegetable Mixups",
                "desc":"Vegetable Fritters with Egg",
                "price":"$10.20",
                "qty":3
                },
                {
                "pic":"https://rosius.s3.us-east-2.amazonaws.com/meal2+(1).jpeg",
                "name":"Chicken Mixed Salad",
                "desc":"Roasted Chicken, mixed with salad",
                "price":"$16.20",
                "qty":2
                }
                ]
            }
        )
        batch.put_item(

            Item={
                "order_no": "#6761",
                "order_date":"12 jan 2021, 08:28pm",
                "ordered_by":"https://rosius.s3.us-east-2.amazonaws.com/cropped_rosius.png",
                "total":"$26.40",
                "items":[
                {
                "pic":"https://rosius.s3.us-east-2.amazonaws.com/meal1+(1).jpg",
                "name":"Vegetable Mixups",
                "desc":"Vegetable Fritters with Egg",
                "price":"$10.20",
                "qty":3
                },
                {
                "pic":"https://rosius.s3.us-east-2.amazonaws.com/meal2+(1).jpeg",
                "name":"Chicken Mixed Salad",
                "desc":"Roasted Chicken, mixed with salad",
                "price":"$16.20",
                "qty":2
                }
                ]
            }
        )
        batch.put_item(
            Item={
                "order_no": "#6762",
                "order_date":"12 jan 2021, 08:28pm",
                "ordered_by":"https://rosius.s3.us-east-2.amazonaws.com/cropped_rosius.png",
                "total":"$26.40",
                "items":[
                {
                "pic":"https://rosius.s3.us-east-2.amazonaws.com/meal1+(1).jpg",
                "name":"Vegetable Mixups",
                "desc":"Vegetable Fritters with Egg",
                "price":"$10.20",
                "qty":3
                },
                {
                "pic":"https://rosius.s3.us-east-2.amazonaws.com/meal2+(1).jpeg",
                "name":"Chicken Mixed Salad",
                "desc":"Roasted Chicken, mixed with salad",
                "price":"$16.20",
                "qty":2
                }
                ]
            }
        )


    # create a response
    response = {
        "statusCode": 200,
        'headers': {
           'Access-Control-Allow-Origin': '*',
           'Access-Control-Allow-Credentials': True


        },
        "body": json.dumps({"successful":"Items successfully loaded into database"})
    }

    return response
List Function
We fetch all order items from the order table using the scan function.import json
import os
from orders import decimalencoder
import boto3
dynamodb = boto3.resource('dynamodb')
def list(event, context):
table = dynamodb.Table(os.environ['DYNAMODB_TABLE'])
# fetch all orders from the database
result = table.scan()
# create a response
response = {
"statusCode": 200,
'headers': {
'Access-Control-Allow-Origin': '*',
'Access-Control-Allow-Credentials': True
},
"body": json.dumps(result['Items'], cls=decimalencoder.DecimalEncoder)
}
return response
And that's about it. The complete code is available on my Github repo. Don't forget to change the value of the region in the serverless.yml file to yours. Once that's done, deploy the API .
Deploying
serverless deploy
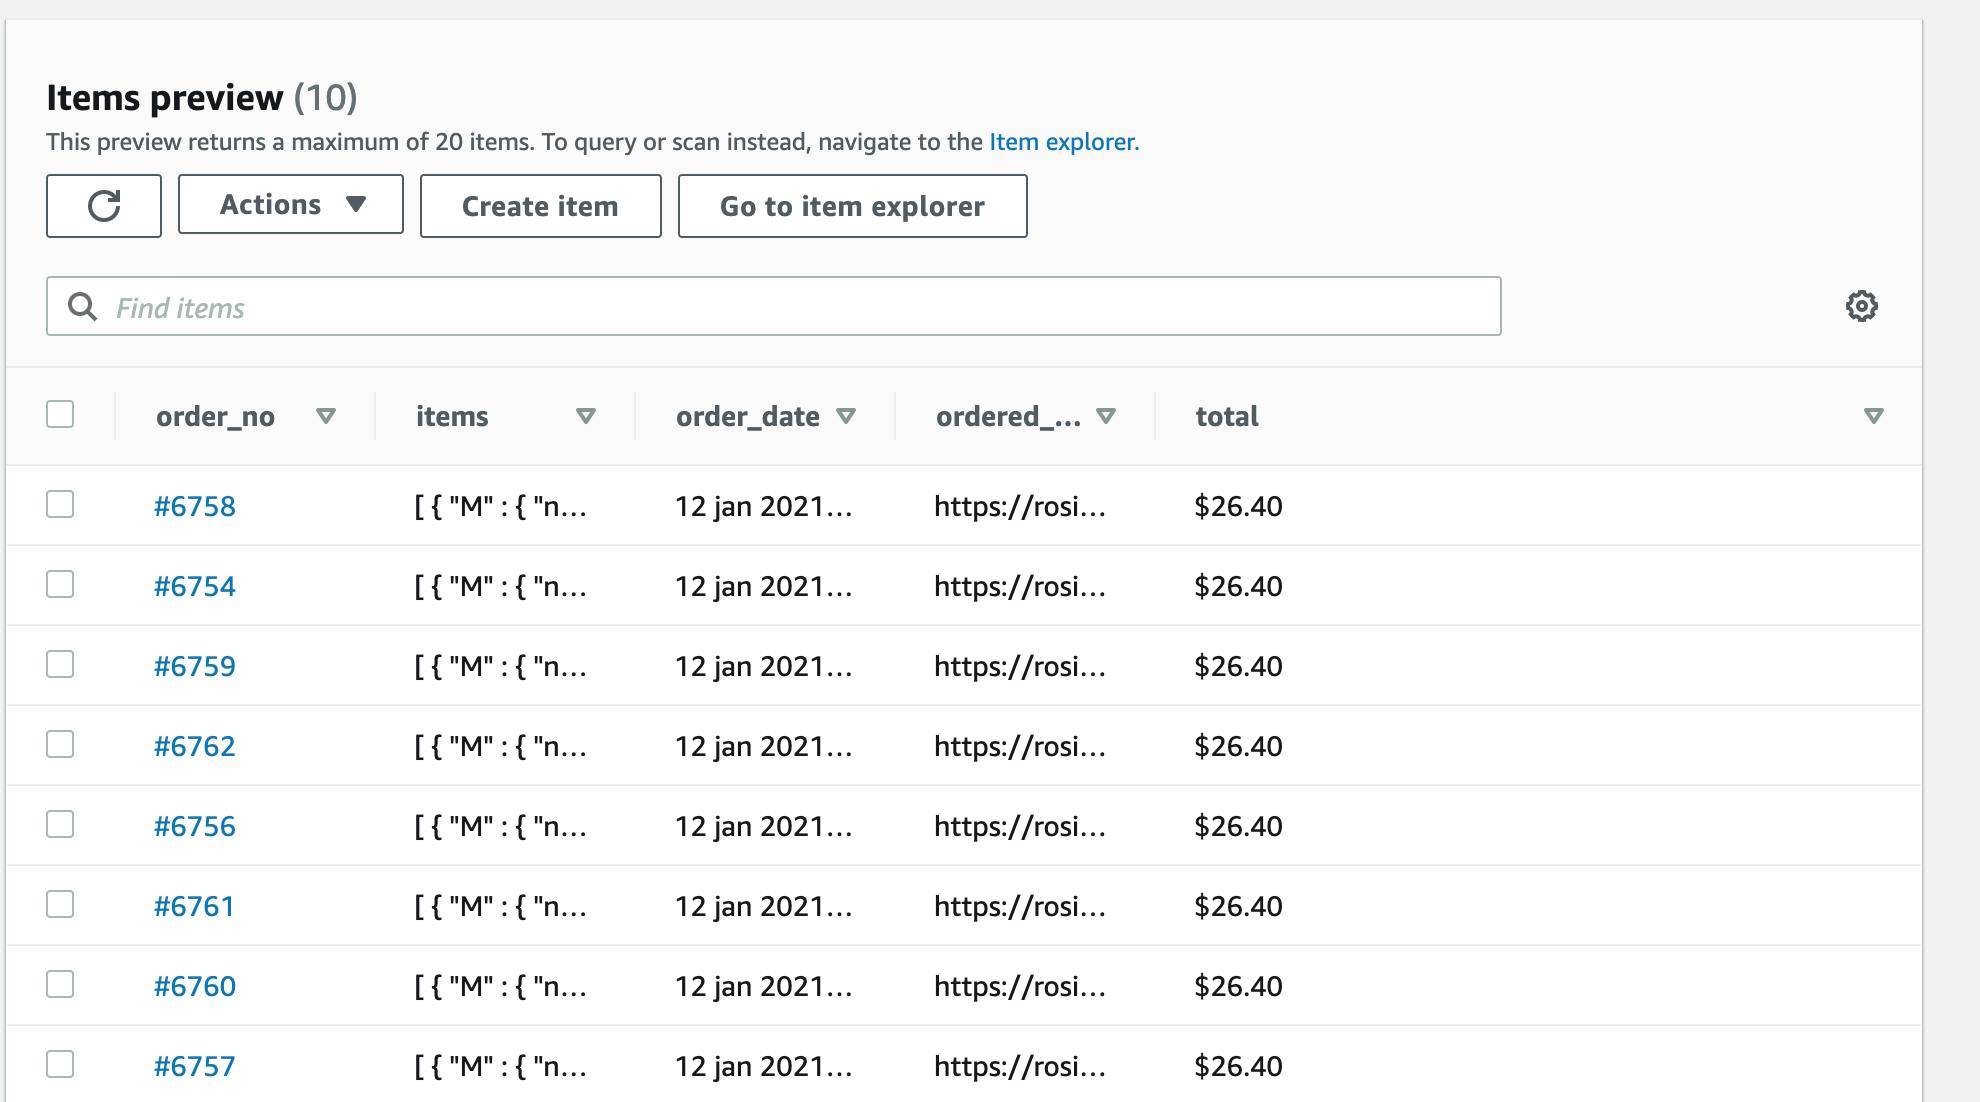
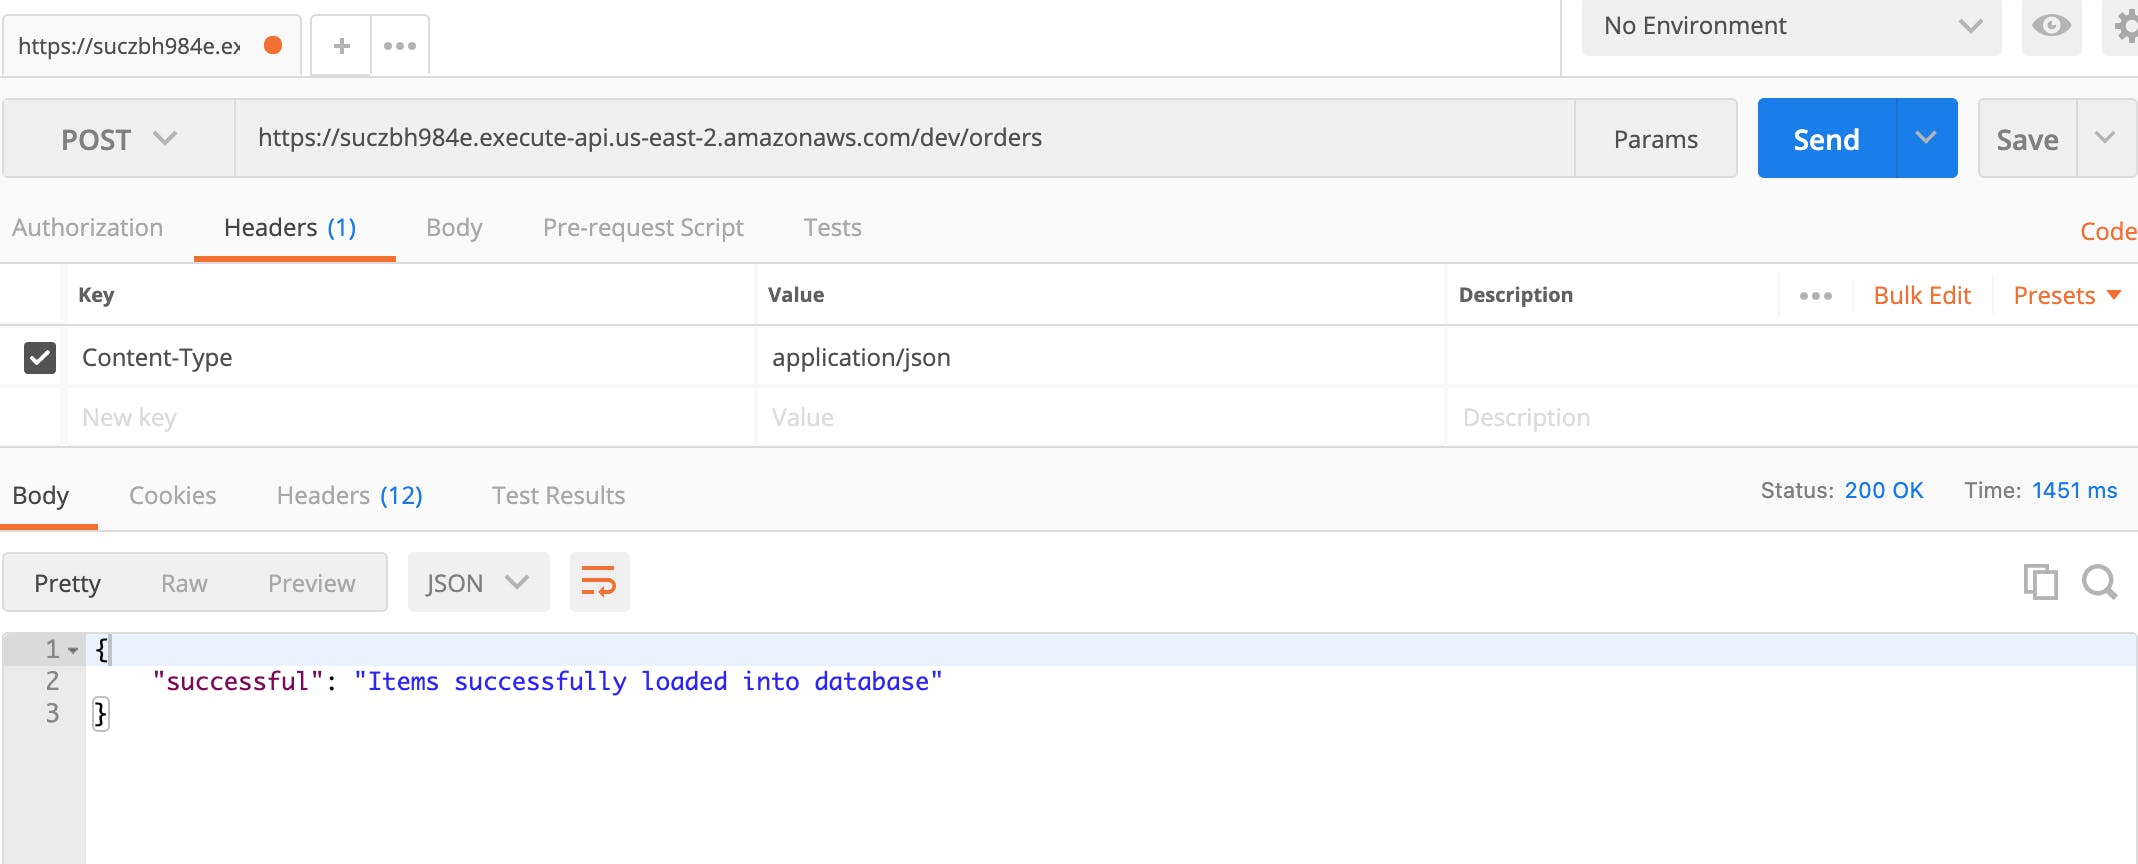
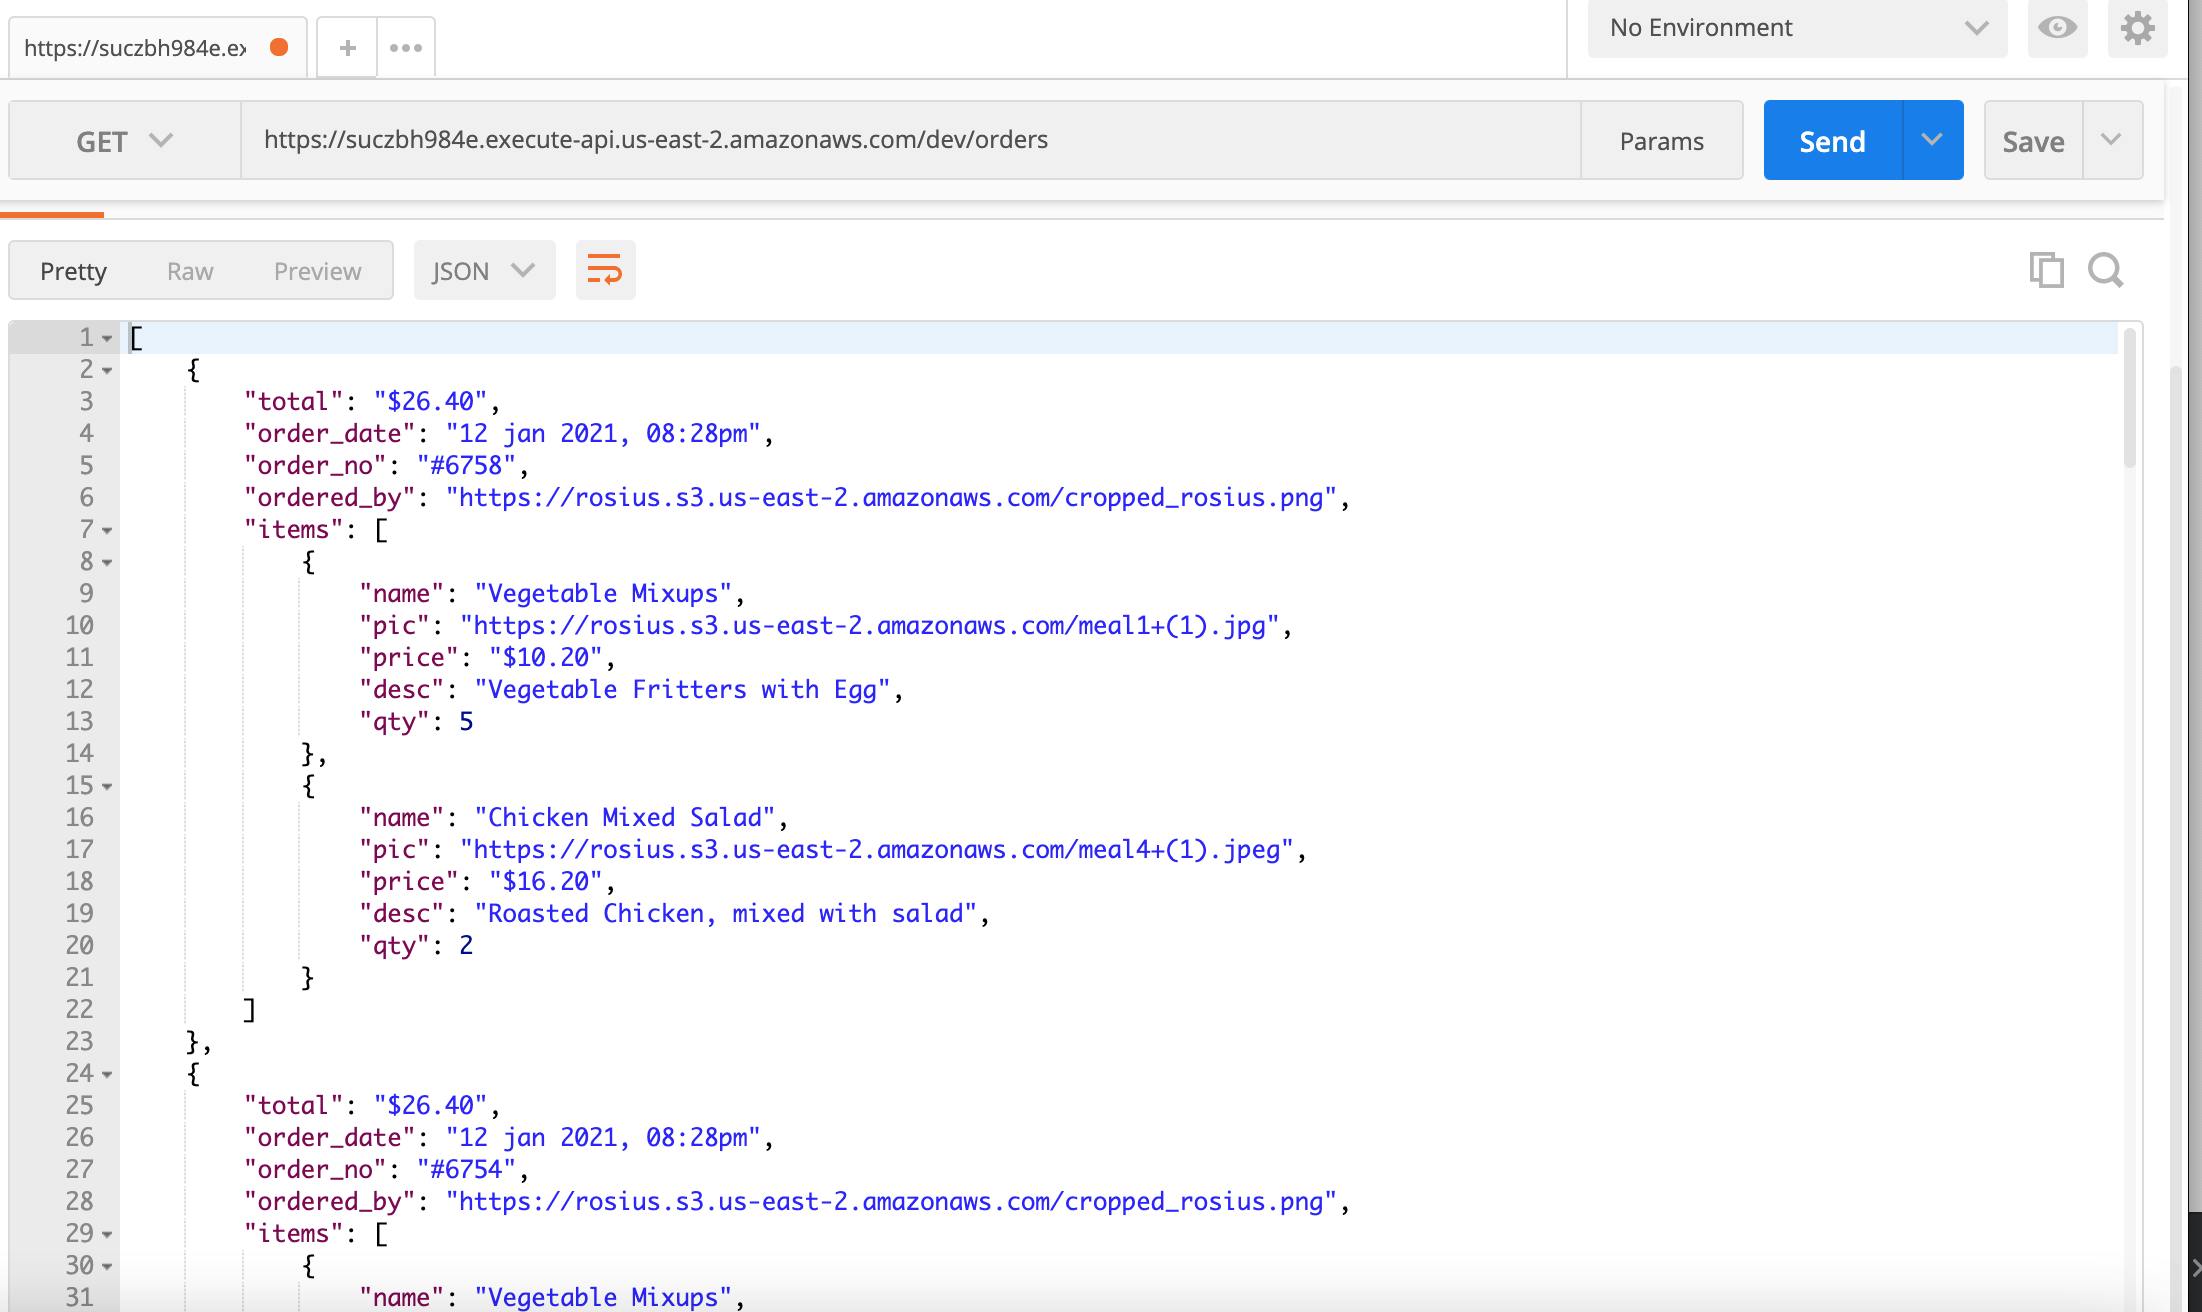
If everything goes well, 2 API endpoints would be generated. One to load data and the other to get the data. I'll be using Postman to test the endpoints. Here's a screenshot of my lambda functions and dynamo DB

Postman load endpoint test
Postman List endpoint test
Security
Our endpoints work just fine, but now, we need to secure them. Log into your AWS console, type API gateway in the search bar, and click on it.
See the photo below.
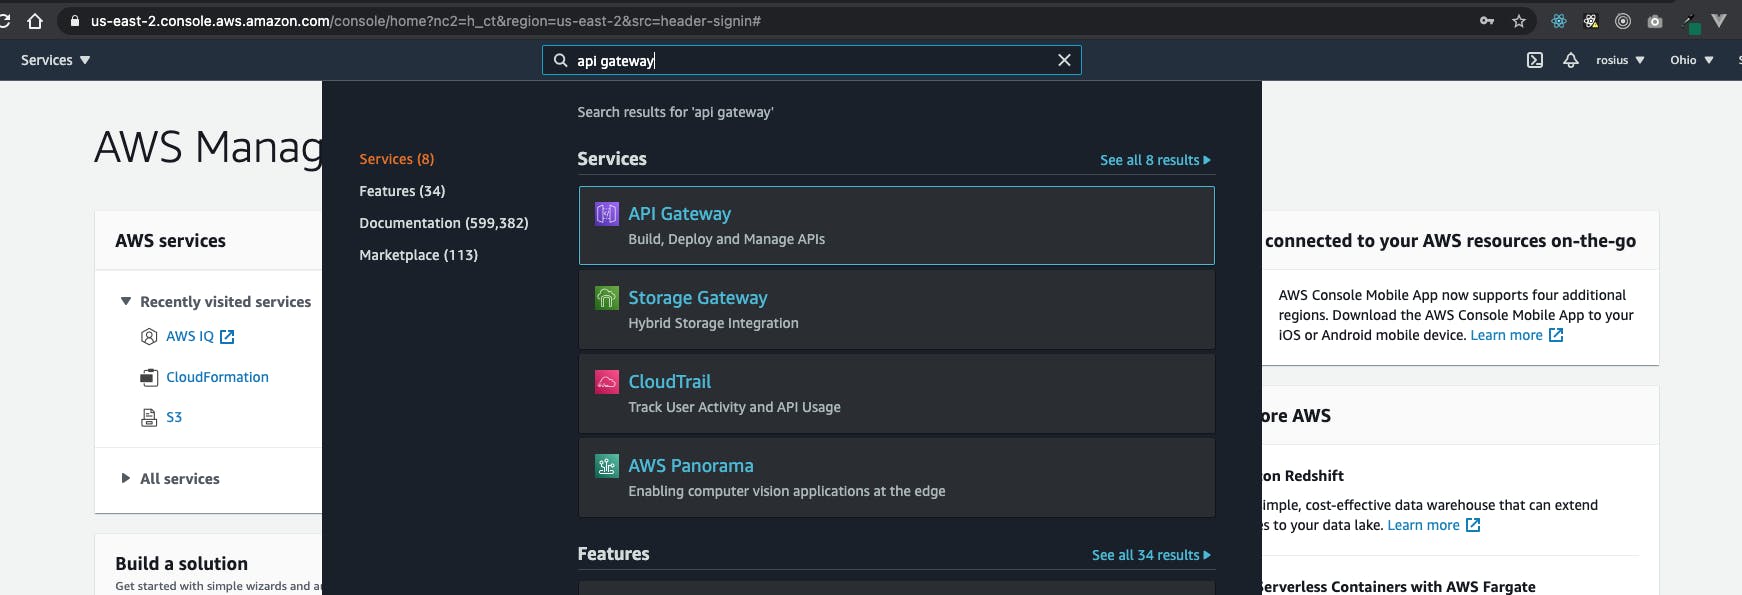 In the next screen, select the API you want to secure. Mine is dev-serverless-order-api
 .
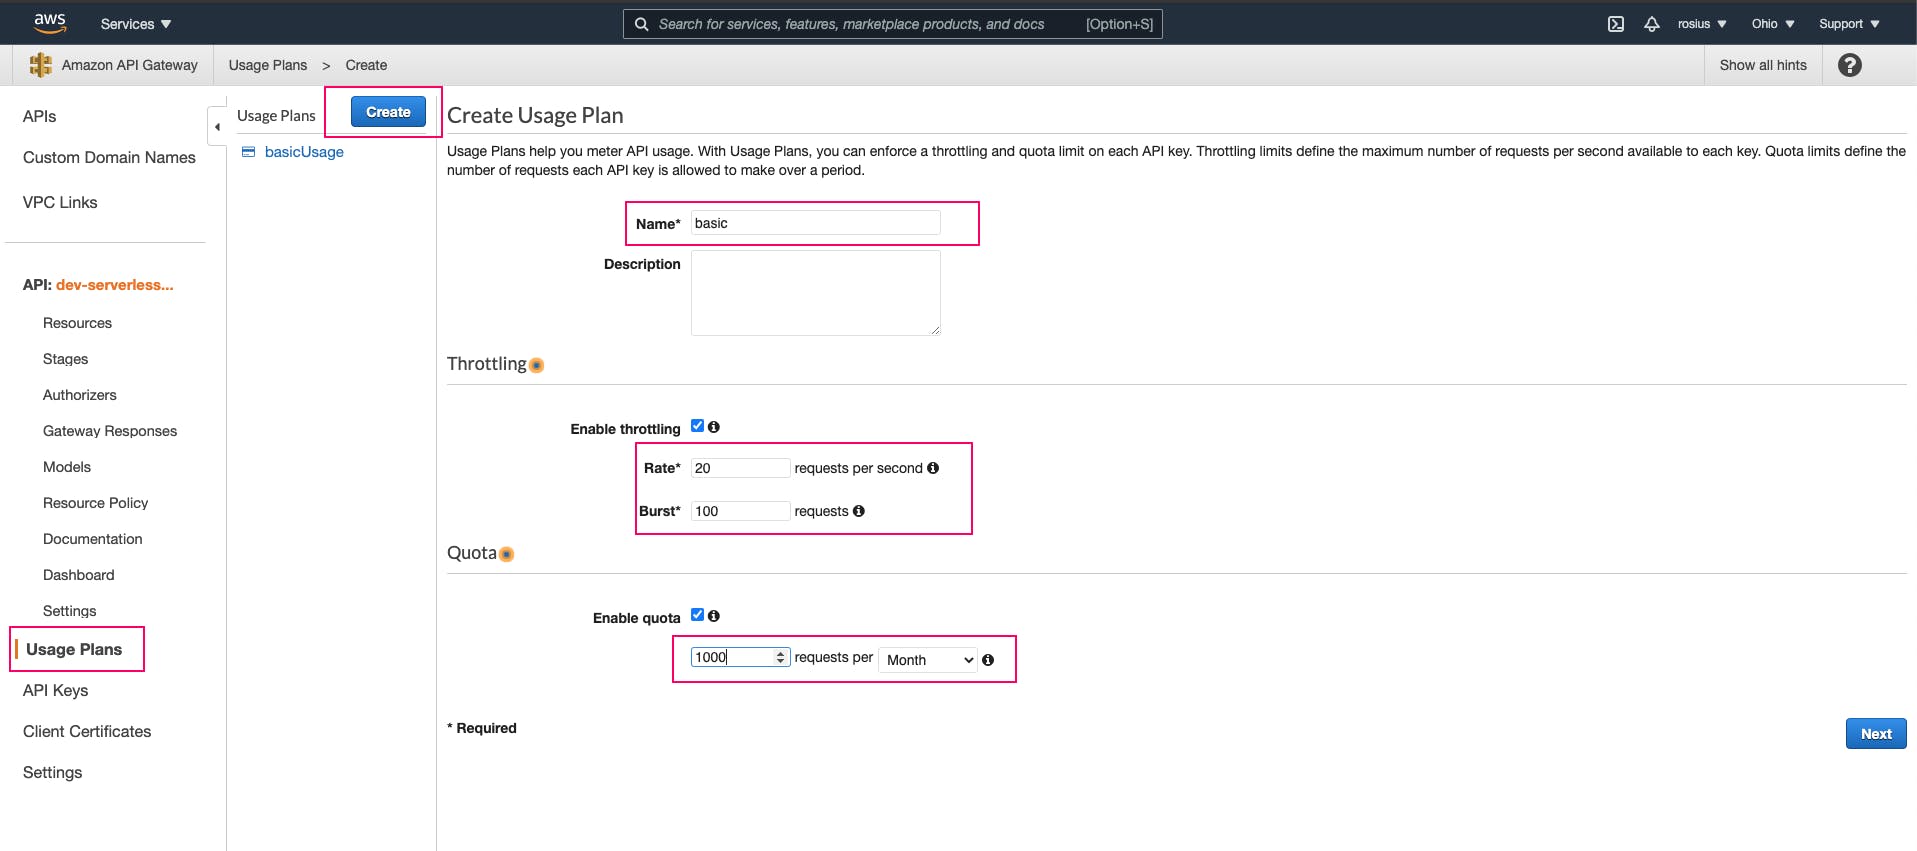
On the next screen, select Usage plan at the bottom left-hand corner, click the Create button and fill in the required fields and click next
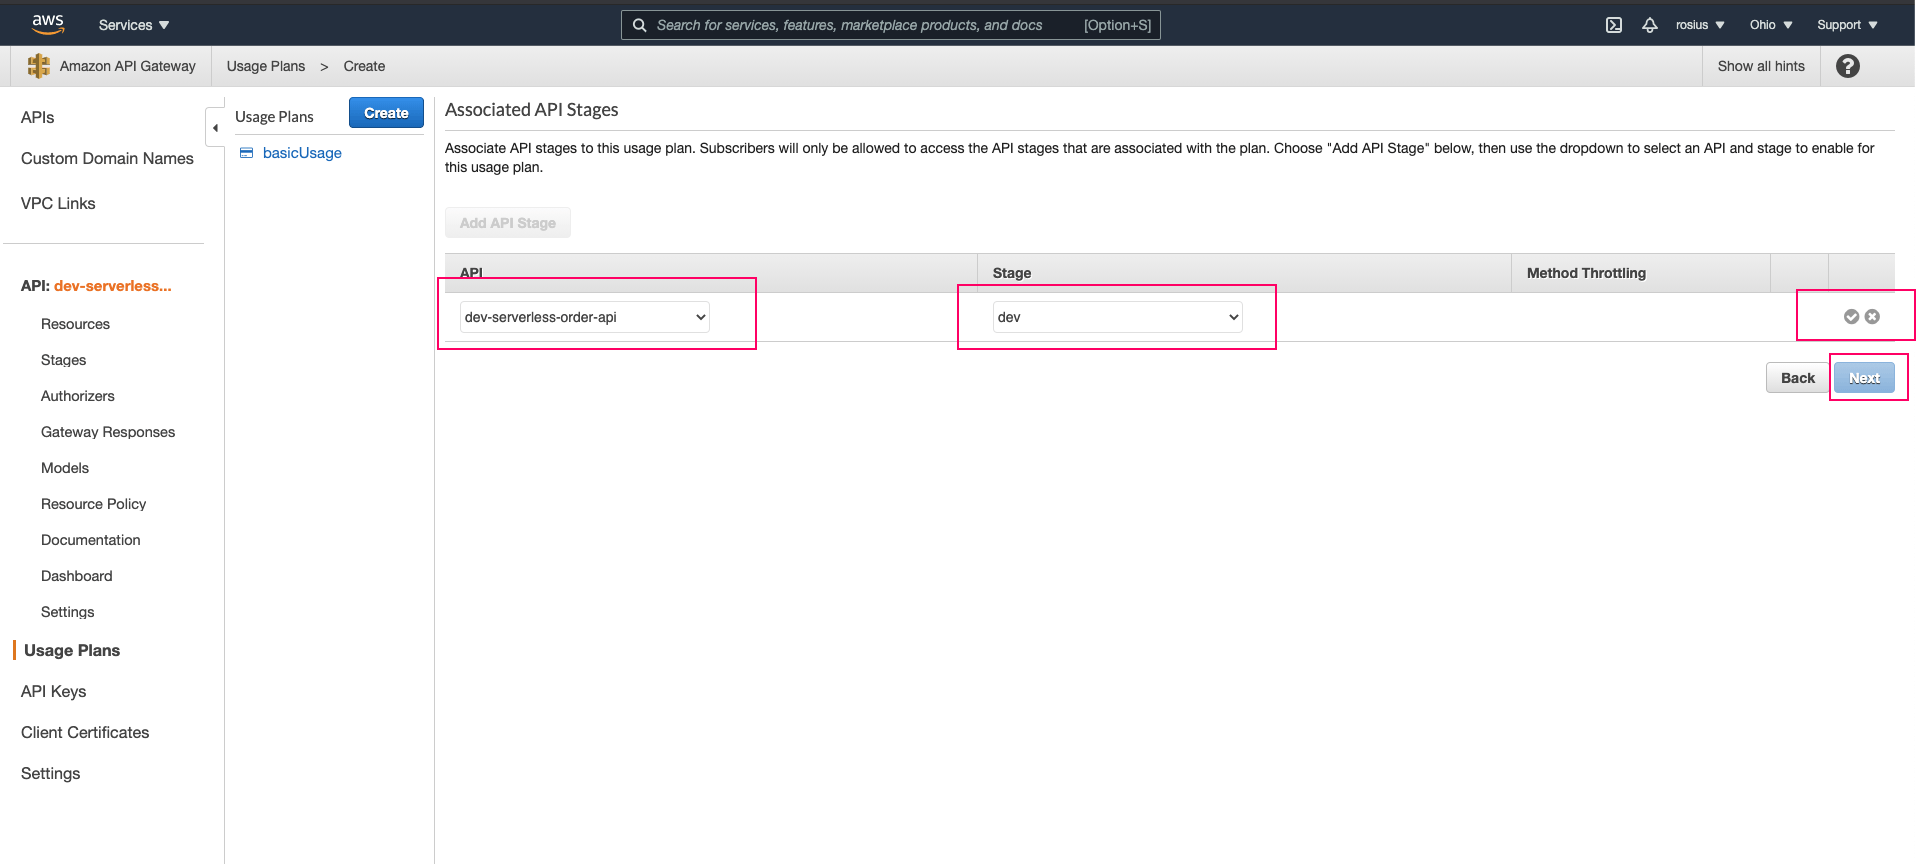
 On the next screen, select your API(dev-serverless-order-api) select the stage and confirm, then click on next.
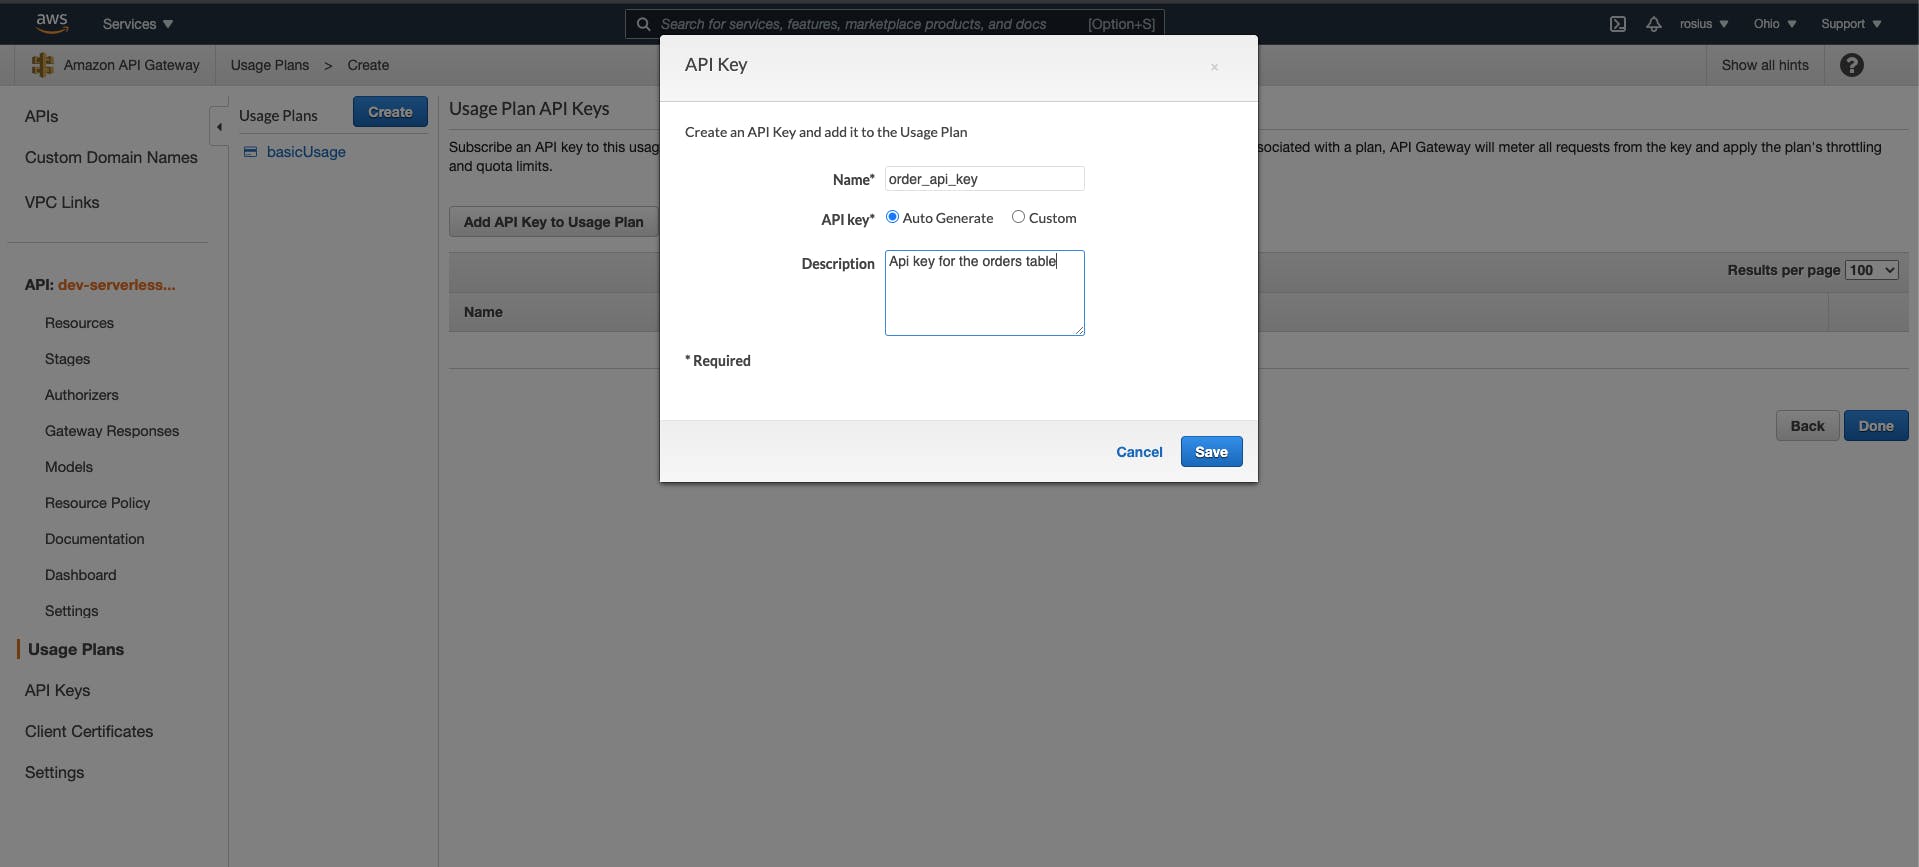
 On the next screen Usage plan API keys click on Create API key and add to usage plan button, fill required fields and save. Then click Done.
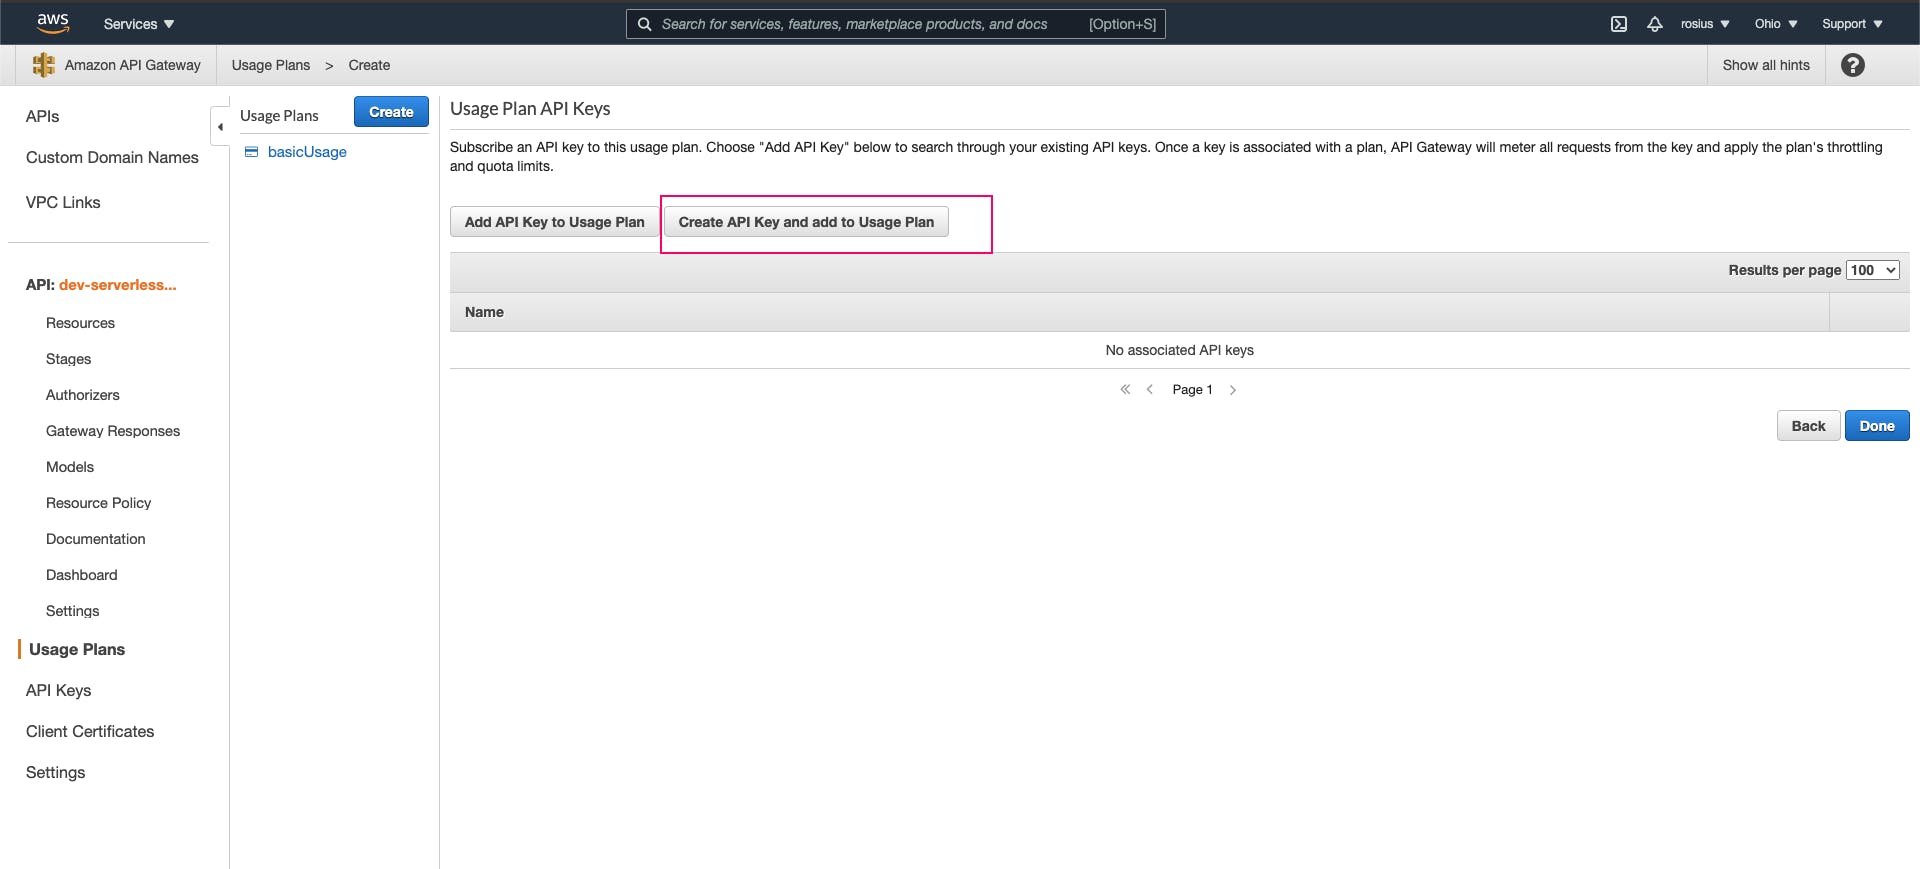
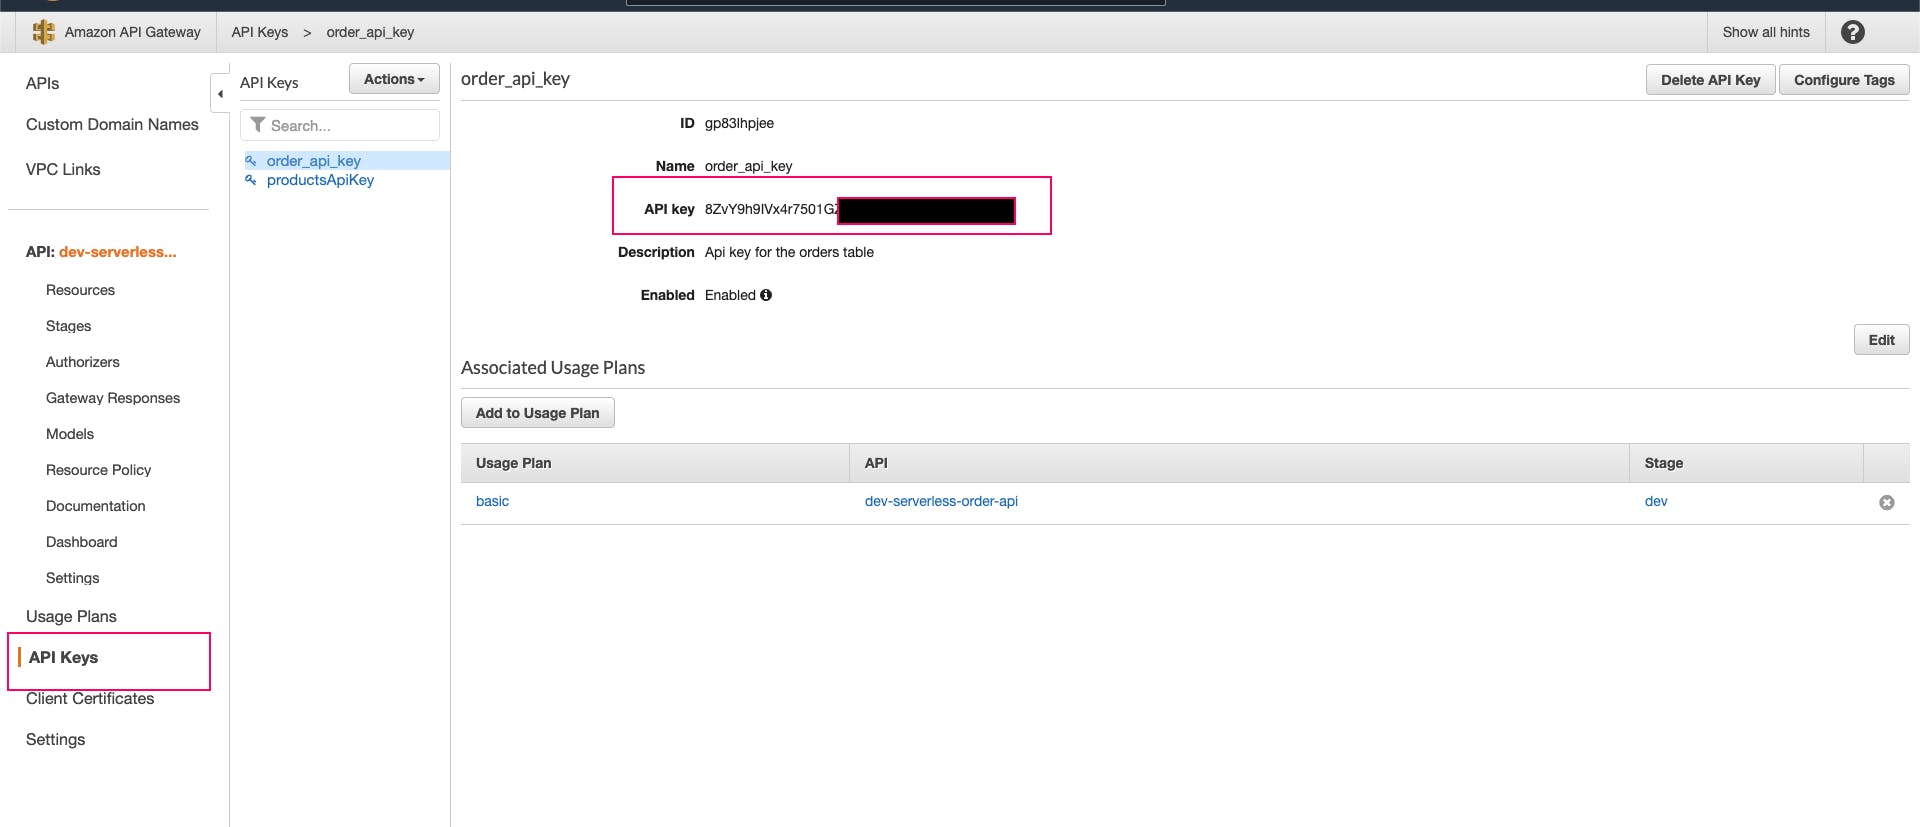
Clicking the done button takes you back to the initial screen. You can go to the API Keys tab on the left-hand side of the screen and see your API Key there. You can click on the key, and then “show” where it says API Key, and there it is! Your generated API key.
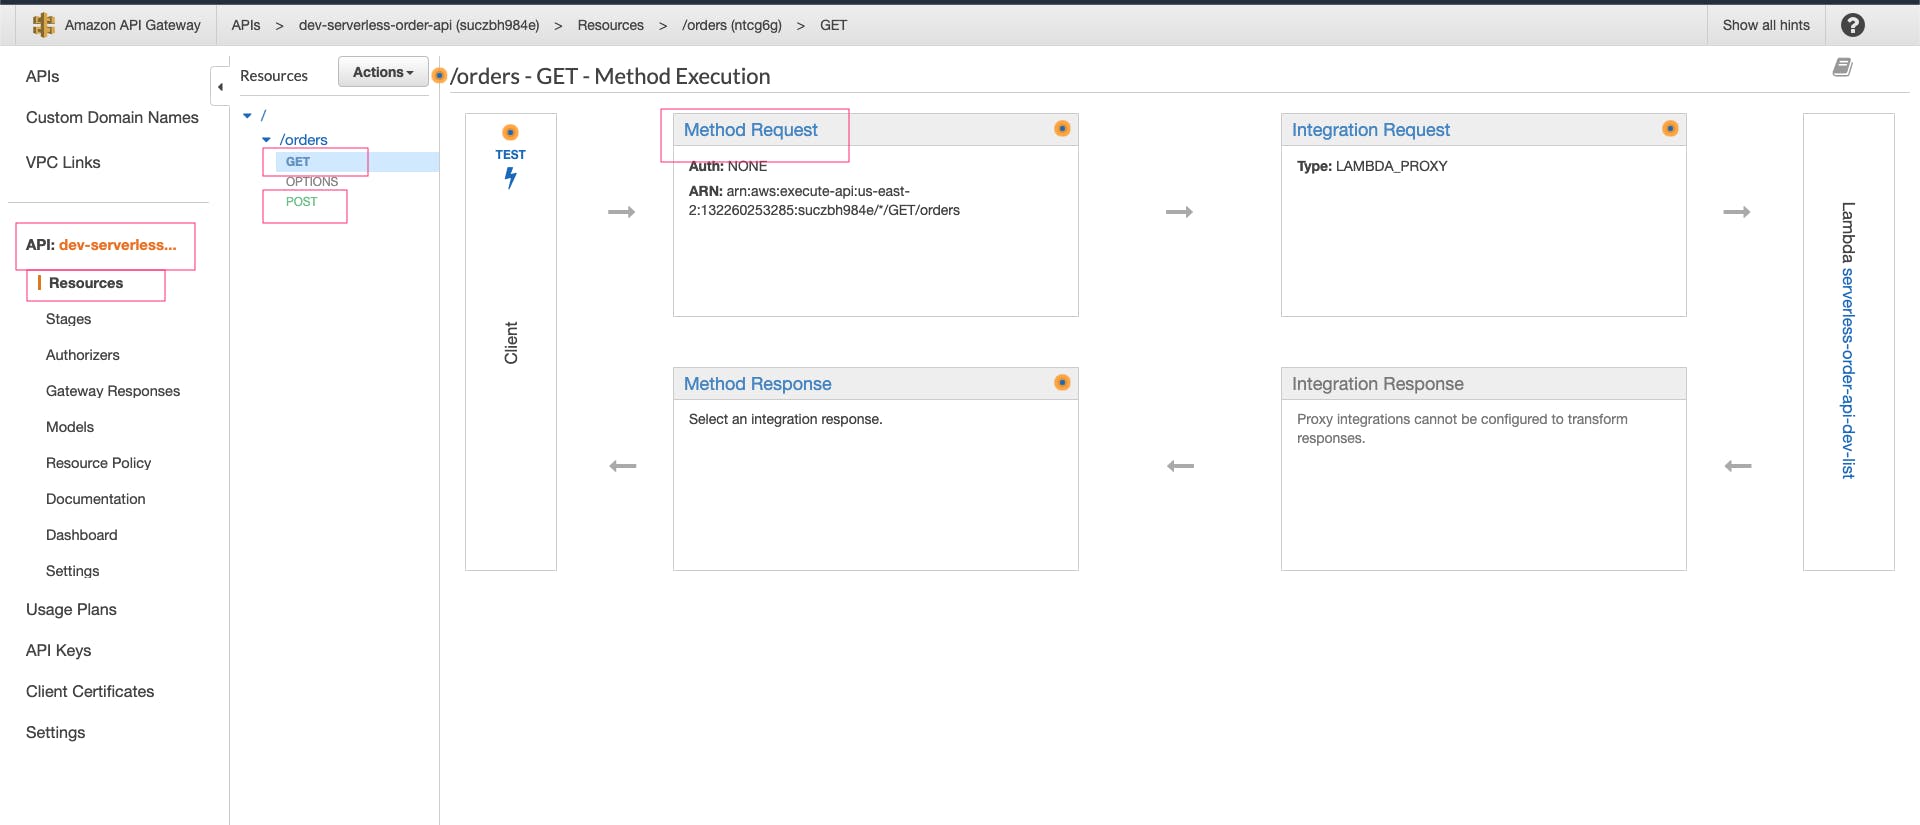
Finally, select the resource menu of your API on the left-hand side of the screen, click on /orders, click on GET method, and select Method Request.
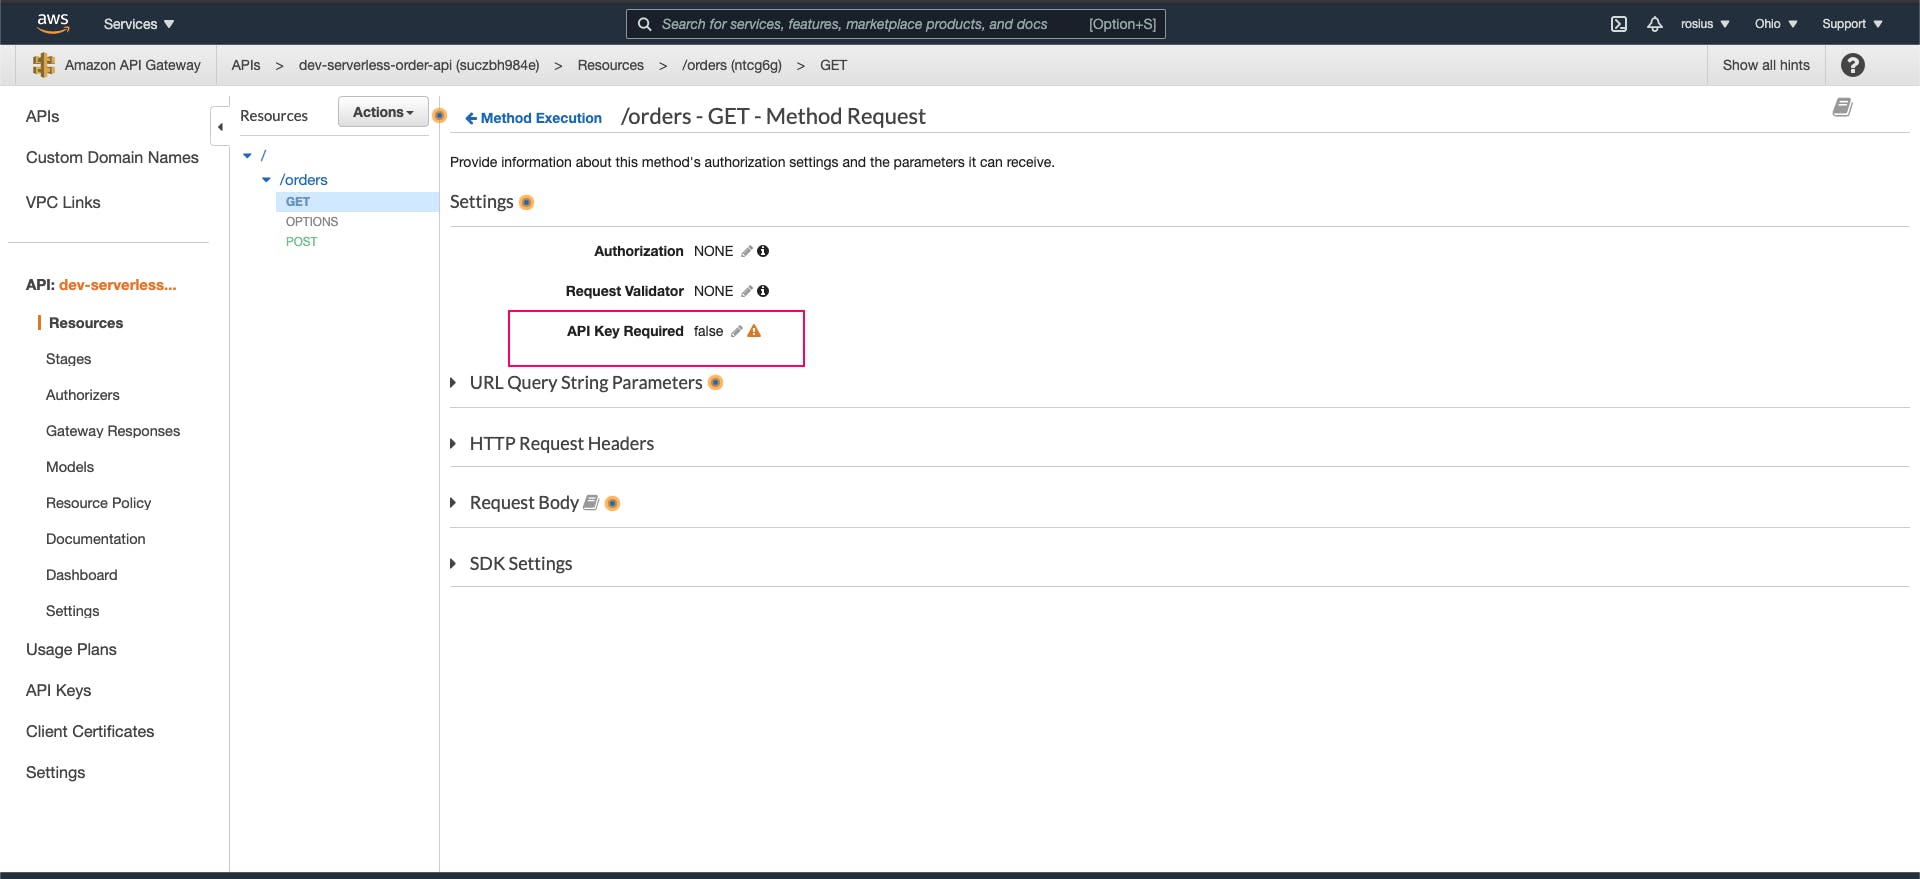
 Set API Key Required to true. Do the same for the POST method.
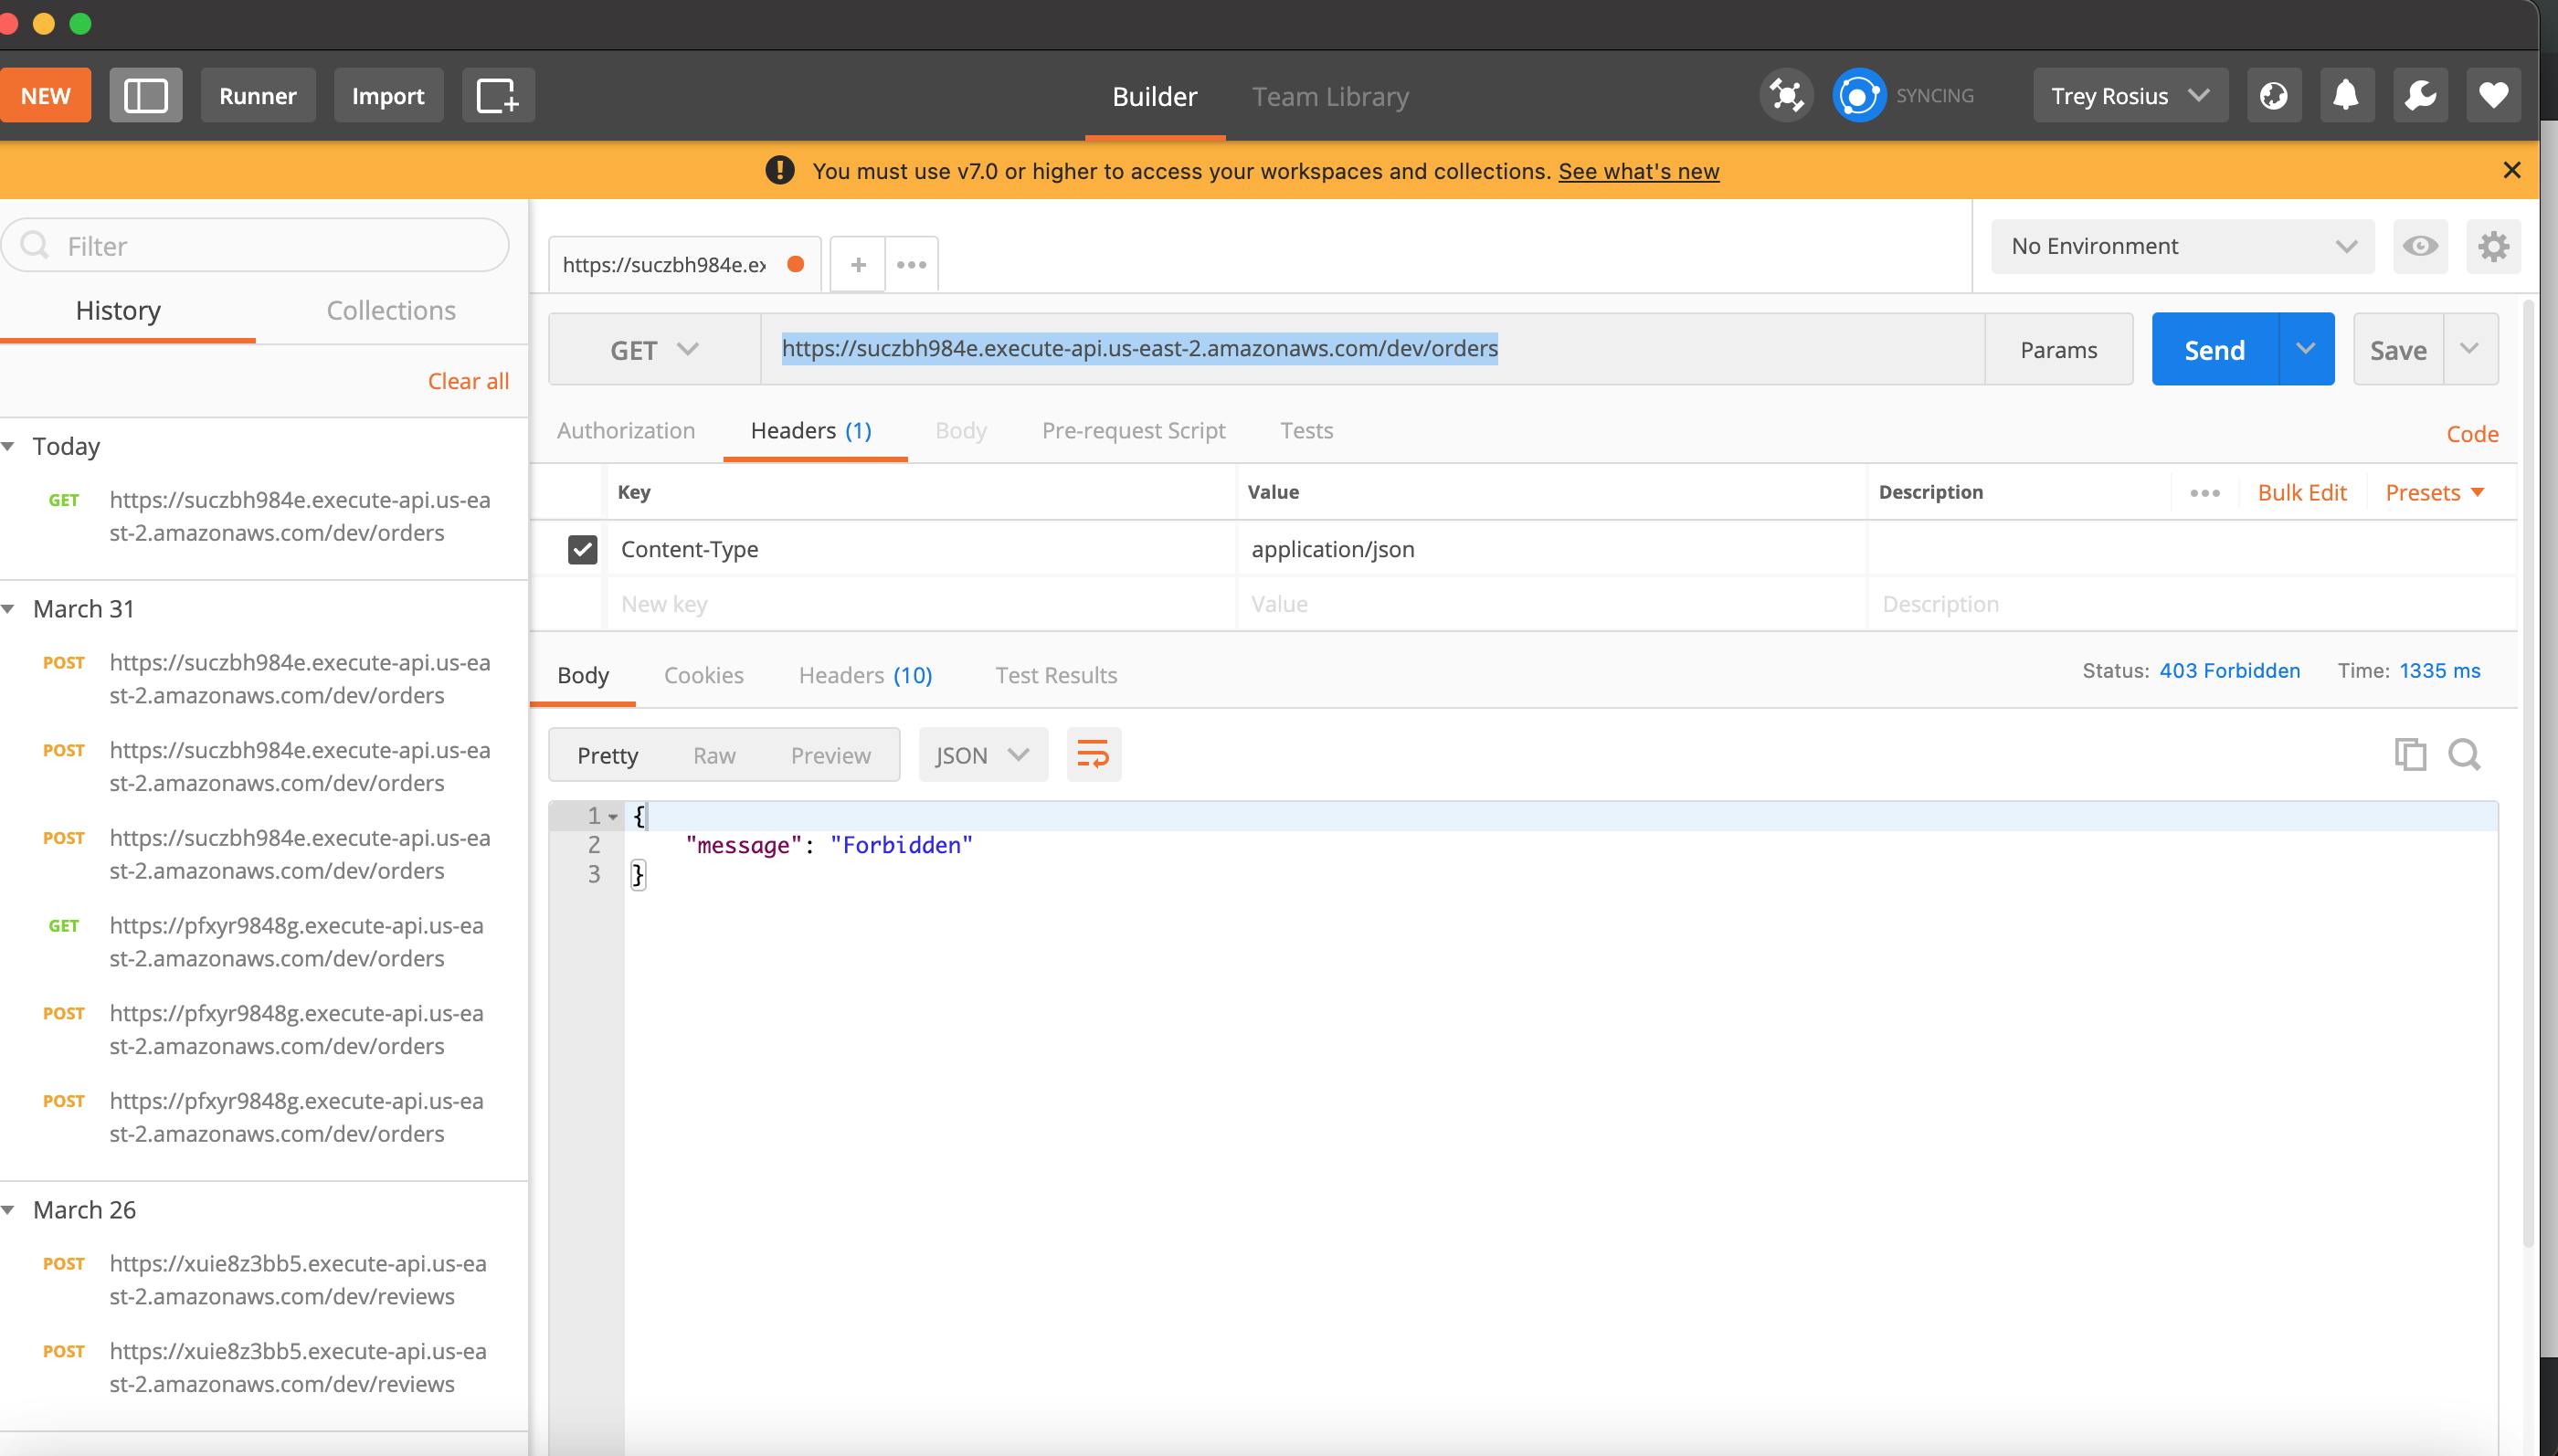
Now, Please Deploy your app again for all the changes to take effect. Let's test in postman. Let's try to get data without adding the api-key. We get the status code 403. Forbidden. That's nice
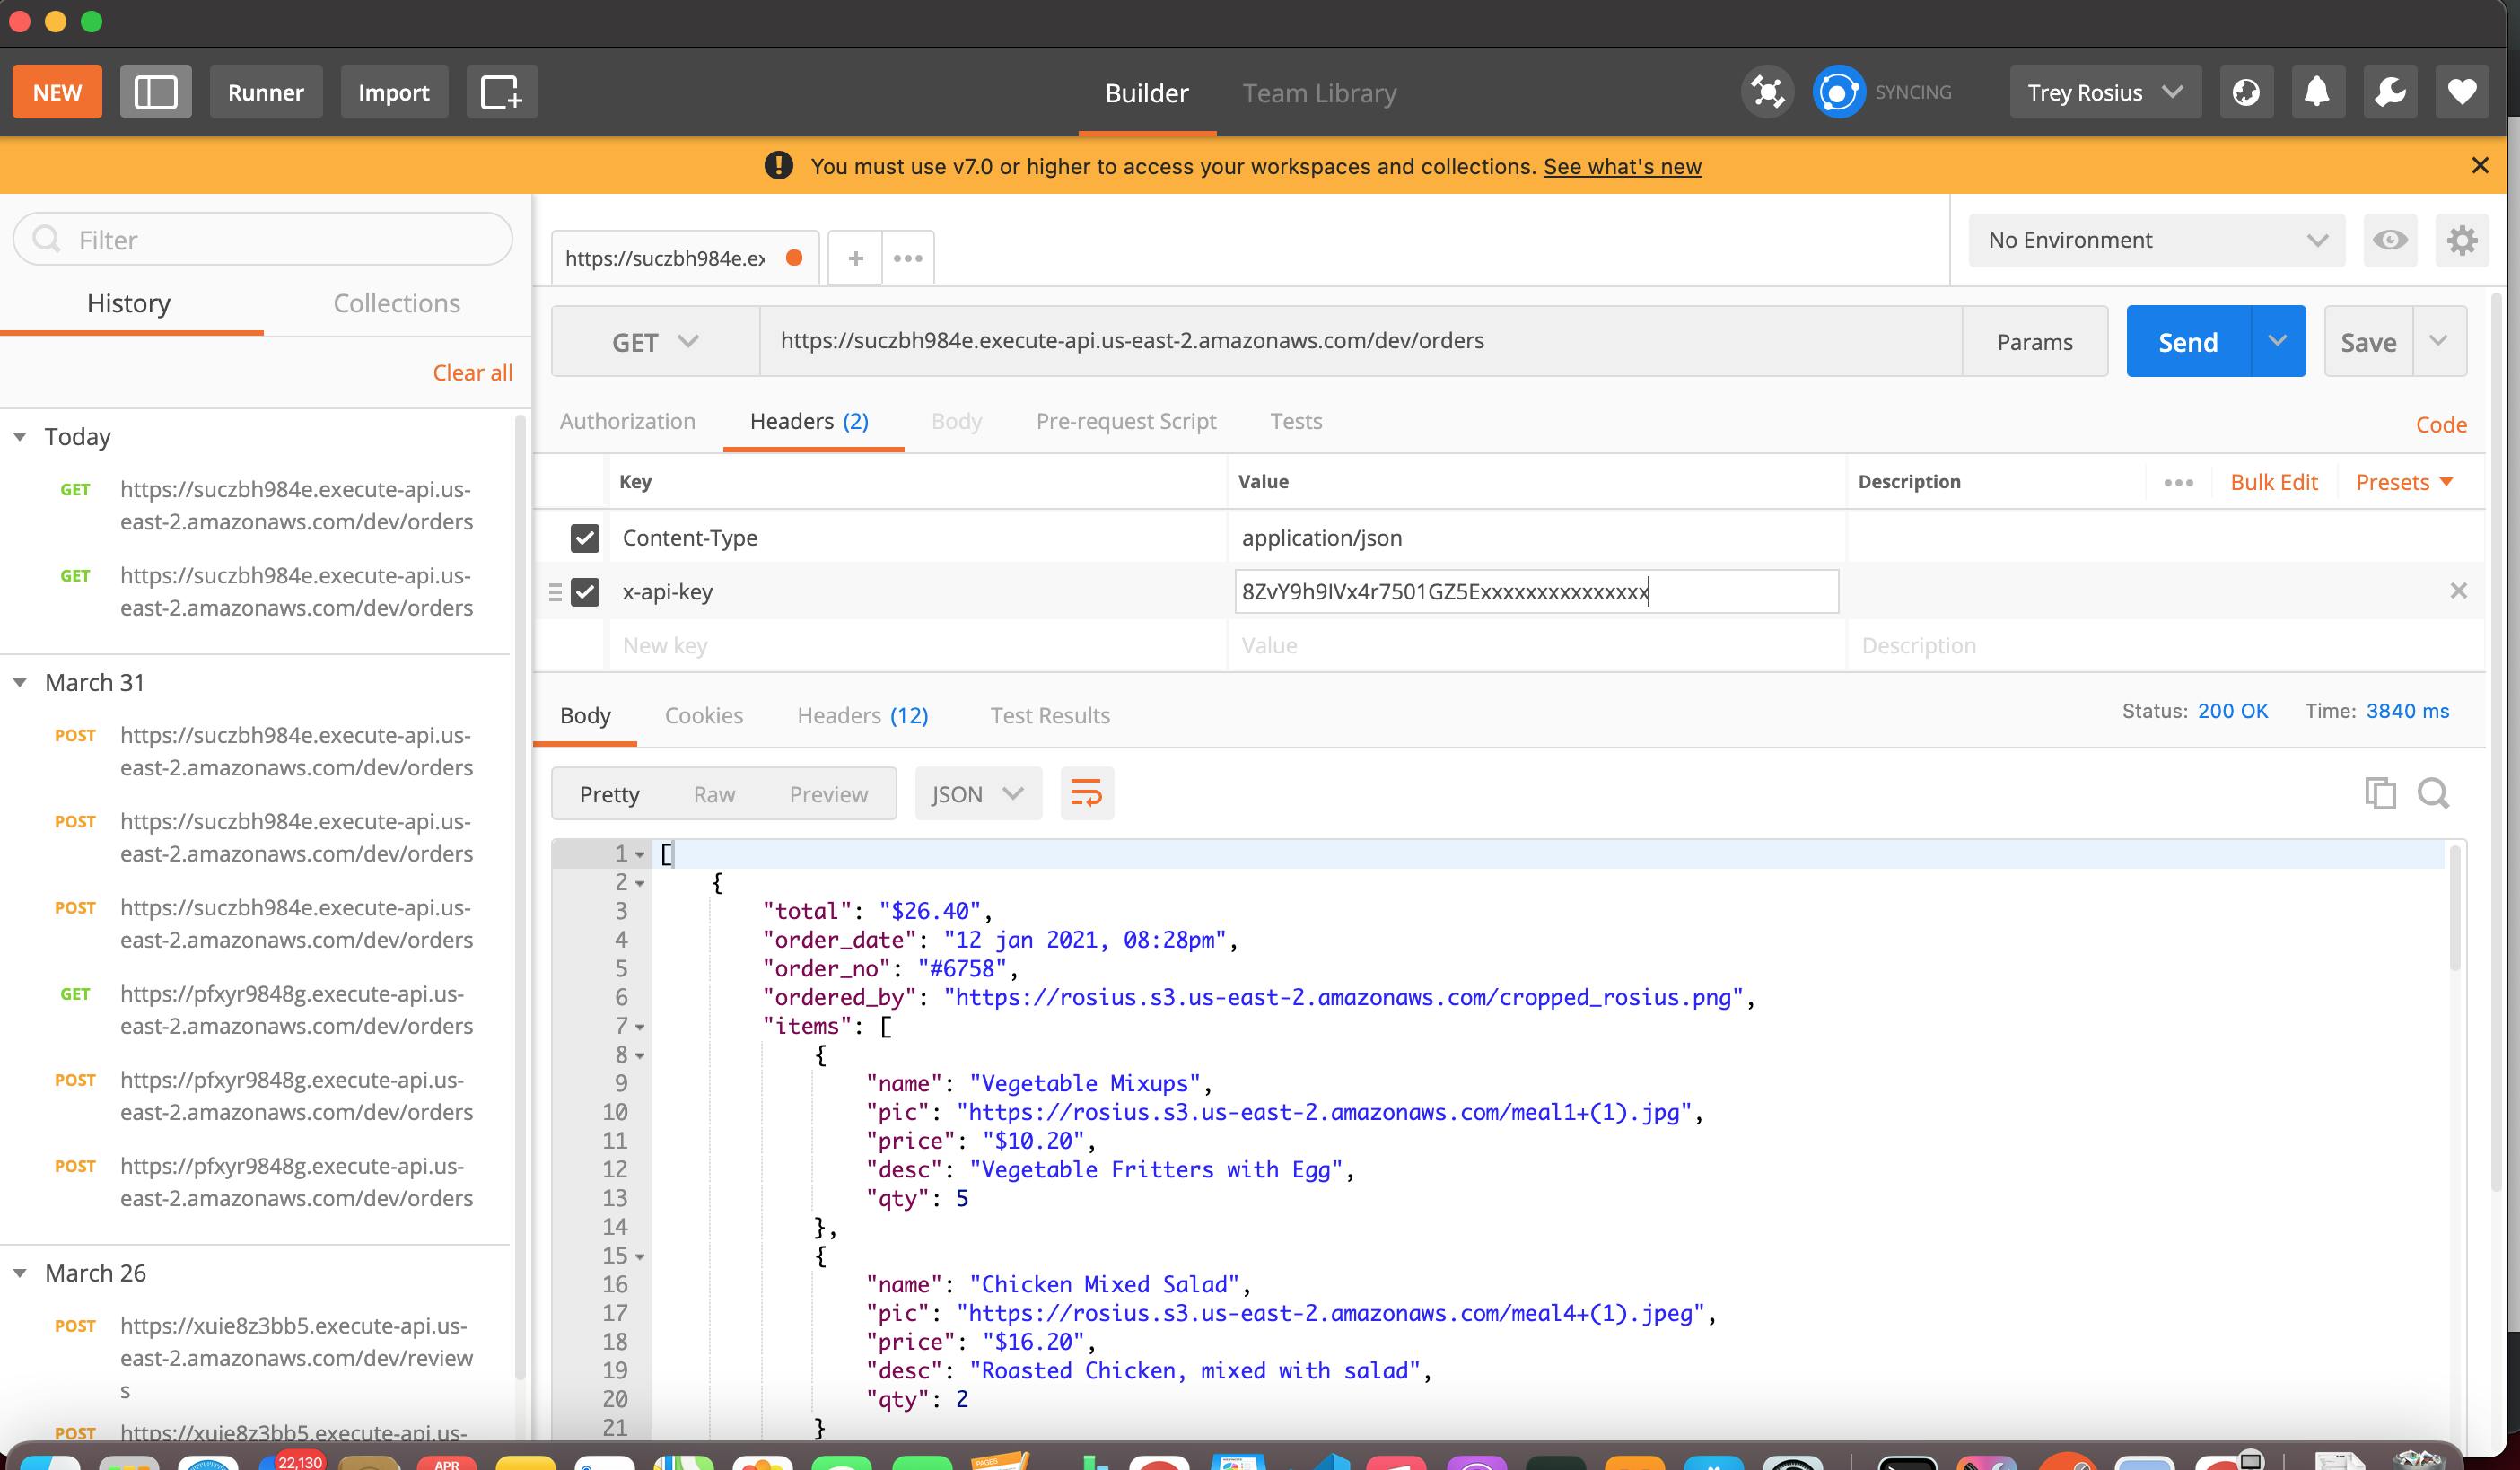
When we add the api-key to our header. x-api-key: "API-KEY". It gets our data.
 Now, our API key is a lot secure.
Let's continue in part 2,where we would be building a JAMSTACK application with it.
Part 2
phatrabbitapps.com/how-to-build-serverless-..Thanks a lot for getting this far with me.
Hope you loved it, please leave a like
Let me know in the comments below, if you have any questions or if I made a mistake somewhere. I'll be more than glad to respond.
Checkout my other article, if you've got some more time.
Demystifying DynamoDb
Happy Coding ❤️

