Building Modern Serverless API's with AWS: DynamoDB, Lambda, and API Gateway(Part 3)
Building a serverless API with SAM.
In Part 1 of this series, we modeled and created access patterns for our application entities.
In Part 2, we designed the primary key and Global Secondary Index, created a sample database schema using NoSql Workbench, and saw clearly each access pattern for our app.
NOTE
I would be posting code snippets of the main function and not the entire code itself. I've uploaded the complete code to GitHub, and I recommend you check it out at the end of this series.In this part, we will start building our API using the serverless application model(SAM) framework.SAM enables us to create and run our APIs faster, and when combined with Docker, we can run and test our application locally before deploying to the cloud.
I'll assume you've installed and configured AWS CLI and SAM CLI(including Docker)
Let's Get's Started
First, we'll create a hello world application, using the command below to begin.sam init
Follow the CLI steps to create the project. I've attached screenshots to guide you through. Let's name our project socially_serverless_api.
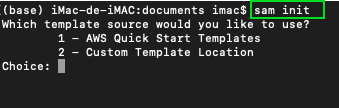
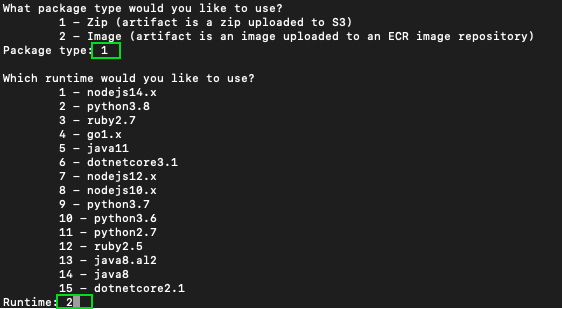
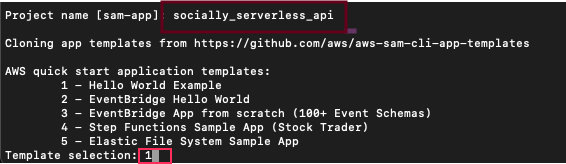
Once created, let's proceed to create the DynamoDB table. We'll call this table data.
Create DynamoDb Table
 DynamoDBTable:
    Type: AWS::DynamoDB::Table
    Properties:
      AttributeDefinitions:
        - AttributeName: "PK"
          AttributeType: "S"
        - AttributeName: "SK"
          AttributeType: "S"


      KeySchema:

        - AttributeName: "PK"
          KeyType: "HASH"
        - AttributeName: "SK"
          KeyType: "RANGE"
      ProvisionedThroughput:

          ReadCapacityUnits: "1"
          WriteCapacityUnits: "1"
      TableName: "data"
      GlobalSecondaryIndexes:
        - IndexName: "GSI1"
          KeySchema:
            - AttributeName: "status"
              KeyType: "HASH"
          Projection:
            ProjectionType: "ALL"
          ProvisionedThroughput:
            ReadCapacityUnits: "1"
            WriteCapacityUnits: "1"
This code is added to the SAM "template.yaml" file. The operation declares two attribute definitions, which are typed attributes to be used in the primary key. Though DynamoDB is schemaless, you must declare the names and types of attributes that are used for primary keys. The attributes must be included on every item that is written to the table and must be specified as you are creating a table. We also create a Global Secondary Index(GSI1) for our post status.
Because we're storing different entities in a single table, our primary key can’t use attribute names like UserId. The attribute means something different based on the type of entity being stored. For example, the primary key for a user might be its UserId, and the primary key for a Post might be its PostId. Accordingly, we use generic names for the attributes -- PK (for partition key) and SK (for sort key).
After configuring the attributes in the key schema, we specify the provisioned throughput for the table. DynamoDB has two capacity modes: provisioned and on-demand. In provisioned capacity mode, you specify exactly the amount of read and write throughput you want. You pay for this capacity whether you use it or not.
In DynamoDB on-demand capacity mode, you can pay per request. The cost per request is slightly higher than if you were to use provisioned throughput fully, but you don’t have to spend time doing capacity planning or worrying about getting throttled. On-demand mode works great for spiky or unpredictable workloads. We’re using provisioned capacity mode in this app because it fits within the DynamoDB free tier.
During deployment, SAM would create and configure our DynamoDB table based on this configuration. But we wouldn't be deploying yet, because there are still other configurations to make and scripts to write. So stay with me.
The next step is to define global variables for your application.
Resources in a SAM template tend to have shared configuration such as Runtime, Memory, VPC Settings, Environment Variables, Cors, etc. Instead of duplicating this information in every resource, you can write them once in the Globals section and let all resources inherit it.
# More info about Globals: https://github.com/awslabs/serverless-application-model/blob/master/docs/globals.rst
Globals:
  Function:
    Timeout: 5
    Runtime: python3.8
    Environment:
      Variables:
        TABLE_NAME: data
So all the functions in our application would use python3.8 as the runtime, they'll have a Timeout of 5 seconds. Each function would also inherit the TABLE_NAME parameter. Let's go-ahead to create our first function, then configure it in SAM.
Create User Script
Create a folder called users and a file within it called create.py and type this code into the file.import json
import logging
import os
import time
import uuid
import boto3
dynamodb = boto3.resource('dynamodb')
def create_user(event, context):
data = json.loads(event['body'])
if 'firstName' not in data:
logging.error("Validation Failed")
raise Exception("Couldn't create the user ")
timestamp = str(time.time())
table = dynamodb.Table(os.environ['TABLE_NAME'])
item = {
'PK': "USER#{}".format(str(uuid.uuid1())),
'SK': "METADATA#{}".format(str(uuid.uuid1())),
'userId': str(uuid.uuid1()),
'firstName': data['firstName'],
"lastName": data['lastName'],
'profilePicture': data['profilePicture'],
'age': data['age'],
'emailAddress': data['emailAddress'],
'createdOn': timestamp,
}
# write the post to the database
table.put_item(Item=item)
# create a response
response = {
"statusCode": 200,
"body": json.dumps(item)
}
return response
At the top, we import the Boto 3 library and some classes to represent the objects in our application code. We import the UUID library to assist with generating universally unique Identifiers which we'll use to assign to attributes.
Next, we grab all data passed through the body of the form and first check if the data contains a key called "firstName".
If yes, we proceed to create an item with all the extracted data and then save the item to the database table using put_item.
Notice that we access the global variable TABLE_NAME using table = dynamodb.Table(os.environ['TABLE_NAME'])
If no, we terminate the application with an exception. Obviously, there are way better ways to handle scenarios like these. But I'll leave that up to you to find out.
Now, let's configure our CreateUserFunction in the template.yaml file s.
  CreateUserFunction:
    Type: AWS::Serverless::Function # More info about Function Resource: https://github.com/awslabs/serverless-application-model/blob/master/versions/2016-10-31.md#awsserverlessfunction
    Properties:
      CodeUri: users/
      Handler: create.create_user
      Policies:
        - DynamoDBCrudPolicy

      Events:
        HttpPost:
          Type: Api # More info about API Event Source: https://github.com/awslabs/serverless-application-model/blob/master/versions/2016-10-31.md#api
          Properties:
            Path: /users
            Method: post
We start by naming the function CreateUserFunction. Then we give the type, which is AWS::Serverless::Function. Notice that when we wrote the configuration above to create the database table, the type was AWS::DynamoDB::Table.
Then we set some properties for our function. The first one is CodeUri, which tells SAM where our code is located. The handler represents the function within our code that would be called to begin execution. The name of your file is create.py and the function within that file is create_user. So the handler is create.create_user.
Next, we assign a policy that grants CRUD(Create, Read, Update and Delete) access to our DynamoDB to this function.
The events property enables us to define the type of event our function would be carrying out, which is an API, and also lets us define properties such as the function endpoint(Path) and the HTTP method, which is post.
Get User Script
Let's add a script to get a given user by id. The API endpoint would look like this /users/{id}/ where id is the ID of the user we want to get from the table.Create a file in the users folder called get.py and type in the following code
import os
import json
import boto3
import decimalencoder
from botocore.exceptions import ClientError

dynamodb = boto3.resource('dynamodb')


def get_user(event, context):
    # print(event)
    print(event['pathParameters'])
    print("print this ")
    table = dynamodb.Table(os.environ['TABLE_NAME'])

    userId = "USER#{}".format(event['pathParameters']['id'])
    metaId = "METADATA#{}".format(event['pathParameters']['id'])
    print(userId)
    print(metaId)

    # fetch user from the database
    result = table.get_item(
        Key={
            'PK': userId,
            'SK': metaId
        }
    )

    print(result)
    # create a response
    response = {
        "statusCode": 200,
        "body": json.dumps(result['Item'],
                           cls=decimalencoder.DecimalEncoder)

    }
    return response
The only thing to take note of here is that we are sending in a combination of the PK and SK, which makes up the composite primary key to get information from the database table.
If you recall in part 2, we said the partition key for the user entity should be prefixed with USER# and METADATA# for the Sort Key. That's exactly what we've done at this line
userId = "USER#{}".format(event['pathParameters']['id'])
 metaId = "METADATA#{}".format(event['pathParameters']['id'])
event['pathParameters']['id'] gets the Id from the URL endpoint.(/users/{id})* Now let's configure the get user function the same way we did for the create user function.
  GetUserFunction:
    Type: AWS::Serverless::Function # More info about Function Resource: https://github.com/awslabs/serverless-application-model/blob/master/versions/2016-10-31.md#awsserverlessfunction
    Properties:
      CodeUri: users/
      Handler: get.get_user
      Runtime: python3.8

      Policies:
        - DynamoDBCrudPolicy:
            TableName: data

      Events:
        GetUser:
          Type: Api # More info about API Event Source: https://github.com/awslabs/serverless-application-model/blob/master/versions/2016-10-31.md#api
          Properties:
            Path: /users/{id}
            Method: get
Create Posts
One of the access patterns for our API was to allow a user to create posts. Let's begin.Create a folder called posts and within it, create a file called create.py .
import json
import logging
import os
import time
import uuid
import boto3

dynamodb = boto3.resource('dynamodb')


def create_post(event, context):
    data = json.loads(event['body'])
    if 'postText' not in data:
        logging.error("Validation Failed")
        raise Exception("Couldn't create the post")

    timestamp = str(time.time())
    uniqueId = str(uuid.uuid1())

    table = dynamodb.Table(os.environ['TABLE_NAME'])

    item = {

        'PK': "USER#{}".format(data['userId']),
        'SK': "POST#{}#{}".format(uniqueId,timestamp),
        'postId':str(uniqueId),
        'postText': data['postText'],
        'postImgUrl': data['postImgUrl'],
        'status': data['status'],
        'createdOn': timestamp

    }

    # write the post to the database
    table.put_item(Item=item)

    # create a response
    response = {
        "statusCode": 200,

        "body": json.dumps(item)
    }

    return response
There's nothing strange to talk about within this script. It's almost identical to the create user script. Take note of the Partition and Sort Keys required to create the post
'PK': "USER#{}".format(data['userId']),
'SK': "POST#{}#{}".format(uniqueId,timestamp),
Next, we add the CreatePostFunction to the template.yaml file.
CreatePostFunction:
    Type: AWS::Serverless::Function # More info about Function Resource: https://github.com/awslabs/serverless-application-model/blob/master/versions/2016-10-31.md#awsserverlessfunction
    Properties:
      CodeUri: posts/
      Handler: create.create_post
      Runtime: python3.8
      Policies:
        - DynamoDBCrudPolicy:
            TableName: data
      Events:
        HttpPost:
          Type: Api # More info about API Event Source: https://github.com/awslabs/serverless-application-model/blob/master/versions/2016-10-31.md#api
          Properties:
            Path: /post
            Method: post
Conclusion
In this post, we created a serverless project using SAM. We saw the configurations needed to create a table and global secondary index. We also defined global variables.We wrote scripts and configured functions for
- Create User(CreateUserFunction)
- Get User(GetUserFunction)
- Create Post(CreatePostFunction)
We configured functions(CreateUserFunction,GetUserFunction,CreatePostFunction) in the template.yaml file.
The complete code is on GitHub https://github.com/trey-rosius/modern_serverless_api
I'll love to know your thoughts on this. Please leave feedback and comments. Please leave a like, if you found this piece helpful.
And till next time, my brothers and sisters✌🏿
About the author
I love creating and writing about the creation of software.
Comments
Join the discussionHey there, Nice Post. I made an npm package for handling AWS Lambda responses. Do checkout 😎
AWS-TS This package lets you handle and send responses from AWS lambda with ease. You have the ability to send various types of responses such as JSON or Plain Text without worrying about headers and status codes. You can also enable or disable cors for all or specific responses or set custom headers.
Nice write ups☺
Demystifying DynamoDb For Beginners
A Technical / Non Technical overview of the dynamoDb for Beginners


