Building Modern Serverless API's with AWS: DynamoDB, Lambda, and API Gateway(Part 4)
Building a serverless API with SAM.
I love creating and writing about the creation of software.
In Part 1 of this series, we modeled and designed access patterns for our application entities.
In Part 2, we designed the primary key and Global Secondary Index, created a sample database schema using NoSql Workbench, and saw clearly each access pattern for our app.
In Part 3, we started coding up our API. We created a project using SAM and wrote a couple of scripts to Create a user, Get a user by ID and also create a post.
For this Fourth article, we will continue from where we left off in part 3.We need to create scripts for
- Updating a post
- Getting all posts for a given user
- Creating a comment
- Getting all comments for a given post
NOTE
I would be posting code snippets of the main function and not the entire code itself. I've uploaded the complete code to GitHub, and I recommend you check it out at the end of this series.Update Post
In the last post, we created a script to enable users to create a post. The script we are going to look at now enables a user to update their post.They are free to update the status, postText, or post image.
import json
import logging
import os
import time
import uuid
import boto3

dynamodb = boto3.resource('dynamodb')


def update_post(event, context):
    data = json.loads(event['body'])
    if 'status' not in data:
        logging.error("Validation Failed")
        raise Exception("Couldn't create the post")

    timestamp = str(time.time())

    table = dynamodb.Table(os.environ['TABLE_NAME'])

    # write the post to the database
    item = table.update_item(
        Key={
            'PK': "USER#{}".format(data['userId']),
            'SK': "POST#{}".format(event['pathParameters']['postId'])


        },
        ExpressionAttributeNames={
            "#pt": 'postText',
            '#st': 'status',

        },
        ExpressionAttributeValues={
            ':postText': data['postText'],
            ':status': data['status'],
            ':updatedAt': timestamp,
        },
        UpdateExpression='SET #pt = :postText,#st=:status, '
                         'updatedAt = :updatedAt',
        ReturnValues='ALL_NEW',
    )

    # create a response
    response = {
        "statusCode": 200,

        "body": json.dumps(item["Attributes"])
    }

    return response
Take note of the UpdateExpression. We are updating the values of the postText, status, and updatedAt. We use the ExpressionAttributeNames to define placeholders in an Amazon DynamoDB expression as an alternative to an actual attribute name. An expression attribute name must begin with a pound sign (#) and be followed by one or more alphanumeric characters. (#pt for postText and #st for status)
Expression attribute values in Amazon DynamoDB are substitutes for the actual values that you want to compare—values that you might not know until runtime. An expression attribute value must begin with a colon (:) and be followed by one or more alphanumeric characters.(':postText': data['postText'],':status': data['status'], ':updatedAt': timestamp).
ReturnValues='ALL_NEW' returns all the attributes of the Item as they appear after the updateItem operation.
Let's add the UpdatePostFunction to our SAM template.yaml file.
  UpdatePostFunction:
    Type: AWS::Serverless::Function # More info about Function Resource: https://github.com/awslabs/serverless-application-model/blob/master/versions/2016-10-31.md#awsserverlessfunction
    Properties:
      CodeUri: posts/
      Handler: update.update_post
      Runtime: python3.8
      Policies:
        - DynamoDBCrudPolicy

      Events:
        HttpPost:
          Type: Api # More info about API Event Source: https://github.com/awslabs/serverless-application-model/blob/master/versions/2016-10-31.md#api
          Properties:
            Path: /post/{id}
            Method: put
Take note, the HTTP method is put since we are updating a record. The endpoint is /post/{id} where id is the ID of the post we want to update.
Get All User Posts
It's always best to optimize DynamoDB tables for the number of requests it receives. We mentioned earlier that DynamoDB does not have joins that a relational database has. Instead, you design your table to allow for join-like behavior in your requests.In this step, we’ll see how to retrieve multiple entity types in a single request. In our application, we may want to fetch information about a user. This would include all of the information in the user’s profile on the User entity as well as all of the posts that have been created by a user.
This request spans two entity types -- the User entity and the Post entity. However, this doesn’t mean we need to make multiple requests.
This script shows how you can structure your code to retrieve both a User entity and the Post entities that were uploaded by the user in a single request
Create a file in the users folder called query.py and type in the following code.
import os
import json
import boto3
import decimalencoder
from botocore.exceptions import ClientError
from boto3.dynamodb.conditions import Key

dynamodb = boto3.resource('dynamodb')


def fetch_user_and_posts(event, context):
    # print(event)
    # print(event['pathParameters'])
    print("print this ")
    table = dynamodb.Table(os.environ['TABLE_NAME'])

    userId = 'USER#{}'.format(event['pathParameters']['id'])
    metadata = 'METADATA#{}'.format(event['pathParameters']['id'])
    print(userId)
    print(metadata)
    result = table.query(
        KeyConditionExpression=
        Key('PK').eq(userId) & Key('SK').between(metadata, 'POST$'),
        ScanIndexForward=True
    )
    # create a response


    response = {
        "statusCode": 200,
        "body": json.dumps(result["Items"],
                           cls=decimalencoder.DecimalEncoder)

    }
    print(response)
    print("Query successful.")
    return response
At the top, we import the Boto 3 library and some other classes to help structure our code.
The real work is happening in the query_user_details function that’s defined in the script.
In this function, we first get the id parameter from the URL (users/{id}/posts). This Id parameter represents the userId for which we want to retrieve information. The Query specifies a HASH key of USER#UserId to isolate the returned items to a particular user.
Then, the Query specifies a RANGE key condition expression that is between METADATA#UserID and POST$. This Query will return a User entity, as its sort key is METADATA#, as well as all of the Post entities for this user, whose sort keys start with POST#. Sort keys of the String type are sorted by ASCII character codes. The dollar sign ($) comes directly after the pound sign (#) in ASCII, so this ensures that we will get all of the Post entities.
Once we receive a response, we send it back through the API.
Then we Configure the FetchUserAndPosts function in our SAM template.yaml
GetPostPerUserFunction:
    Type: AWS::Serverless::Function # More info about Function Resource: https://github.com/awslabs/serverless-application-model/blob/master/versions/2016-10-31.md#awsserverlessfunction
    Properties:
      CodeUri: users/
      Handler: query.fetch_user_and_posts
      Runtime: python3.8
      Policies:
        - DynamoDBCrudPolicy

      Events:
        HttpPost:
          Type: Api # More info about API Event Source: https://github.com/awslabs/serverless-application-model/blob/master/versions/2016-10-31.md#api
          Properties:
            Path: /users/{id}/posts
            Method: get
In order to keep this post short and concise, we'll build and test all scripts we've already written. In the next post, we'll look at creating comments, getting all comments for a given post and also querying a Global Secondary Index.
Get the complete source code from here and let's begin deploying.
Build the SAM project using
sam build --use-container
After successfully building the project, deploy it using
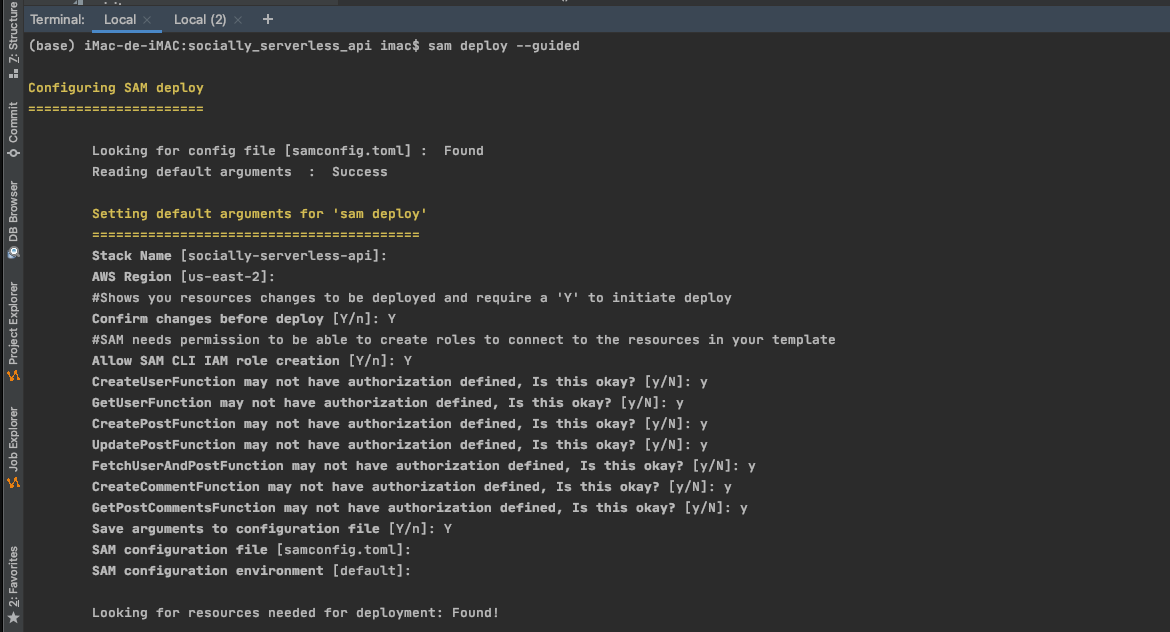
sam deploy --guided
Here's a screenshot of the steps I took to deploy the app. You can use it for guidance
Once deployed successfully, you should see all URL endpoints for your application.
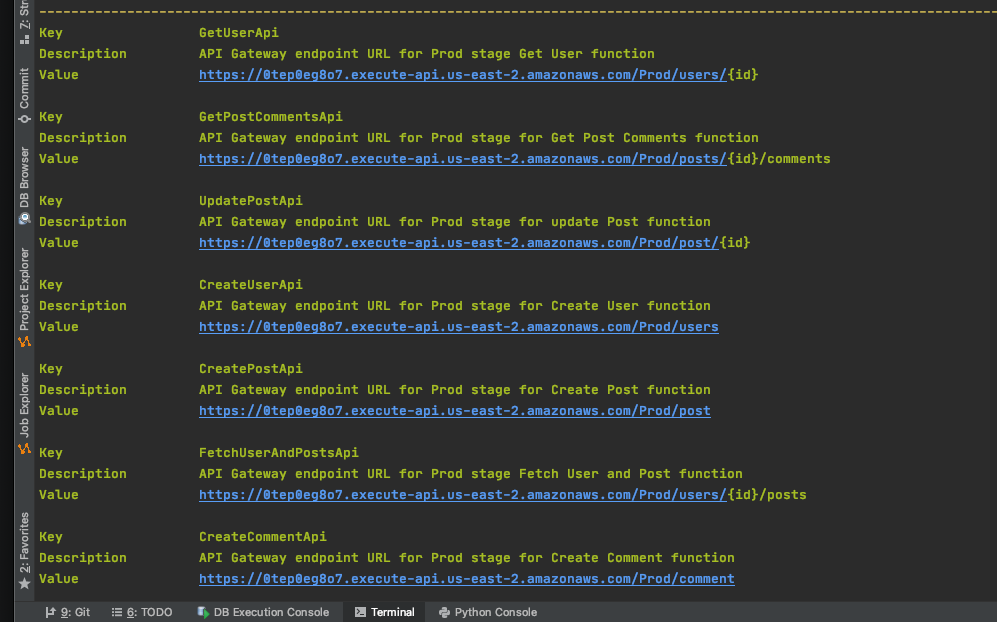
I'll be using Postman to test the API. You can use any API development client of your choice.
Create User
Copy the Url to create a user and paste it in the Enter request field of Postman. Be sure to set your body to raw and format to JSON(application/json).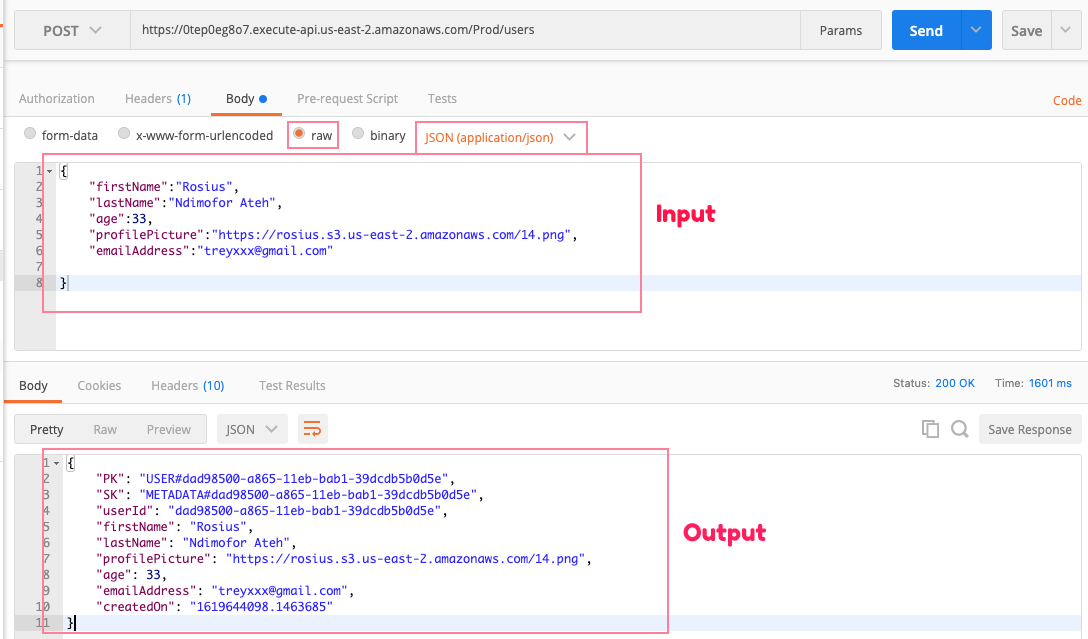 Log into your aws account and navigate to the DynamoDB to see the user data in the data table.

Create Post
When creating a post, copy the userId of any user in your database and use it as the userId in the create post form field. See the attached screenshot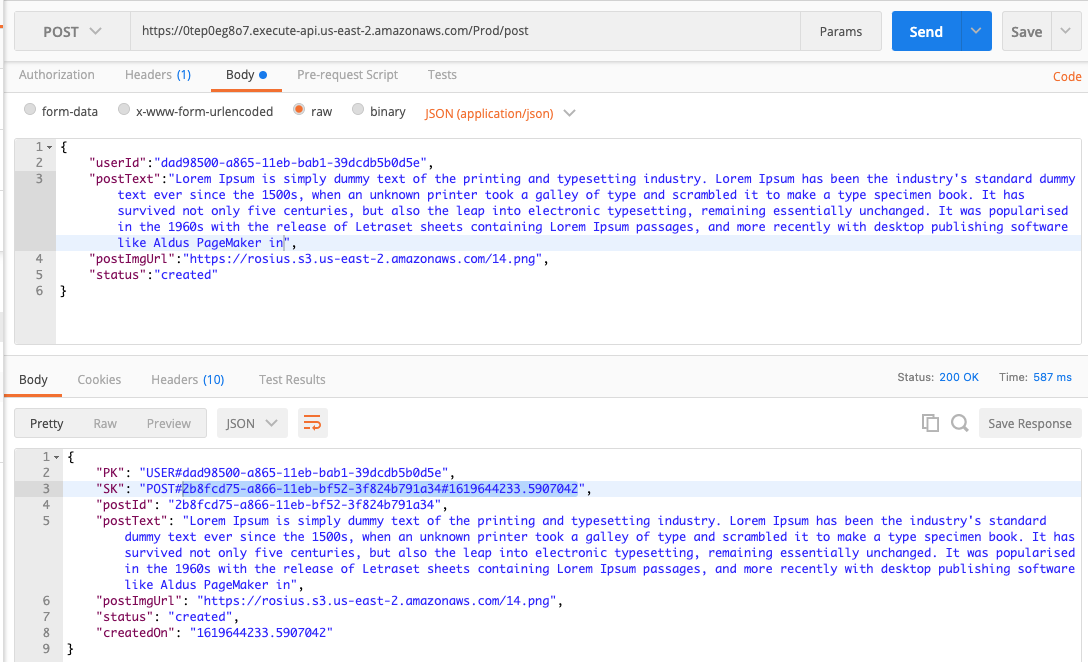 You can go ahead and create multiple posts for this user. Also, make sure the data is being saved correctly in the DynamoDB table(data).
Fetch Posts for User
Now, let's fetch all posts for a given user. We expect a response containing a user entity as the first object and the rest as Post Entities. Copy the fetch post for user endpoint and paste it in the request bar. Make sure to replace the ID with the ID of a user with posts.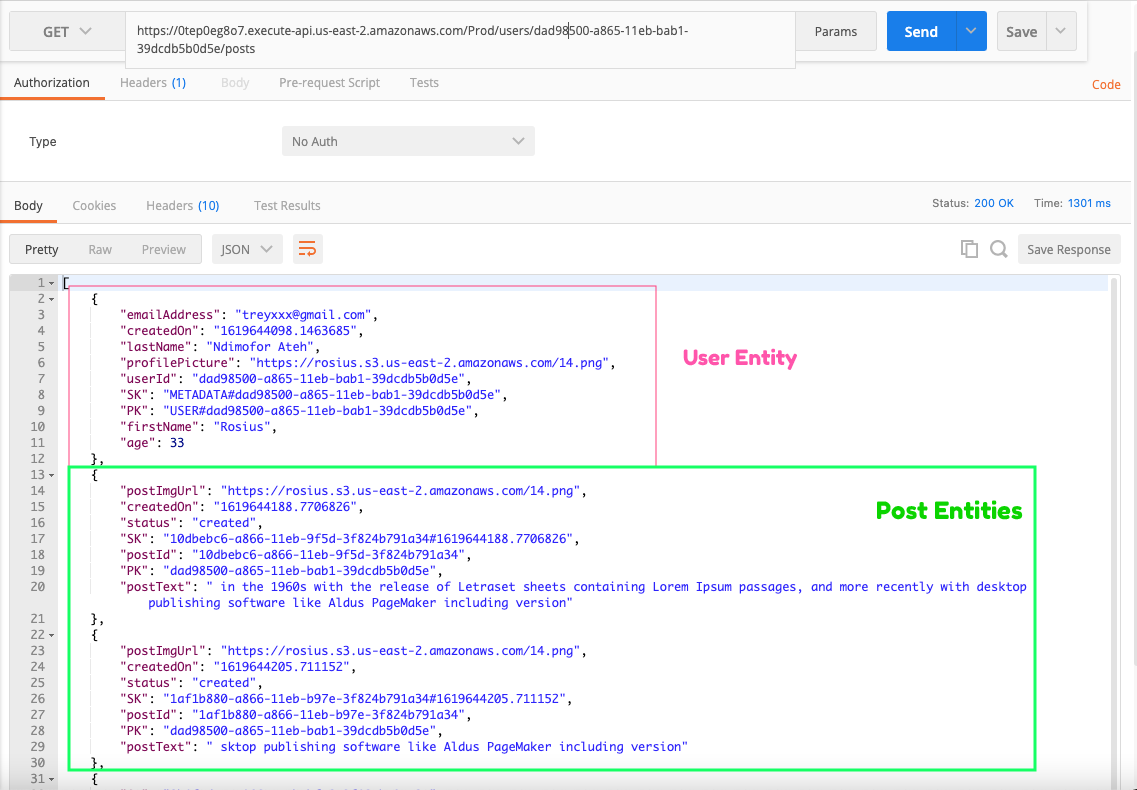 And there you have it, user entity and post entities.
Conclusion
In this post, we wrote scripts to update a post and also to fetch all posts for a given user. We then proceeded to build and deploy our API to the cloud. We used postman to test- Create User
- Create Post
- Fetch Posts For User
As a little challenge, you can go ahead to test the other scripts like
- Update User
- Get User
- Update Post
In the next post, we'll write scripts to create comments, retrieve comments for post, and also query a Global Secondary Index.
Thanks for reading. If you found this post helpful, please leave feedback by commenting or liking it.
And till next time my brothers and sisters ✌🏿


