Hi, in this post, we will be deploying the CDK application we built earlier to AWS using CDK pipelines.
Here are the articles on the app we built. I recommend you go through them, in other to fully understand the complete process.
Build a GraphQL API on AWS with CDK, Python, AppSync, and DynamoDB(Part 1)
Build a GraphQL API on AWS with CDK, Python, AppSync, and DynamoDB(Part 2)
Prerequisites
Here's the starter code, which is the code we built in the last 2 posts.
github.com/trey-rosius/cdkTrainer
I'll assume you already have this code committed to your own Github account.
To have AWS CodePipeline read from this GitHub repo, you need to have a GitHub personal access token stored as a plaintext secret (not a JSON secret) in AWS Secrets Manager under the name trainer-github-token.
Let's walk through the process of creating a personal access token and storing it in AWS secrets.
Go to your GitHub account and click on settings.
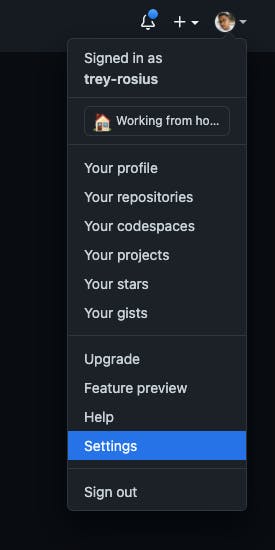
Next, click on Developer settings, then select Personal access tokens.
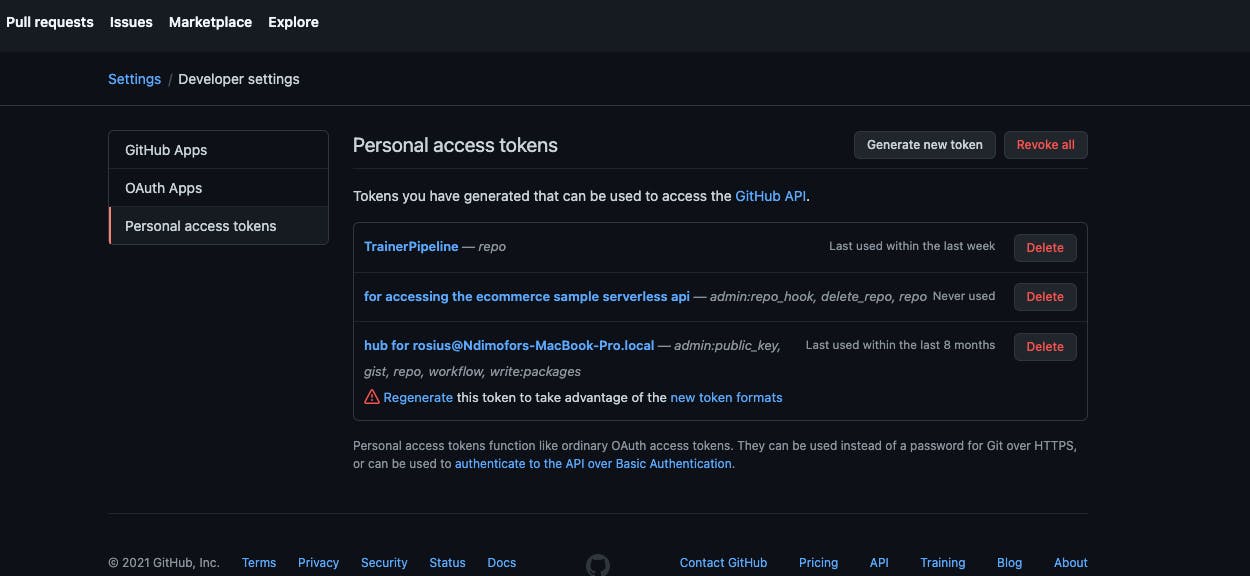
Click on Generate new token, give it a name trainer-github-token.
Give it full access to private repositories.
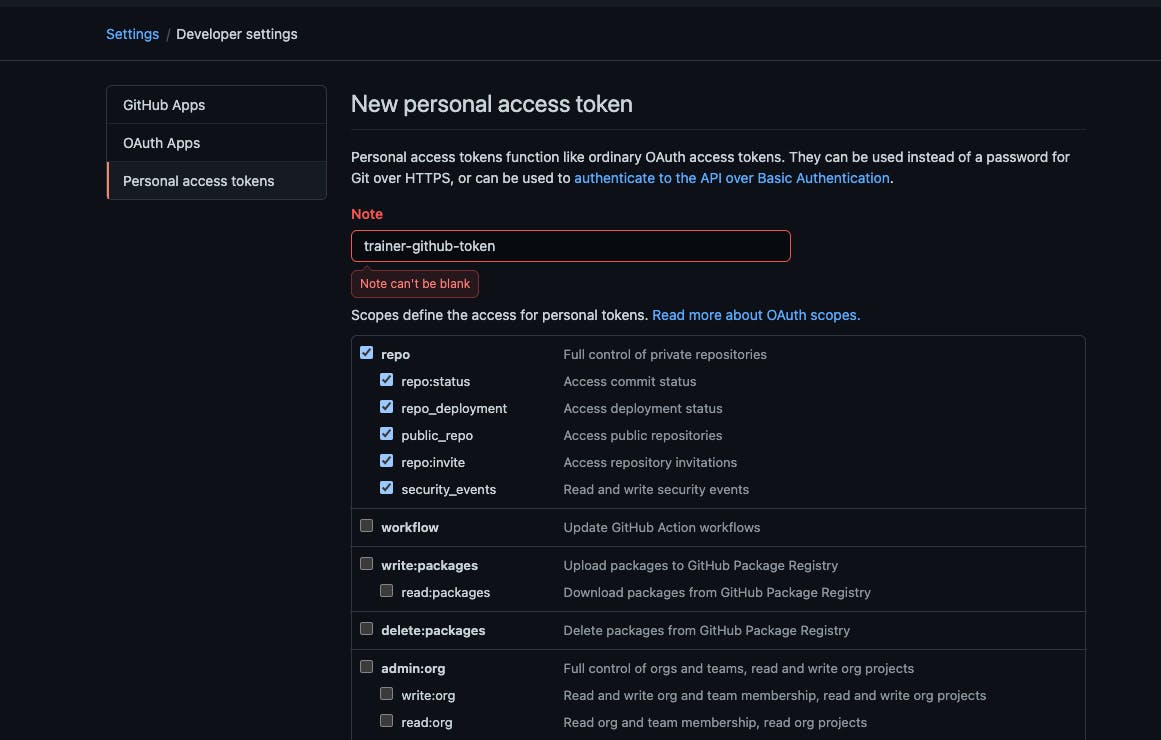
After saving, a token would be generated. Copy the token and move to the next step.
 .
Don't even bother trying to copy mine.😉
Sign in to your AWS console and navigate to Secrete Manager
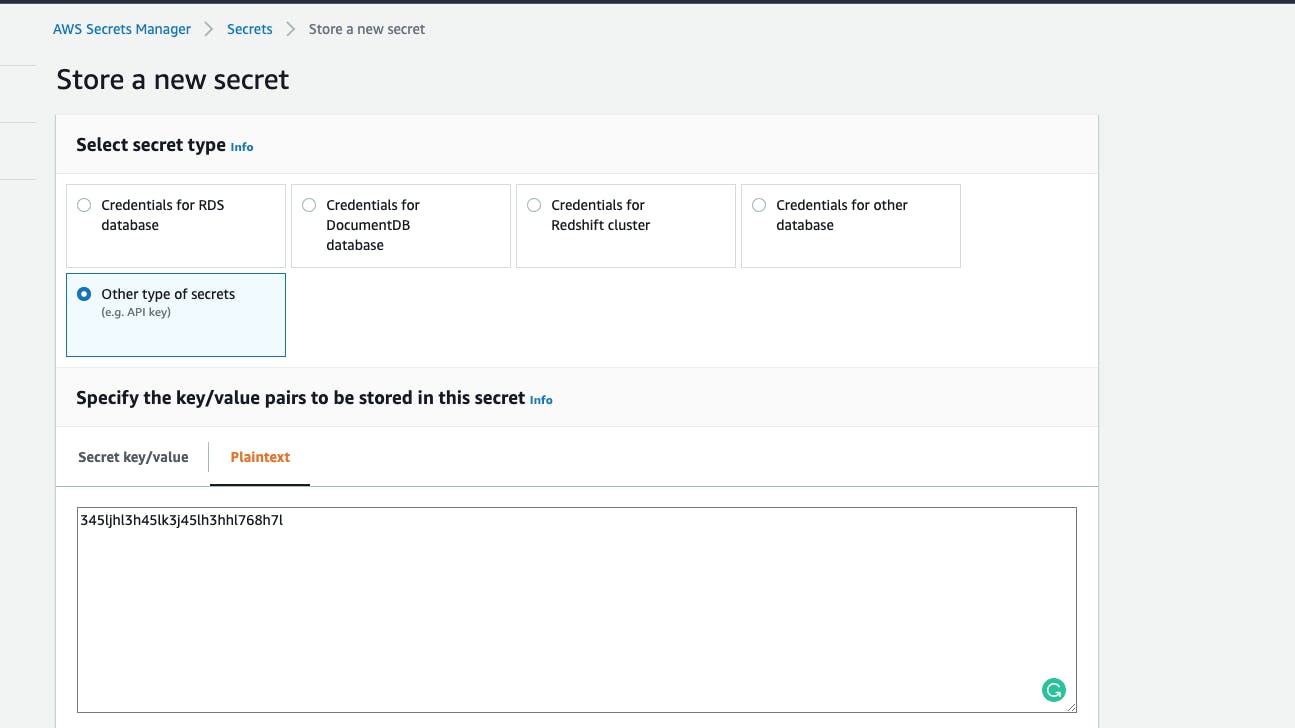
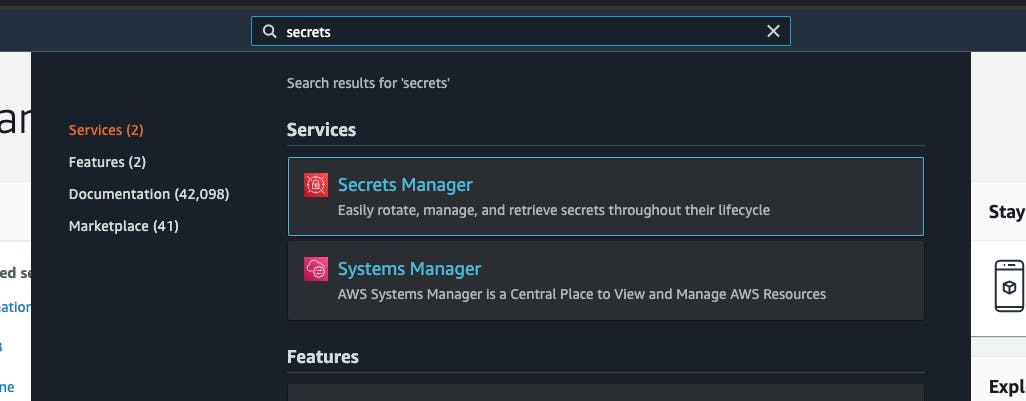 Click on store new secret,in the next screen, select other types of secrets and then add your token under plain text.
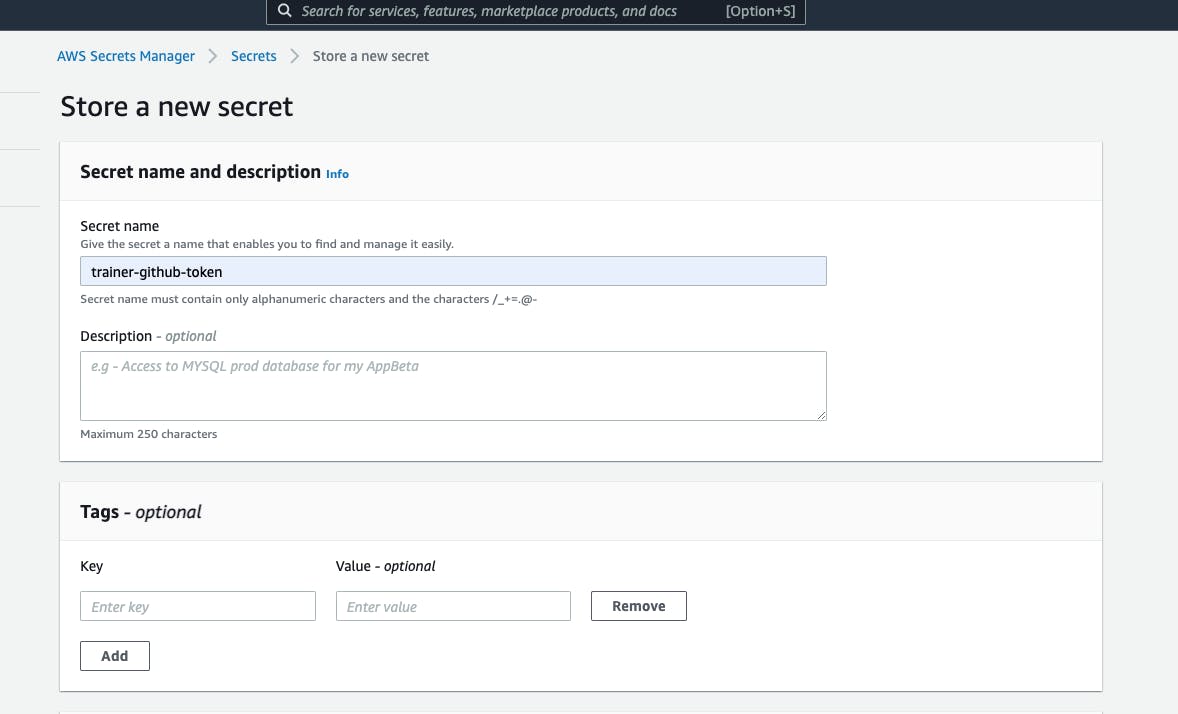
 Click on next, then give Secret name trainer-github-token
Concepts
CDK pipelines is a construct library for painless Continuous Delivery of CDK applications.
In Part 1 of this series, I made mention of the fact that I deployed this app a lot of times. After every change I make, I quickly save and do cdk deploy.
With CDK Pipelines, I don't have to do this manually anymore. Whenever you check your AWS CDK app's source code into AWS CodeCommit, GitHub, or BitBucket, CDK Pipelines can automatically build, test, and deploy your new version.
CDK Pipelines are self-updating: if you add new application stages or new stacks, the pipeline automatically reconfigures itself to deploy those new stages and/or stacks.
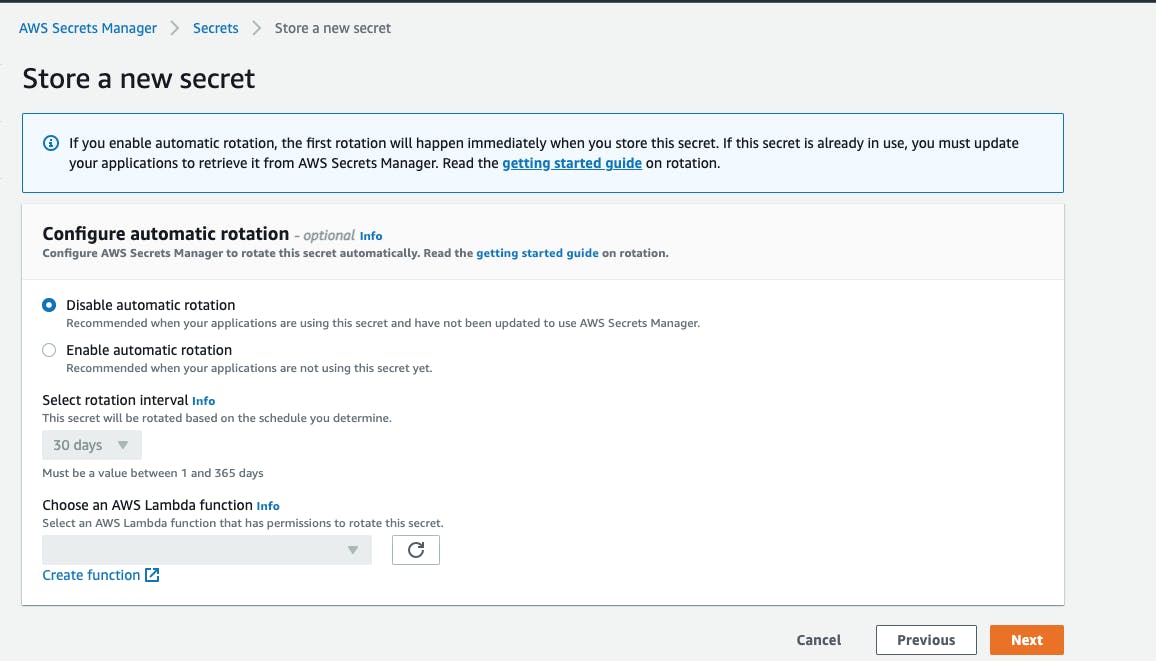
Finally, store the token and take note of the Secret Name.(trainer-github-token).
The following diagram illustrates the stages of a CDK pipeline.
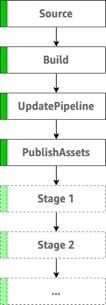
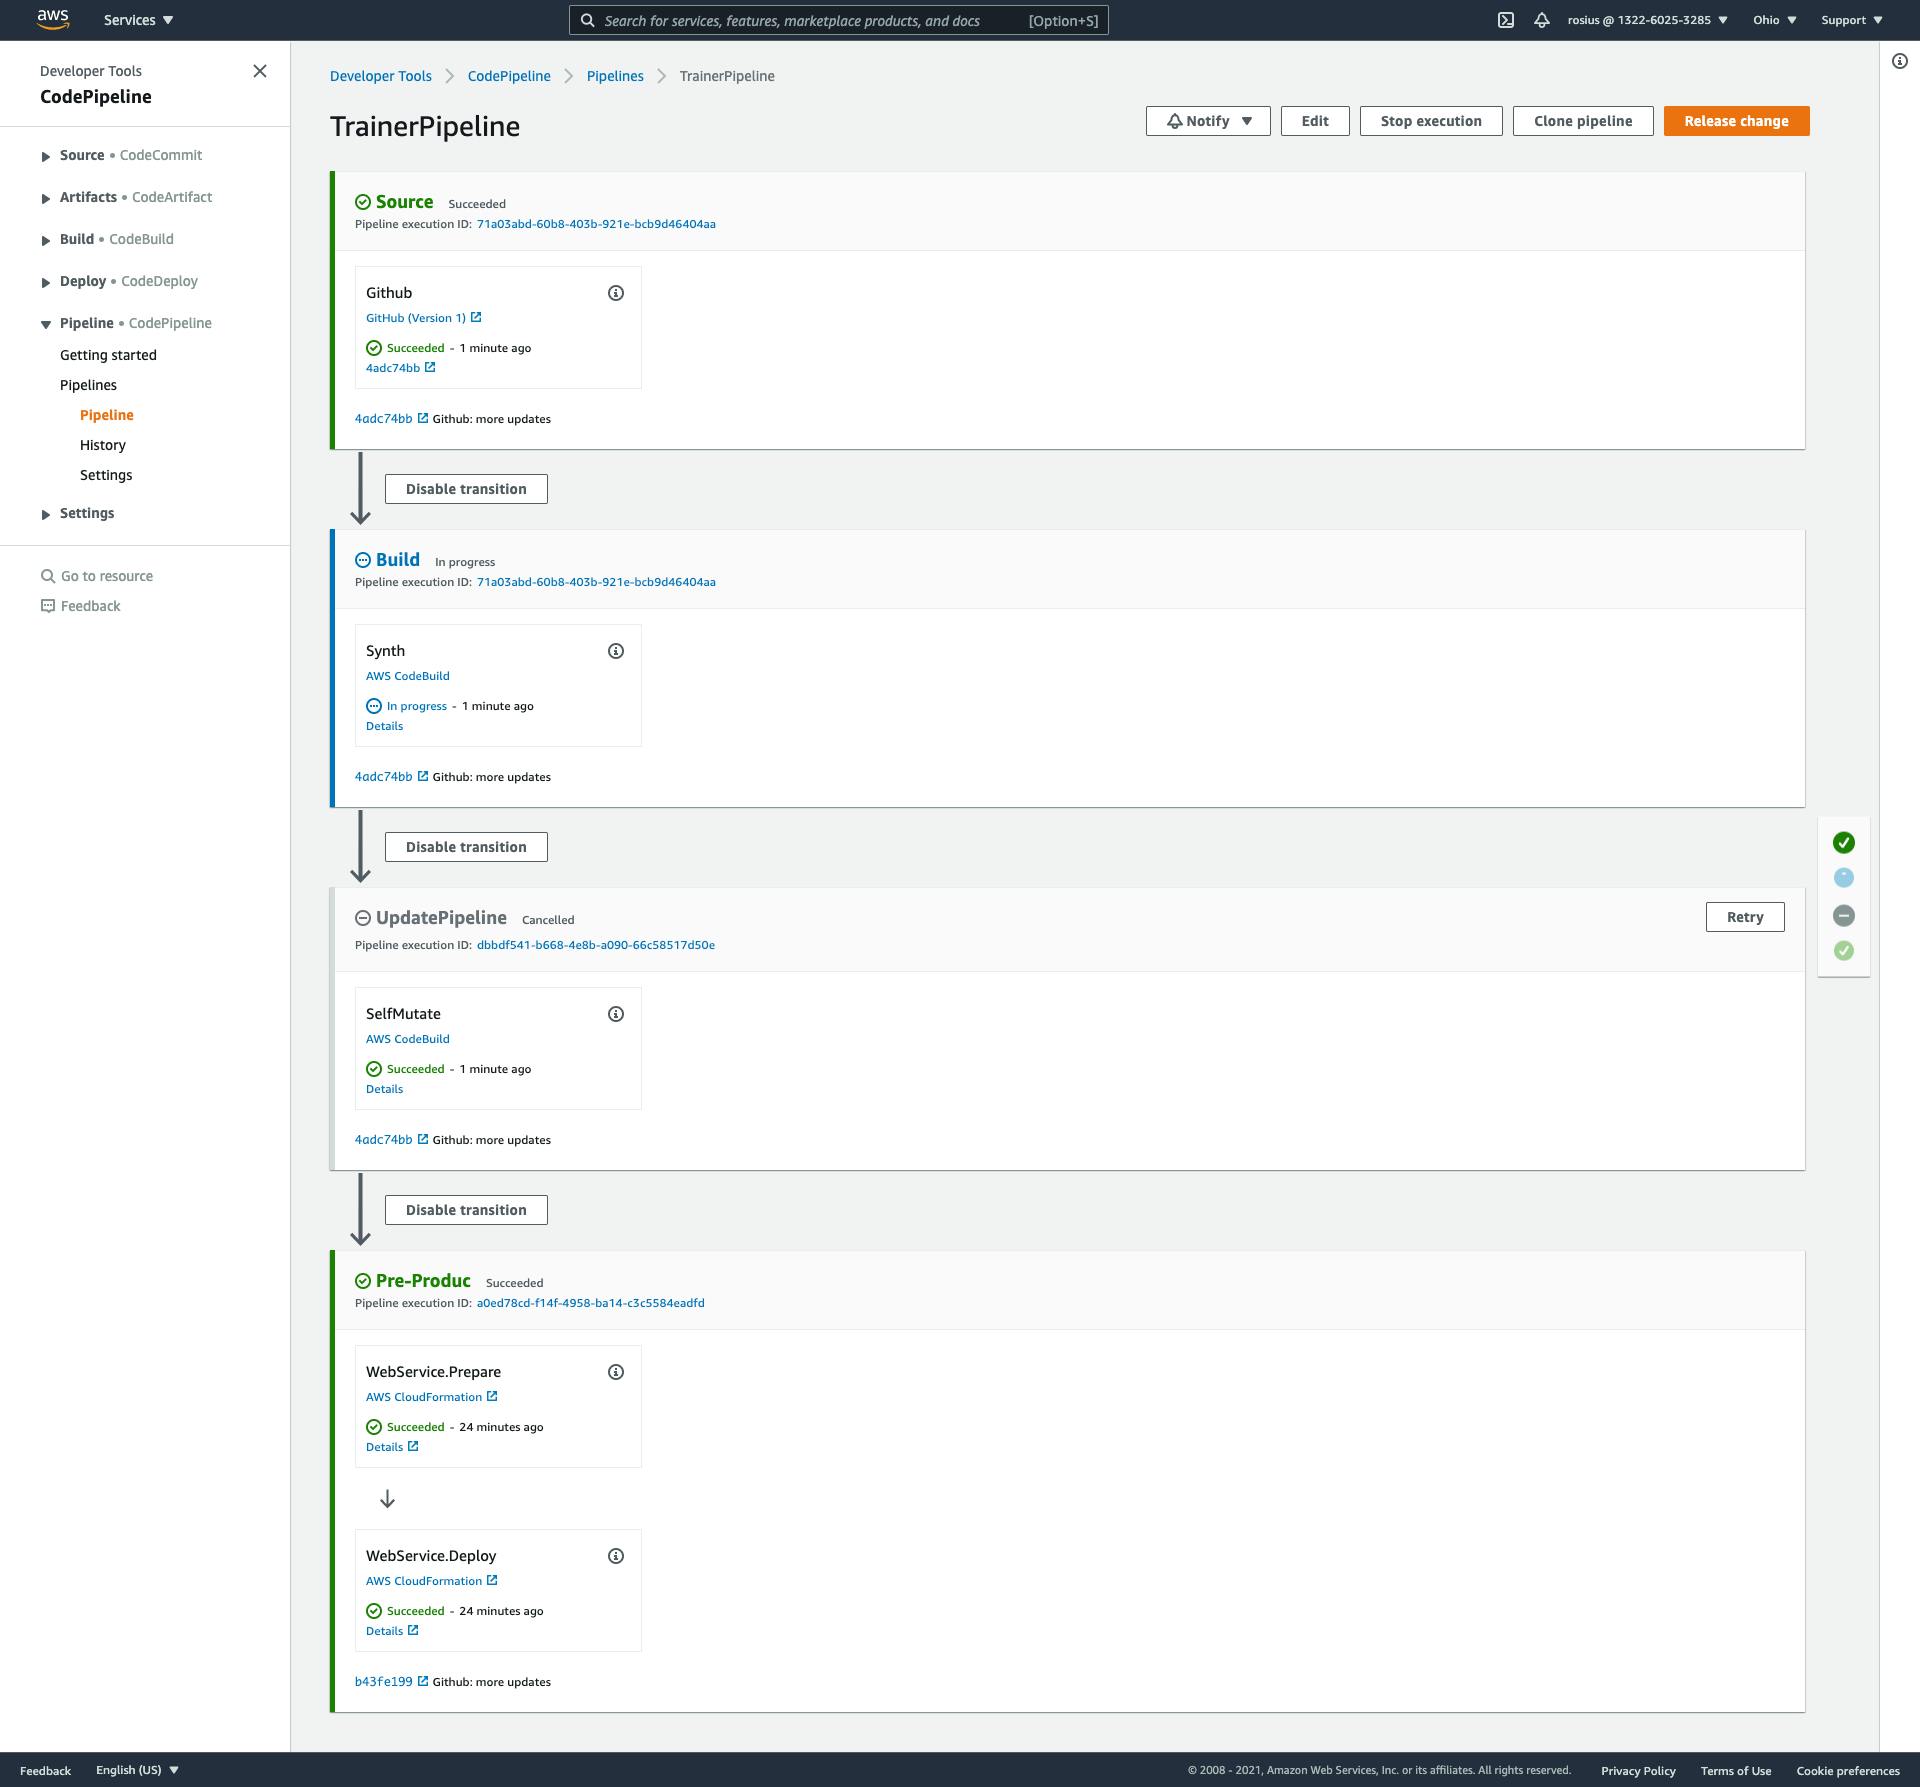
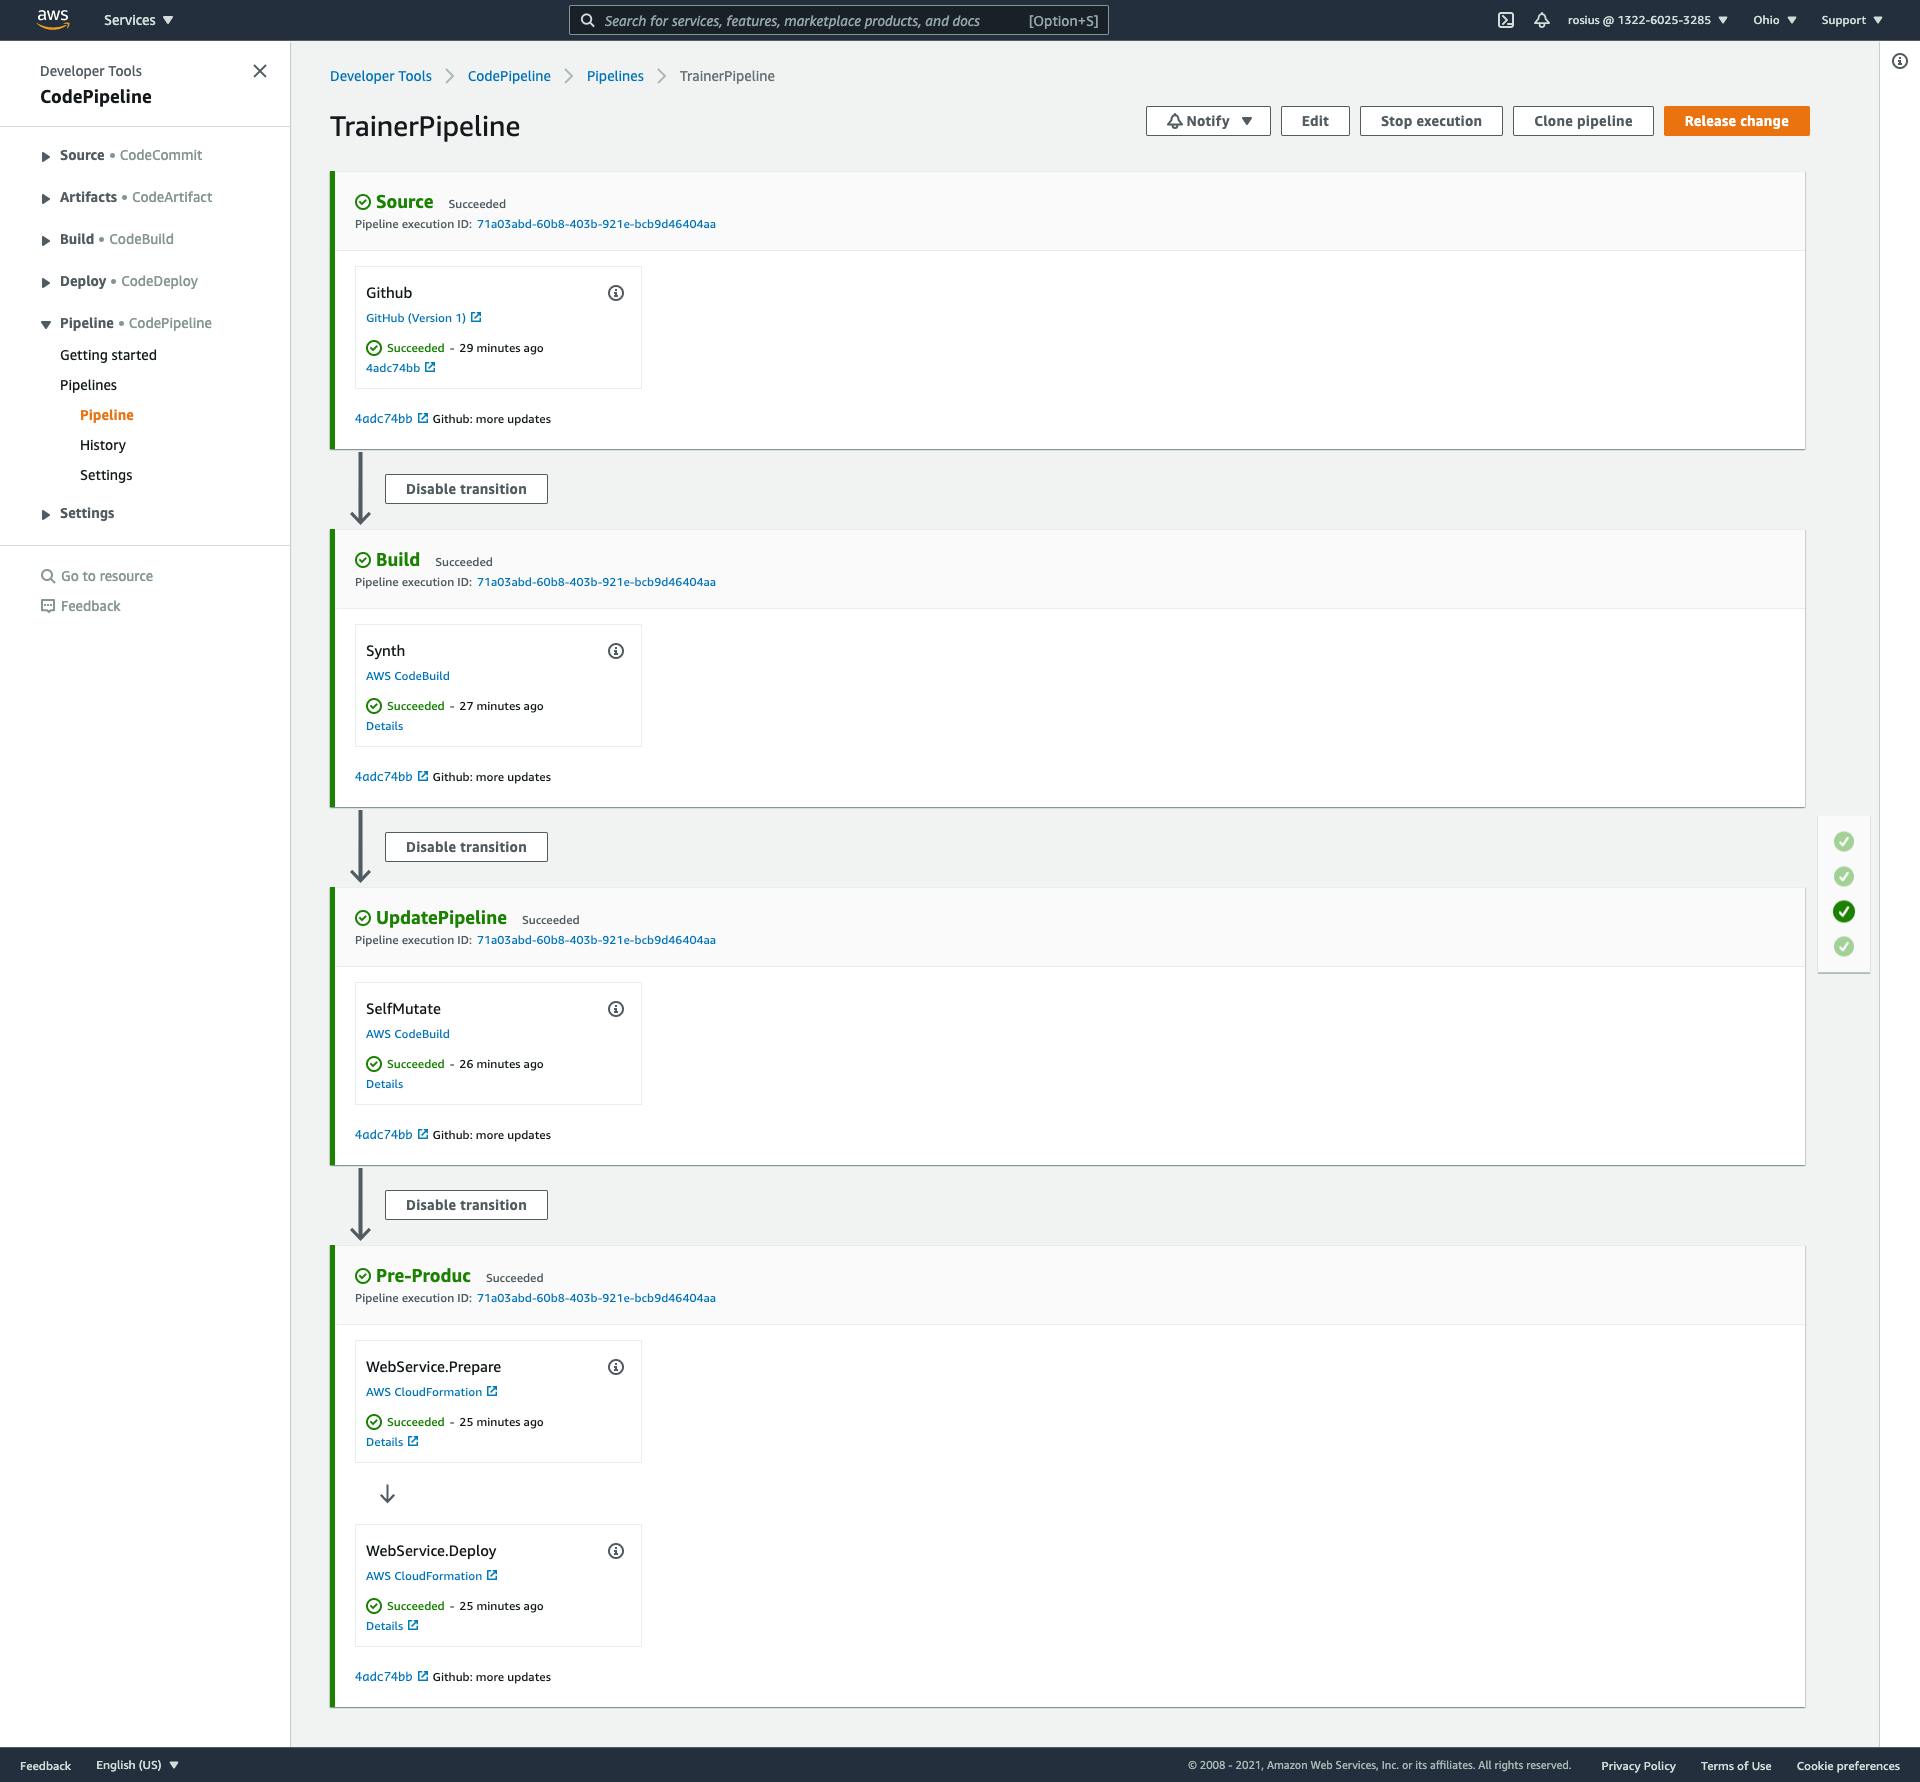
- Source – This stage is probably familiar. It fetches the source of your CDK app from your forked GitHub repo and triggers the pipeline every time you push new commits to it.
- Build – This stage compiles your code (if necessary) and performs a CDK synth. The output of that step is a cloud assembly, which is used to perform all actions in the rest of the pipeline.
- UpdatePipeline – This stage modifies the pipeline if necessary. For example, if you update your code to add a new deployment stage to the pipeline or add a new asset to your application, the pipeline is automatically updated to reflect the changes you made.
- PublishAssets – This stage prepares and publishes all file assets you are using in your app to Amazon Simple Storage Service (Amazon S3) and all Docker images to Amazon Elastic Container Registry (Amazon ECR) in every account and Region from which it’s consumed so that they can be used during the subsequent deployments.
All subsequent stages deploy your CDK application to the account and Region you specify in your source code.
The account and Region combinations you want to deploy have to be bootstrapped first, which means some minimal infrastructure is provisioned into the account so that the CDK can access it. You also have to add a trust relationship to the account that contains the pipeline. You learn how to do that later in this post.
Let's Begin
Assuming you already have the project opened up in your IDE, activate the virtual environmentsource .venv/bin/activate
Install dependencies
python -m pip install aws_cdk.pipelines aws_cdk.aws_codebuild
python -m pip install aws_cdk.aws_codepipeline aws_cdk.aws_codepipeline_actions
Freeze your dependencies in requirements.txt.
MacOS/Linux
python -m pip freeze | grep -v '^[-#]' > requirements.txt
Windows
python -m pip freeze | findstr /R /B /V "[-#]" > requirements.txt
Finally, add the @aws-cdk/core:newStyleStackSynthesis feature flag to the project's cdk.json file. The file will already contain some context values; add this new one inside the context object.
{
  ...
  "context": {
    ...
    "@aws-cdk/core:newStyleStackSynthesis": true
  }
}
So the final file content should look like this
{
  "app": "python3 app.py",
  "context": {
    "@aws-cdk/aws-apigateway:usagePlanKeyOrderInsensitiveId": true,
    "@aws-cdk/core:enableStackNameDuplicates": "true",
    "aws-cdk:enableDiffNoFail": "true",
    "@aws-cdk/core:stackRelativeExports": "true",
    "@aws-cdk/aws-ecr-assets:dockerIgnoreSupport": true,
    "@aws-cdk/aws-secretsmanager:parseOwnedSecretName": true,
    "@aws-cdk/aws-kms:defaultKeyPolicies": true,
    "@aws-cdk/aws-s3:grantWriteWithoutAcl": true,
    "@aws-cdk/aws-ecs-patterns:removeDefaultDesiredCount": true,
    "@aws-cdk/aws-rds:lowercaseDbIdentifier": true,
    "@aws-cdk/aws-efs:defaultEncryptionAtRest": true,
    "@aws-cdk/core:newStyleStackSynthesis": true
  }
}
Define pipelines
In the cdk_trainer_stack folder, create a file called pipeline_stack.py and type in the following codefrom aws_cdk import core
from aws_cdk import aws_codepipeline as codepipeline
from aws_cdk import aws_codepipeline_actions as cpactions
from aws_cdk import pipelines
from .cdk_trainer_stack import CdkTrainerStack
class PipelineStack(core.Stack):
def __init__(self,scope:core.Construct,id:str,**kwargs):
super().__init__(scope,id,**kwargs)
source_artifact = codepipeline.Artifact()
cloud_assembly_artifact = codepipeline.Artifact()
pipeline = pipelines.CdkPipeline(self, 'Pipeline',
cloud_assembly_artifact=cloud_assembly_artifact,
pipeline_name='trainerPipeline',
source_action=cpactions.GitHubSourceAction(
action_name='Github',
output=source_artifact,
oauth_token=core.SecretValue.secrets_manager('trainer-github-token'),
owner='trey-rosius', #"GITHUB-OWNER"
repo='cdkTrainer', #"GITHUB-REPO"
trigger=cpactions.GitHubTrigger.POLL),
synth_action=pipelines.SimpleSynthAction(
source_artifact=source_artifact,
cloud_assembly_artifact=cloud_assembly_artifact,
install_command='npm install -g aws-cdk && pip install -r requirements.txt',
synth_command= 'cdk synth'))
The construct CdkPipeline is the construct that represents a CDK Pipeline. When you instantiate CdkPipeline in a stack, you define the source location for the pipeline as well as the build commands.
The basic pieces of CDK pipelines are sources and synth actions.
Sources are places where your code lives. Any source from the codepipeline-actions module can be used.
Synth actions (synthAction) define how to build and synth the project. A synth action can be any AWS CodePipeline action that produces an artifact containing an AWS CDK Cloud Assembly (the cdk.out directory created by cdk synth). Pass the output artifact of the synth operation in the Pipeline's cloudAssemblyArtifact property.
SimpleSynthAction is available for synths that can be performed by running a couple of simple shell commands (install, build, and synth) using AWS CodeBuild. When using these, the source repository does not require a buildspec.yml.
Note the following in the above code:
The source code is stored in a GitHub repository.
The GitHub access token needed to access the repo is retrieved from AWS Secrets Manager. (trainer-github-token)
Specify the owner of the repository and the repo name where indicated.
Application stages
Our application is made up of multiple stacks.To define a multi-stack AWS application that can be added to the pipeline all at once, define a subclass of Stage (not to be confused with CdkStage in the CDK Pipelines module).
The stage contains the stacks that make up your application. If there are dependencies between the stacks, the stacks are automatically added to the pipeline in the right order. Stacks that don't depend on each other are deployed in parallel.
You can add a dependency relationship between stacks by calling stack1.addDependency(stack2).
Stages accept a default env argument, which the Stacks inside the Stage will use if no environment is specified for them.
An application is added to the pipeline by calling addApplicationStage() with instances of the Stage. A stage can be instantiated and added to the pipeline multiple times to define different stages of your multi-region application pipeline:
Create a file called webservice_stage.py in cdk_trainer and type in the following code
from aws_cdk import core
from cdk_trainer.cdk_trainer_stack import CdkTrainerStack
class WebServiceStage(core.Stage):
def __init__(self, scope: core.Construct, id: str, **kwargs):
super().__init__(scope, id, **kwargs)
service = CdkTrainerStack(self, 'WebService')
In the app.py, replace it's content with this
#!/usr/bin/env python3
import os
from aws_cdk import core as cdk
# For consistency with TypeScript code, `cdk` is the preferred import name for
# the CDK's core module. The following line also imports it as `core` for use
# with examples from the CDK Developer's Guide, which are in the process of
# being updated to use `cdk`. You may delete this import if you don't need it.
from aws_cdk import core
from cdk_trainer.pipeline_stack import PipelineStack
app = core.App()
PipelineStack(app, "CdkTrainerPipeline",env={
'account':'132260253285',
'region': 'us-east-2'}
# If you don't specify 'env', this stack will be environment-agnostic.
# Account/Region-dependent features and context lookups will not work,
# but a single synthesized template can be deployed anywhere.
# Uncomment the next line to specialize this stack for the AWS Account
# and Region that are implied by the current CLI configuration.
#env=core.Environment(account=os.getenv('CDK_DEFAULT_ACCOUNT'), region=os.getenv('CDK_DEFAULT_REGION')),
# Uncomment the next line if you know exactly what Account and Region you
# want to deploy the stack to. */
#env=core.Environment(account='123456789012', region='us-east-1'),
# For more information, see https://docs.aws.amazon.com/cdk/latest/guide/environments.html
)
app.synth()
Now, we have to add our application to the pipeline using addApplicationStage() in the pipeline_stack.py file.
Your pipeline_stack.py file should look like this now.
from aws_cdk import core
from aws_cdk import aws_codepipeline as codepipeline
from aws_cdk import aws_codepipeline_actions as cpactions
from aws_cdk import pipelines


from .cdk_trainer_stack import CdkTrainerStack

class PipelineStack(core.Stack):
    def __init__(self,scope:core.Construct,id:str,**kwargs):
        super().__init__(scope,id,**kwargs)

        source_artifact = codepipeline.Artifact()
        cloud_assembly_artifact = codepipeline.Artifact()

        pipeline = pipelines.CdkPipeline(self, 'Pipeline',

            cloud_assembly_artifact=cloud_assembly_artifact,
            pipeline_name='trainerPipeline',

            source_action=cpactions.GitHubSourceAction(
                action_name='Github',
                output=source_artifact,
                oauth_token=core.SecretValue.secrets_manager('trainer-github-token'),
                owner='trey-rosius', #"GITHUB-OWNER"
                repo='cdkTrainer', #"GITHUB-REPO"
                trigger=cpactions.GitHubTrigger.POLL),

            synth_action=pipelines.SimpleSynthAction(
                source_artifact=source_artifact,
                cloud_assembly_artifact=cloud_assembly_artifact,
                install_command='npm install -g aws-cdk && pip install -r requirements.txt',
                synth_command= 'cdk synth'))
pipeline.add_application_stage(WebServiceStage(self,'Pre-Produc',env={
'account':'132260253285', #account
'region': 'us-east-2' #region
}))
Don't forget to change the account and region to yours.
You can also add more than one application stage to a pipeline stage. For example:
pipeline.add_application_stage(WebServiceStage(self,'testing',env={

    'account':'132260253285', #account
    'region': 'us-east-2' #region
}))

pipeline.add_application_stage(WebServiceStage(self,'Production',env={

    'account':'132260253285', #account
    'region': 'us-east-2' #region
}))
In order for this work, we have to first deploy our application. After that, anytime we push a commit of the app to our repo, it builds and deploys automatically.
Make sure you've committed all code to the repository.
I'm assuming your virtual environment is still activated, and you have already ran
cdk bootstrap and cdk synth, deploy your application with cdk deploy.
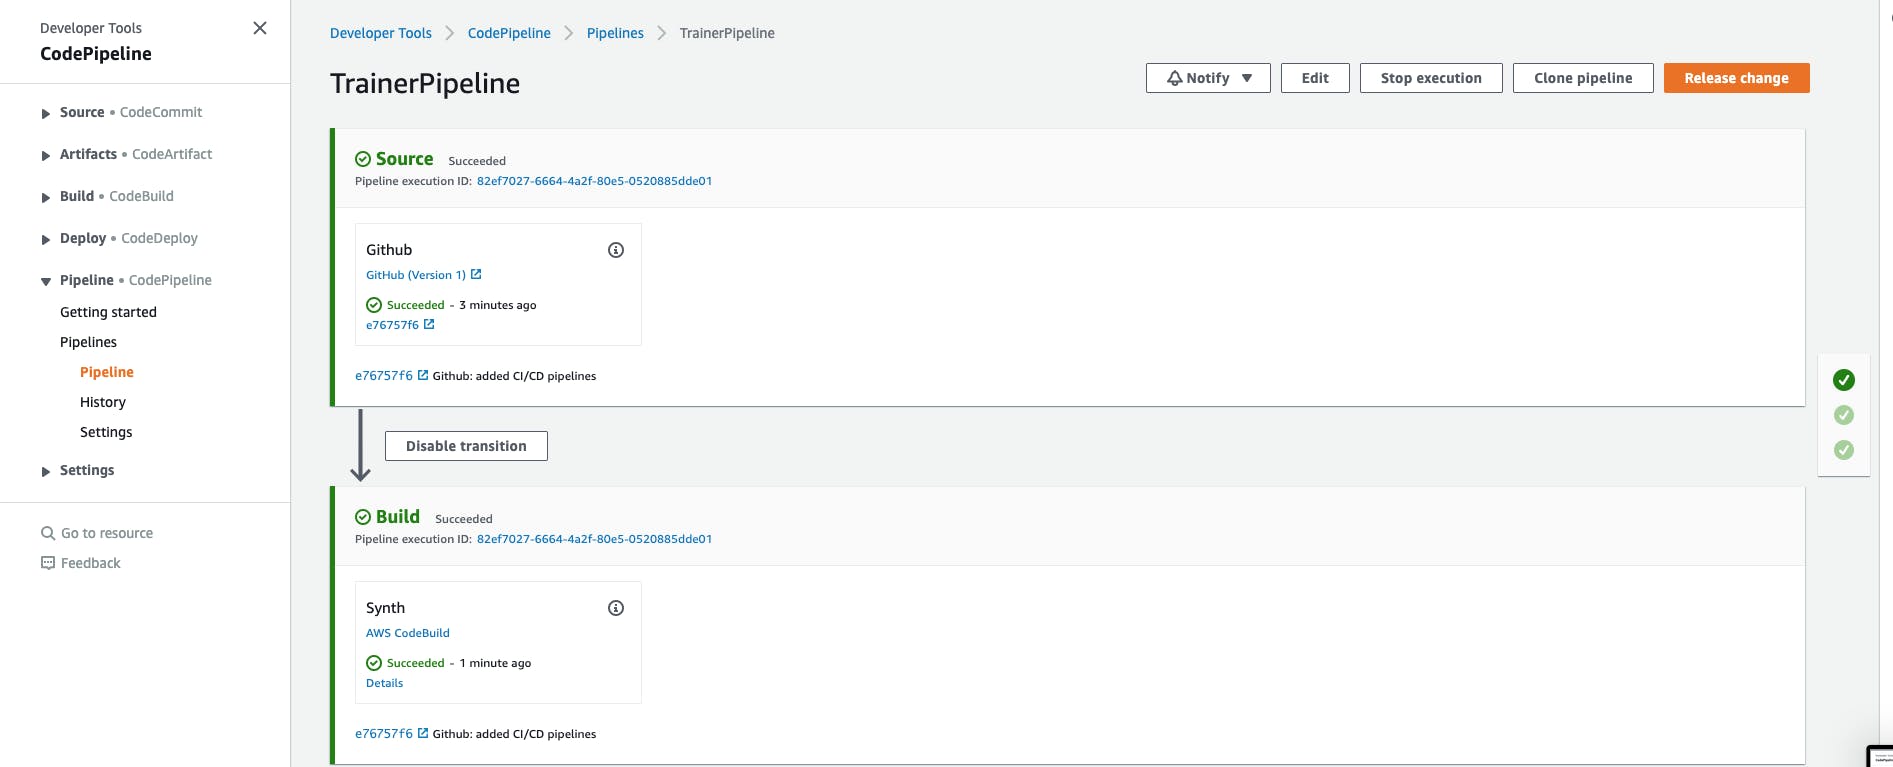
If you navigate to pipelines in the AWS console and click on trainerPipeline(that's what I named mine) you should see it building.
Github link
The pipeline branch github.com/trey-rosius/cdkTrainer/tree/pipe..Conclusion
There's a lot more you can do with CDK pipelines. We haven't looked at writing unit or integration tests and adding them to our pipelines.You can dig deeper and deeper. I've added references below.
If you found this article helpful, please leave feedback.
References:
All the articles which made me look cool, and you can use them to grab more information.docs.aws.amazon.com/cdk/latest/guide/cdk_pi..

