How to Build a serverless application with AWS and Flutter

I love creating and writing about the creation of software.
This article is the third in a series of "Build serverless apps with AWS".
The first article covered how to create an API with Lambda, dynamo db,api-gateway.
The second article covered creating a Jamstack application with vue/nuxt to consume our API. The App is hosted on netlify.
https://eloquent-mestorf-134416.netlify.app/
The whole concept idea was to build a serverless web and mobile app.
In this article, we will be creating a flutter app based on the API we created in the first part of this series. So I recommend you check it out, in order to get a complete picture of the system we are about to build.
Assumption
- You have flutter installed and running on your computer.
Install Flutter
Create a flutter project
I'll create a flutter project called food_dashboard. You can name yours whatever you like. Here's how my project structure looks like.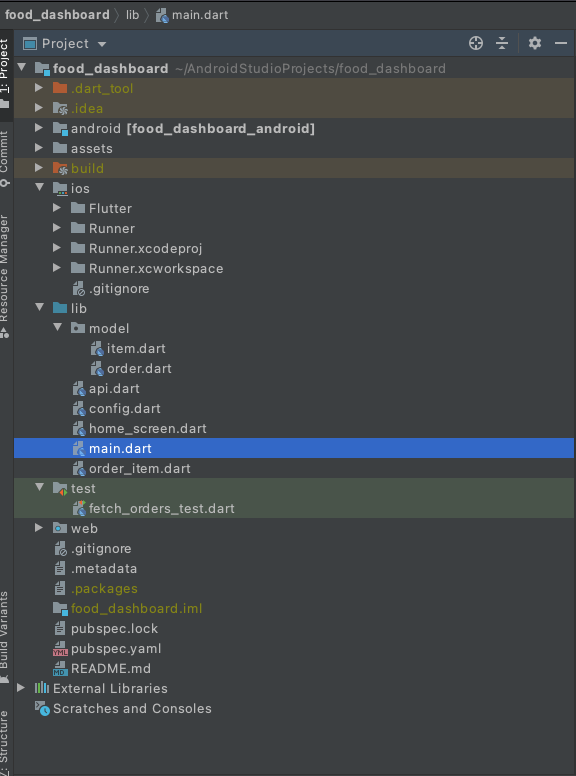 We are fetching data over the internet. Here's my get request. But I won't show you the API.
https://suczbh984e.execute-api.us-east-2.amazonaws.com/dev/orders Combined with the API, here's how the JSON response looks like.
[
    {
        "total": "$26.40",
        "order_date": "12 jan 2021, 08:28pm",
        "order_no": "#6758",
        "ordered_by": "https://rosius.s3.us-east-2.amazonaws.com/cropped_rosius.png",
        "items": [
            {
                "name": "Vegetable Mixups",
                "pic": "https://rosius.s3.us-east-2.amazonaws.com/meal1+(1).jpg",
                "price": "$10.20",
                "desc": "Vegetable Fritters with Egg",
                "qty": 5
            },
            {
                "name": "Chicken Mixed Salad",
                "pic": "https://rosius.s3.us-east-2.amazonaws.com/meal4+(1).jpeg",
                "price": "$16.20",
                "desc": "Roasted Chicken, mixed with salad",
                "qty": 2
            }
        ]
    },
{
.....
....
},
{
......
.....
}

]
Add the HTTP and SVG Packages
The http package provides the easiest way to fetch data over the internetOpen up your pubspec.yaml file and add the latest version of the HTTP package to it.
dependencies:
  http: <latest_version>
Additionally, in the AndroidManifest.xml file, add internet permission. Since we are fetching the data over the internet <!-- Required to fetch data from the internet. -->
<uses-permission android:name="android.permission.INTERNET" />
Most of the icons used in the app are svg. Therefore we'll need a package to display those icons properly.Under dependencies in pubspec.yaml, add
flutter_svg: ^0.21.0+1
So your dependencies should be
dependencies:
  http: <latest_version>
  flutter_svg: ^0.21.0+1
Run Pub get and everything should be fine.
Convert Json Response to Custom Dart Object
It's always recommended to map your HTTP response to a dart object for easy manipulation.Based on the json response we got above, we see that it has a list of orders and each order has a list of items.
Let me show you.
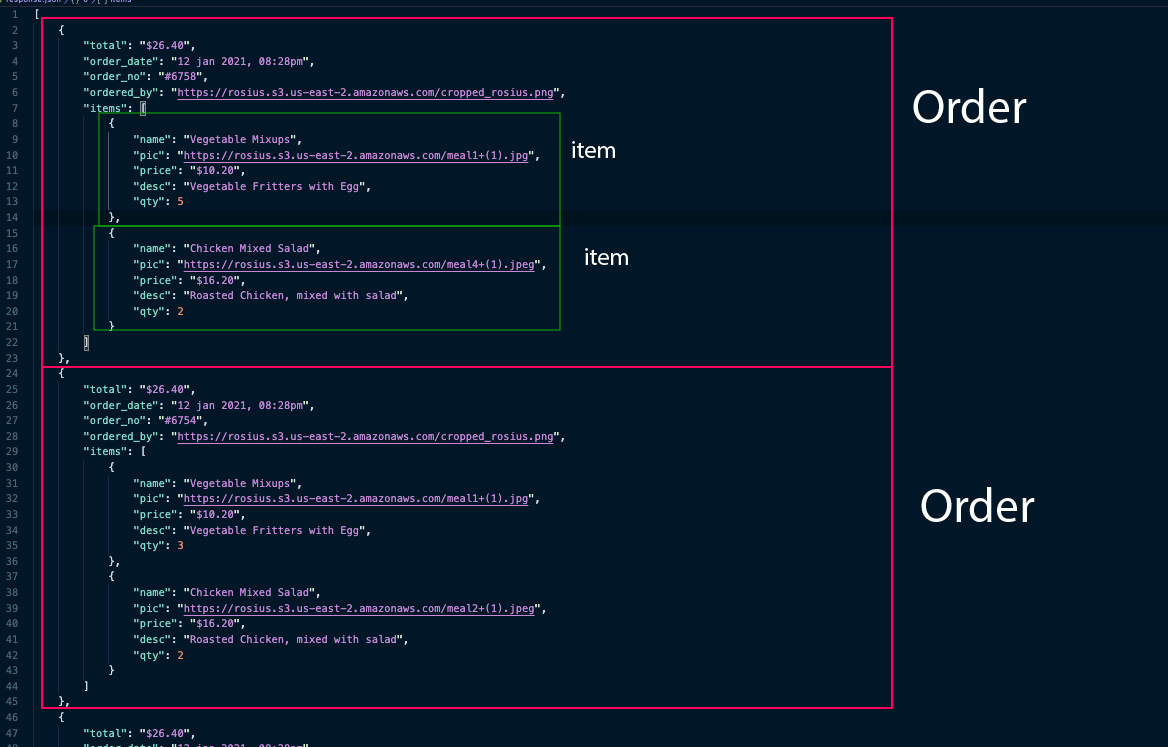 Here's how our custom dart objects for Order and Item looks like
 These classes would reside in a model folder.
order.dart
class Order{


  final String orderNo;
  final String orderDate;
  final String total;
  final String orderedBy;

  final List<Item> items;

  Order({ @required this.orderNo, @required this.orderDate,
  @required this.total, @required this.orderedBy,@required this.items});

  factory Order.fromJson(Map<String,dynamic> json){
     var parsedItems = json['items'].cast<Map<String, dynamic>>();

    return Order(orderNo: json['order_no'],
        orderDate: json['order_date'],
        total: json['total'], orderedBy: json['ordered_by'],
      items: parsedItems.map<Item>((json) => Item.fromJson(json)).toList()

    );
  }
}
item.dart
class Item{
  final String name;
  final String pic;
  final String price;
  final String description;
  final int qty;

  Item({@required this.name, @required this.pic, @required this.price,
  @required this.description, @required this.qty});

  factory Item.fromJson(Map<String,dynamic> json){
    return Item(name: json['name'], pic: json['pic'], price: json['price'],
        description: json['desc'], qty: json['qty']);
  }
}
Each of the above classes includes a factory constructor that creates an Order and Item from JSON.
Convert the response into a list of Orders
- Create a parseOrders() function that converts the response body into a List.
- Use the parseOrders() function in the fetchOrders() function.
Since we are getting the list of data over the internet, it's always best to do these tasks in a background thread. This prevents our application from freezing momentarily when getting the data. Here's where the compute()function comes in handy
The compute() function runs expensive functions in a background isolate and returns the result. In this case, run the parseOrders() function in the background.
api.dart
Create a class called api.dart and type these codes in it.
final String getOrdersUrl = "https://suczbh984e.execute-api.us-east-2.amazonaws.com/dev/orders";


// A function that converts a response body into a List<Order>.
List<Order> parseOrders(String responseBody) {
  final parsed = jsonDecode(responseBody).cast<Map<String, dynamic>>();

  return parsed.map<Order>((json) => Order.fromJson(json)).toList();
}

Future<List<Order>> fetchOrders(http.Client client) async {
  final response = await client
      .get(Uri.parse(getOrdersUrl),headers: {
    "x-api-key":Config.API_KEY
  });

  return compute(parseOrders,response.body);
}
Be sure to replace the getOrdersUrl with yours and also the Config.API_KEY with yours.
order_item.dart
When we fetch the data, we need to display it. How would an order item look like ?Let me show you.
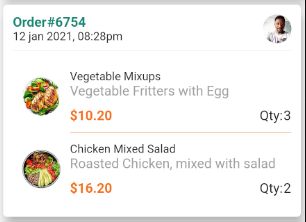 Here's how the code looks like .
class OrderItem extends StatelessWidget {
  OrderItem(this.order);
  final Order order;
  @override
  Widget build(BuildContext context) {
    return Card(
      elevation: 10,
      child: Container(

        padding: EdgeInsets.symmetric(horizontal: 10,vertical: 10),
        child: Column(
          mainAxisAlignment: MainAxisAlignment.start,
          crossAxisAlignment: CrossAxisAlignment.start,
          children: [
          Row(
            mainAxisAlignment: MainAxisAlignment.spaceBetween,
            children: [
              Expanded(
                child: Column(
                  mainAxisAlignment: MainAxisAlignment.start,
                  crossAxisAlignment: CrossAxisAlignment.start,
                  children: [
                    Row(

                      children: [
                        Text("Order",style: TextStyle(fontWeight: FontWeight.bold,color: Theme.of(context).primaryColor)),
                        Text(order.orderNo,style: TextStyle(fontWeight: FontWeight.bold,color: Theme.of(context).primaryColor)),
                      ],
                    ),
                    Text(order.orderDate,style: TextStyle(fontSize: 12),),

                  ],
                ),
              ),

              ClipRRect(
                borderRadius: BorderRadius.all(Radius.circular(100)),
                child: Image.network(order.orderedBy,height: 30,width: 30,),

              )
            ],
          ),
            Divider(),
            Container(
              padding: EdgeInsets.only(top: 10,bottom: 10),
              child: ListView.separated(
                separatorBuilder: (context,index){
                  return Container(margin: EdgeInsets.only(left: 60),
                      child: Divider(color: Theme.of(context).accentColor,));
                },
                shrinkWrap: true,
                physics: ClampingScrollPhysics(),
                itemBuilder: (context,index){
                  List<Item> listItem = order.items;
                  return Container(

                    child: Row(
                      children: [
                        Container(
                          padding:EdgeInsets.all(10),
                          child: ClipRRect(
                            borderRadius: BorderRadius.all(Radius.circular(100)),
                            child: SizedBox(


                                child: Image.network(listItem[index].pic,fit: BoxFit.cover,height: 40,width: 40,)),

                          ),
                        ),
                        Expanded(
                          child: Column(
                            mainAxisAlignment: MainAxisAlignment.start,
                            crossAxisAlignment: CrossAxisAlignment.start,
                            children: [
                              Text(listItem[index].name,style: TextStyle(fontSize: 12),),
                              Text(listItem[index].description,style: TextStyle(color: Colors.grey),),
                              Container(

                                padding:EdgeInsets.only(top: 10),
                                child: Row(
                                  mainAxisAlignment: MainAxisAlignment.spaceBetween ,
                                  children: [
                                    Text(listItem[index].price,style: TextStyle(fontWeight: FontWeight.bold,color: Theme.of(context).accentColor),),
                                    Row(
                                      children: [
                                        Text("Qty:"),
                                        Text(listItem[index].qty.toString()),
                                      ],
                                    ),
                                  ],
                                ),
                              )

                            ],
                          ),
                        )
                      ],
                    ),
                  );
                },itemCount: order.items.length,),
            )
        ],),
      ),
    );
  }
}
Fetch the data
Call the fetchOrders() method in either the initState() or didChangeDependencies() methods.
The initState() method is called exactly once and then never again. If you want to have the option of reloading the API in response to an InheritedWidget changing, put the call into the didChangeDependencies() method.
class HomeScreen extends StatefulWidget {
  @override
  _HomeScreenState createState() => _HomeScreenState();
}

class _HomeScreenState extends State<HomeScreen> {
     Future<List<Order>> futureOrders;
     int _selectedIndex = 0;
  @override
  void initState() {
    // TODO: implement initState
    super.initState();
    futureOrders = fetchOrders(http.Client());
  }
Display the data
To display the data on screen, use the FutureBuilder widget. The FutureBuilder widget comes with Flutter and makes it easy to work with asynchronous data sources.You must provide two parameters:
- The Future you want to work with. In this case, the future returned from the fetchOrders() function.
- A builder function that tells Flutter what to render, depending on the state of the Future: loading, success, or error.
Note that snapshot.hasData only returns true when the snapshot contains a non-null data value.
Because fetchOrders can only return non-null values, the function should throw an exception even in the case of a “404 Not Found” server response. Throwing an exception sets the snapshot.hasError to true which can be used to display an error message.
Otherwise, the spinner will be displayed.
FutureBuilder<List<Order>>(
            future: futureOrders,
            builder: (context, snapshot) {
              if (snapshot.hasData) {
                List<Order> orderLists = snapshot.data;
                return ListView.builder(itemBuilder: (context,index){
                  return  OrderItem(orderLists[index]);
                },itemCount: snapshot.data.length,);
              } else if (snapshot.hasError) {
                return Text("${snapshot.error}");
              }

              // By default, show a loading spinner.
              return Container(
                  height: 40,
                  width: 40,

                  child: Center(child: CircularProgressIndicator()));
            },
          )
Here's the complete code for home_screen.dart
import 'package:flutter/material.dart';
import 'package:flutter_svg/flutter_svg.dart';
import 'package:food_dashboard/model/item.dart';
import 'package:food_dashboard/model/order.dart';
import 'package:food_dashboard/order_item.dart';
import 'package:http/http.dart' as http;
import 'api.dart';

class HomeScreen extends StatefulWidget {
  @override
  _HomeScreenState createState() => _HomeScreenState();
}

class _HomeScreenState extends State<HomeScreen> {
     Future<List<Order>> futureOrders;
     int _selectedIndex = 0;
  @override
  void initState() {
    // TODO: implement initState
    super.initState();
    futureOrders = fetchOrders(http.Client());
  }

  @override
  Widget build(BuildContext context) {
    return Scaffold(
      appBar: AppBar(title: Text("Food Dashboard"),centerTitle: true,),
      body: Row(

        children: [
          NavigationRail(
           // minWidth: 40.0,
           // groupAlignment: 0.5,
            groupAlignment: 1,


            trailing: IconButton(
              icon: Icon(Icons.logout),
            ),


            selectedIndex: _selectedIndex,

            onDestinationSelected: (int index) {
              setState(() {
                _selectedIndex = index;
              });
            },
            labelType: NavigationRailLabelType.selected,
            selectedLabelTextStyle: TextStyle(color: Theme.of(context).primaryColor,fontWeight: FontWeight.bold),
            destinations: [
              NavigationRailDestination(

                  label: Text(""),
                  icon: Padding(
                    padding: EdgeInsets.all(5),
                    child:SvgPicture.asset(
                      "assets/dashboard.svg",

                      height: 20,
                      width: 20,
                      fit: BoxFit.cover,
                      // color: color,

                    ),
                  ),
                  selectedIcon: Padding(
                    padding: EdgeInsets.all(5),
                    child:SvgPicture.asset(
                      "assets/dashboard.svg",

                      height: 20,
                      width: 20,
                      fit: BoxFit.cover,
                      color: Theme.of(context).primaryColor,

                    ),
                  )),
              NavigationRailDestination(
                  label: Text(""),

                  icon: Padding(
                    padding: EdgeInsets.all(5),
                    child:SvgPicture.asset(
                      "assets/orders.svg",

                      height: 20,
                      width: 20,
                      fit: BoxFit.cover,
                      // color: color,

                    ),
                  ),
                  selectedIcon: Padding(
                    padding: EdgeInsets.all(5),
                    child:SvgPicture.asset(
                      "assets/orders.svg",

                      height: 20,
                      width: 20,
                      fit: BoxFit.cover,
                      color: Theme.of(context).primaryColor,

                    ),
                  )),
              NavigationRailDestination(
                  label: Text(""),

                  icon: Padding(
                    padding: EdgeInsets.all(5),
                    child:SvgPicture.asset(
                      "assets/home.svg",

                      height: 20,
                      width: 20,
                      fit: BoxFit.cover,
                      // color: color,

                    ),
                  ),
                  selectedIcon: Padding(
                    padding: EdgeInsets.all(5),
                    child:SvgPicture.asset(
                      "assets/home.svg",

                      height: 20,
                      width: 20,
                      fit: BoxFit.cover,
                      color: Theme.of(context).primaryColor,

                    ),
                  )),

              NavigationRailDestination(

                  label: Text(""),
                  icon: Padding(
                    padding: EdgeInsets.all(5),
                    child:SvgPicture.asset(
                      "assets/messages.svg",

                      height: 20,
                      width: 20,
                      fit: BoxFit.cover,
                      color: Colors.black,

                    ),
                  ),
                  selectedIcon:  Padding(
                    padding: EdgeInsets.all(5),
                    child:SvgPicture.asset(
                      "assets/messages.svg",

                      height: 20,
                      width: 20,
                      fit: BoxFit.cover,
                      color: Theme.of(context).primaryColor,

                    ),
                  )),
              NavigationRailDestination(

                  label: Text(""),
                  icon: Padding(
                    padding: EdgeInsets.all(5),
                    child:SvgPicture.asset(
                      "assets/settings.svg",

                      height: 20,
                      width: 20,
                      fit: BoxFit.cover,
                      color: Colors.black,

                    ),
                  ),
                  selectedIcon:  Padding(
                    padding: EdgeInsets.all(5),
                    child:SvgPicture.asset(
                      "assets/settings.svg",

                      height: 30,
                      width: 30,
                      fit: BoxFit.cover,
                      color: Theme.of(context).primaryColor,

                    ),
                  )),


            ],
          ),
          VerticalDivider(thickness: 1, width: 1),
          Expanded(child: FutureBuilder<List<Order>>(
            future: futureOrders,
            builder: (context, snapshot) {
              if (snapshot.hasData) {
                List<Order> orderLists = snapshot.data;
                return ListView.builder(itemBuilder: (context,index){
                  return  OrderItem(orderLists[index]);
                },itemCount: snapshot.data.length,);
              } else if (snapshot.hasError) {
                return Text("${snapshot.error}");
              }

              // By default, show a loading spinner.
              return Container(
                  height: 40,
                  width: 40,

                  child: Center(child: CircularProgressIndicator()));
            },
          ))
        ],
      )
    );
  }
}
Github Link
As always, you can get the complete code here https://github.com/trey-rosius/flutter_food_dashboardTESTING
I've written a couple of unit tests using the Mockito library, which you can view in the test folder. I won't be covering testing because it's out of the scope of this article. But I strongly recommend you always write unit, widget, and integration tests for your applications to confirm smooth functionality, catch bugs before production, and also catch bugs when something within the code changes.Generate mocks using
flutter pub run build_runner build
Change the URL and apikey to yours and run the test using
flutter test test/fetch_orders_test.dart
Hopefully, all tests pass.
 If tests fail, then get down to debugging ...😂
Conclusion
Thanks for reading. I really do hope you enjoyed it. Please like and comment.Maybe I made a mistake somewhere. Point it out and I'll get down to it.
Every week I come through with hot serverless tutorials on building real-life applications. So Stay tuned.
Happy Coding ✌🏿
I also have tutorials on the basics of dynamoDB.
https://phatrabbitapps.com/dynamodbdemistyfied-chapter-1.


